You are West on opening lead against South’s contract of three hearts. Here is your hand:
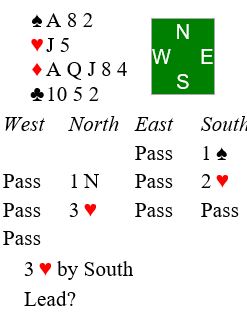
Visualize opponents’ hands. What does that leave for partner? What’s your lead?
Hilo Bridge Club Updates
You are West on opening lead against South’s contract of three hearts. Here is your hand:
Visualize opponents’ hands. What does that leave for partner? What’s your lead?
Here is a good defensive puzzle. You are East. How do you plan to defend after partner leads the queen of hearts?
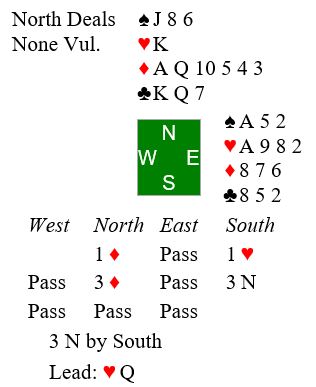
You are south in 3NT. Partner opens the bidding with two hearts (weak) in 1st seat. You respond 2NT, asking partner about his hand. Partner raises you to 3NT, promising a strong 6-card heart suit.
Opening lead by West is the queen of diamonds. You win in hand as East follows with the three of diamonds. Next you lead a low heart toward dummy, West following with the deuce. Here is what you see and what you know about opponents’ hands before you play from dummy:
You know from the opening lead and play so far that West started with the queen-jack and 10 or 9 of diamonds and (from West’s card at trick two) the deuce of hearts. You know one card that East started with was the three of diamonds. That leaves 9 unknown spaces in the West hand and 12 unknown spaces in the East hand.
Now you need to decide how you are going to play the heart suit.
You can count six sure winners: two clubs, two diamonds, and two hearts. You will need to develolp 3 more winners in hearts to make the contract. 4 more heart winners would give you an overtrick. In matchpoints it’s always better to go for the overtrick when you have a better than even chance of winning it.
In thinking about your decision, notice that hearts provide your only entry to dummy.
Your best line of play depends on opponents’ shapes in their holding of the remaining hearts. What are those possible shapes? Should you finess the jack of hearts now?
This is a good one for one (maybe two) of our Wednesday think out loud lessons.
Here is a hand I played at the club recently. I am in 3 spades on the bidding shown. I messed up the fundamentals. Look at my problem and see if you can do better. 

What would be your plan? (Scroll down to see the plan I should have come up with.)
Visualizing the opponents’ hands: It looks like the king of hearts is top of a doubleton (North likely started with 7 hearts). Also, East is likely to be short in diamonds. Bottom line is that you may be able to develop a crossruff without either opponent being able to overruff. You need to cash the outside suit (clubs) before starting the crossruff. Also, you need to lead a diamond to void your hand.
Plan:
10. Diamond ruff.
11. Ace of spades for your 10th trick.
Wasn’t that easy! (I pulled trumps prematurely)
In my opinion there were three errors when this deal was played: a bidding error, a declarer play error, and a defensive error.

Check out the bidding first. Before you look at my opinion, who do you think made the error?
I don’t like South’s bid of 3C. North showed the major suits with no extras. From South’s perspective it is a misfit, and time to get out. But the better sign-off is to take the suit preference to two spades. North will be happy you stopped at the two-level. And North will like your two spade honors.
Now you are South in three clubs. (Suggest you print the NS hands to more easily follow the play.) Can you hold it to down one? West led the ace of diamonds followed by the king of diamonds at trick two. The eight of hearts then went to East’s jack. East continued with the ace of hearts. You trumped with a low club and led a low club to dummy’s ace as the queen fell from East. Back to your hand with the king of spades. Then the jack of clubs revealed the 5-1 break. West wins the king and exits with the four of hearts. How do you play from here? (Cover up the EW hands and see if you can avoid South’s error.)
Give it some thought before reading my recommendation.
The key is to make sure that West is on lead (end played so that she will be forced to exit with a trump from 9-6 to your 10-8. Do that by cashing the queen of diamonds and ace of spades. Then lead the queen of spades, discarding the nine of diamonds from hand. West will be in and forced to lead a club at trick 12.
The actual South did not do that. Instead, South cashed the 10 of clubs and had to lead the nine of diamonds at trick 12. Thus losing the last two trick to the 10 of diamonds and nine of clubs. The mistake cost EW a top board in a pairs game: Plus 100 instead of plus 50 by most of the field.
West erred on defense, however. West trumped the nine of diamonds, crashing East’s 10. And West had to give up a trick to South’s eight of clubs. Painful to watch.
Put yourself in the South seat on this hand. You are declaring 3 hearts after the auction shown below. Opening lead is the deuce of clubs. What is your plan?

Reminder of fundamentals involved:
Counting losers:
Visualizing opponents’ hands from the bidding:
Decide on your plan of play and then scroll down to see mine.
I plan to win the ace of clubs at trick one. Draw trumps and lead the 10 of diamonds, intending to let it ride. That will hold my diamond losses to one trick when West has ace, queen 5 times (10 tricks). If the finesse losses, I will still be home with 9 tricks, contract making.
I failed to concentrate on what could go wrong on this one. And what could go wrong did go wrong!
Put yourself in the South seat and see if you can do better:

Opening lead was the five of hearts. East won the ace and returned the four, I won with the king, and West played the six. I then cashed the ace and king of spades and saw West discard the nine of hearts on the second spade.
From here is looks easy: Cash the queen of hearts to discard a diamond and draw the last trump. Losers are one heart, one diamond, and one club.
Oops, there was another loser. What went wrong, and how could I have avoided the error?
You have this hand in 4th seat (favorable vulnerability). Left hand opponent opens with a weak two hearts, partner passes, and right hand opponent bids four hearts.

It’s your turn. What do you decide to do?
First thing to think about is what kind of hands opponents have. The oppening bid is straightforward, usually promising six hearts, 5 to 10 high card points, and likely loss of no more than three tricks vulnerable..
Right hand opponent usually has two kinds of hands for continuing the preempt. It could be somewhat weakish hand with four card support for hearts. Or, it could be a good hand with only two or three card support for hearts. You are somewhat in the dark, and that’s why preempts are so annoying. Those rascals have forced you to make your first decision at the four-level!
What can you deduce from your partner’s decision to pass in second seat? If responder had the weakish hand with good trump support, then partner would be short in hearts with a good hand. But partner did not double or overcall! Therefore, right hand opponent must have a big hand. You may not want to risk jumping into the auction if that’s the case. Unless, of course, you think you can hold your loss to minus 500 (down 4 in four spades doubled).Do you think your spade textue is good enough to hold your loss to down 4? Whan I saw this played on BBO, 4th seat chose to bid four spades. He went down four for minus 800 and a bad match point result. The usual result was minus 620 or minus 650 when opponents were allowed to play four hearts — above average match point score for the defenders..
10 tricks are easy on this one. But you are in five hearts. Where are you going to find the 11th winner? Here is the hand, auction, and opening lead.


Your thoughts at trick one:
Give it a try and then scroll down for the solution.
Your thoughts at trick one:
Now that you can picture East’s hand, you know to go up with the ace of clubs immediately. Otherwise, East will win the trick and give West a club ruff. When a spade comes back through king in dummy you will be down two after first four tricks.
The idea is to end play East in one of the black suits. Run your seven hearts. By doing so, East must protect the black suits. So, East will be left with 5 black cards:

Now when you cash your ace of diamonds, pitching a low club from dummy, East must discard a club or the queen of spades.
You are East on defense after the auction shown below. Here is what you see when partner leads the eight of hearts (partnership agreement is to lead low from 3 or more cards when your partner has the suit). Declarer plays the ace from dummy, three by you, and deuce by declarer.

At trick two declarer leads the three of spades from dummy. Are you counting? What’s your plan for the defense?
Scroll down for my recommended plan.
There are two key clues to this puzzle:
Rise with the ace of spades at trick two and lead a heart. If partner ruffs, you will set the contract: ace of spades, heart ruff, top two diamonds.
If partner cannot ruff, opponents were always going to get the top three hearts. So, you have lost nothing. You may be able to find a fourth trick in the minor suits since partner has a little smattering of HCP. Make declarer do all the work to bring contract home.


Here is a declarer play problem. You are South in a contract of six spades on the bidding shown. North leads the ten of clubs and this is what you see:


You assume that West would not lead the club 10 when holding the king, so you play the ace of clubs and draw trumps in 2 rounds. As you do so you observe the following from opponents:
Your 12th trick will have to come via a successful finesse. Are you counting the opponents’ hands? Which red suit finesse offers the better likelihood of success? Give it some thought and then scroll down for my decision rationale:
West showed up with a singleton spade and doubleton club. That means West started with 10 red cards and East with five. After West discards two hearts you know that West now holds 8 red cards and East 5 red cards. Odds are 8 to 5 that West holds the king of hearts. Probability that West holds the heart king is 8/13 (61.5%). It’s the same for West holding the diamond queen. I decide to go with the odds and finesse West for the heart king.
When opening the bidding make sure you plan your reibid. Here is an example:
You are in 1st seat (both sides vulnerable) holding this hand:

You have an easy minimum opening bid of one diamond with your 13 HCP. Now anticipate a response from partner might make your rebid difficult. A one heart response would make it easy for you to raise to two hearts. A response of two clubs would make it easy for you to raise to three clubs. And a one spade response would make it easy for you to rebid one no trump.
Difficulty arises if partner’s response is one no trump. You hate to pass 1NT knowing that opponents have many spades plus a troublesome number of HCP. You hate to rebid diamonds with that crummy 5-card suit. And you are way too weak to reverse to two hearts.
But you have a couple of inferences available to help you decide: First, what is the minimum number of spades held by opponents?. Second, what is the minimum number minor suit cards held by partner? Decide on your rebid once you answer those questions.
See my decision below:
Inference number 1: opponents hold at least nine spades. Partner has at most three spades and I hold one.
Inference number 2: Partner did respond one heart so has at most three hearts. Ergo partner must hold at least seven cards in the minors.
My rebid is two clubs. That’s your best chance for a plus score.Partner did not raise diamonds, so you should have at least a seven card club fit. You will be able to hold off an attack in spades because of your shortness. Partner may take the suit preference for diamonds which would be even better.
BTW, you may have seen this hand before. Do you know where?
You are South in a contract of three hearts doubled. Here is the auction and what you see when West leads the queen of clubs:

East overtakes with the club king and continues with the ace at trick two. Counting losers, you have two hearts, one diamond, and one club. The problem is you may lose trump control as defenders force you to ruff clubs. The good new is you are reasonably sure that East has the ace and queen of hearts. The bad news is that you need to get to dummy twice to finess of the ace and queen of hearts. Also, East may well have four hearts.
It looks like you will need the king of diamonds to be onside. So, you might as well make that assumption.
What card do you play at trick 3? (Remember that your are worried about losing trump control.)
I recommend discarding a diamond at trick two. That makes life difficult for East. She cannot continue clubs because dummy is now void. If she shifts to a spade you let it ride to dummy’s king. Now you can lead the 8 of hearts, expecting to to win or drive out one of East’s honors. Either way you are in control.
Similarly if she shifts to a diamond you will let that ride to dummy and play as before. You may even make an overtrick: three spades, four hearts, and three diamonds.
Here was the entire hand:

You are South declaring three diamonds after West makes a preemptive jump to two spades over your opening bid. West leads the three of spades. Here is what you see with a summary of the auction:

Trick 1: You win the king of spades, East playing the jack.
Trick 2: Then you cash the ace of clubs, both following.
Trick 3: You then lead the eight of clubs, ruffing low in dummy.
Trick 4: Next comes the three of hearts from dummy and you put in the eight, losing to West’s jack.
Solution: Play the nine of spades, knowing it will get ruffed. West started with six spades for the preemtive overcall. You and dummy started with a combined total of six spades. East’s jack at trick one had to be a singleton. Don’t let your ace of spades get ruffed!
You are South, having ended up in a contract of three hearts. East opened the bidding in 1st seat with one spade, and you overcalled two hearts. From there it was an interesting competitive auction, during which West and North indicated weak hands by their reluctance to bid. West leads the king of spades. Here is what you see, including details of the auction:

Trick 1: You won the ace of spades.
Trick 2: You cashed the ace of hearts.
Trick 3 you gave up a spade to East.
Trick 4 East then cashed the king of hearts, West discarding the deuce of diamonds. (See details of 1st 4 tricks above.)
Solution: You know from the auction that East has the ace of clubs. Play the queen of clubs and it wins. Once you get to dummy again you will lead another club, putting in the king if East follows low. You are assured of two club tricks, knowing that the ace of clubs is onside.
It’s from Chip Dombrowski writing in the latest edition of the ACBL District 20 newsletter Trumpet. Concluding from West’s takeout double that East cannot have any of the missing honors, Chip puts in the queen of hearts from dummy. When East wins the trick with the heart king Chip comments:
It is one of my great pet peeves when people turn up with cards they are known not to have.
We have all experienced that peeve. It seems to occur at least twice every session on BBO.
I suggest you become familiar with it. For example, you often come up with a problem such as how five missing will spades split between East and West. Answer: spades will break 3-2 68 percent of the time, 4-1 28 percent of the time, and 5-0 4 percent of the time.
What’s known as “counting the hand” in bridge might better be called visualization. Experts don’t actually count. They visualize possible ways each suit originally broke in the unseen hands, and they confirm or adjust that vision as more is learned from the play. For example, say you are declarer in a spade contract with silent opponents. You hold eight spades between you and dummy. You tentatively visualize opponents’ original spade holding as breaking either 3-2 or 2-3 (a 68 percent chance). But you realize that the less friendly breaks (4-1 or 1-4 or 5-0 or 0-5) are also possible (32 percent chance).
You start to draw trumps and find that right hand opponent shows out on the second round. Don’t grimace about the 4-1 break. All the other pairs sitting your way are getting the same unfriendly break. Focus instead on adjusting your vision of the unseen hands: You now know that left hand opponent started with four spades, and you know precisely which spades those are. Also, you recall that right hand opponent was silent during the auction even though she held a singleton spade. Adjust your plan of play based on your new, more accurate vision.
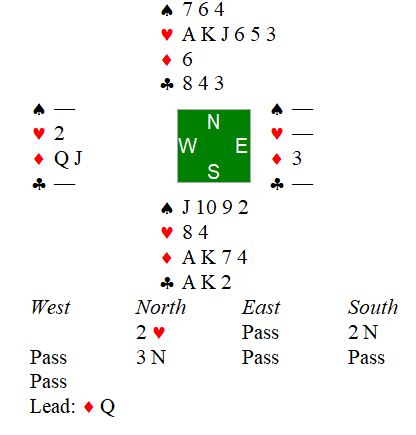
To give you a little visualization exercise “here is a rather extreme, but instructive, example” from Alfred Sheinwold’s Five Weeks to Winning Bridge*:
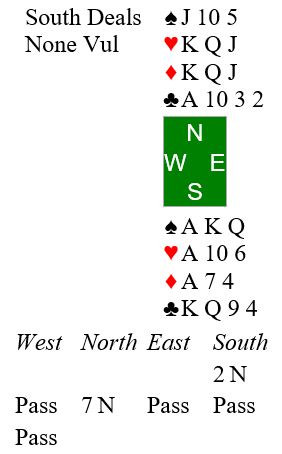
Opening lead is the 10 of diamonds. You have 12 sure tricks. The only possible worry is that clubs don’t break 3-2, and you lose a trick to the jack. You don’t have much of a vision of unseen hands to start with, other than they each contain 13 crummy cards. How are you going to go about visualizing the club suit to eliminate that one little worry?
To get a firm grip on opponents’ original holdings, take your tricks in the other three suits before you tackle clubs:
* https://www.amazon.com/Weeks-Winning-Bridge-Alfred-Sheinwold/dp/4871876098
Clues from bidding and play are usually available for you to deduce the original shape of unseen hands. Once you can visualize those shapes, your path to taking tricks becomes much clearer. The issue for most of us is time: How are we going to do it in the heat of battle while the director’s clock is ticking?.
The answer is practice! Bridge Winners has developed a nice game to practice deducing the opponents’ original suit holding when one player shows out: http://bridgewinners.com/pages/counting-game/. Also, Bridge Winners has a nice discussion forum among well-known experts on how best to go about practicing: https://bridgewinners.com/article/view/counting-3/ How you do it is up to you, but I recommend you get started now.
I try to tentatively estimate shapes early from the opening lead and bidding. Usually, though, I must wait until one opponent shows out of a suit to reach a firm conclusion. When an opponent shows out, it becomes easy with practice to make a mental note of how many cards in that suit each opponent originally held.
Another source for practice: Larry Cohen’s guidance on counting and visualization: https://www.larryco.com/bridge-articles/counting. (BTW, I recommend you subscribe to his newsletter. It is a great resource for learning.)