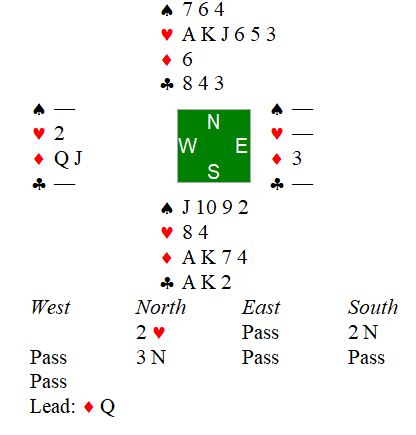
The Villages Bridge Club gives us an interesting “hand of the week” puzzle each Sunday. Here is a recent example:
East follows suit with the six of hearts. Can you find the sure way to make four hearts?
Hilo Bridge Club Updates
The Villages Bridge Club gives us an interesting “hand of the week” puzzle each Sunday. Here is a recent example:
East follows suit with the six of hearts. Can you find the sure way to make four hearts?
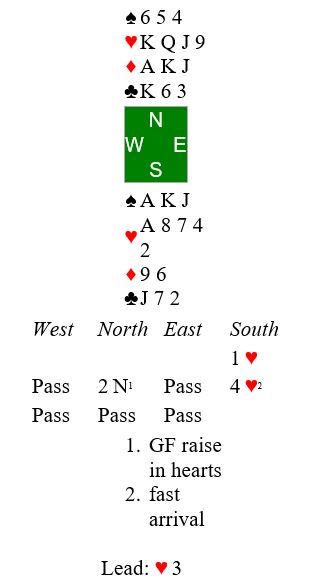
You are south in 3NT. Partner opens the bidding with two hearts (weak) in 1st seat. You respond 2NT, asking partner about his hand. Partner raises you to 3NT, promising a strong 6-card heart suit.
Opening lead by West is the queen of diamonds. You win in hand as East follows with the three of diamonds. Next you lead a low heart toward dummy, West following with the deuce. Here is what you see and what you know about opponents’ hands before you play from dummy:
You know from the opening lead and play so far that West started with the queen-jack and 10 or 9 of diamonds and (from West’s card at trick two) the deuce of hearts. You know one card that East started with was the three of diamonds. That leaves 9 unknown spaces in the West hand and 12 unknown spaces in the East hand.
Now you need to decide how you are going to play the heart suit.
You can count six sure winners: two clubs, two diamonds, and two hearts. You will need to develolp 3 more winners in hearts to make the contract. 4 more heart winners would give you an overtrick. In matchpoints it’s always better to go for the overtrick when you have a better than even chance of winning it.
In thinking about your decision, notice that hearts provide your only entry to dummy.
Your best line of play depends on opponents’ shapes in their holding of the remaining hearts. What are those possible shapes? Should you finess the jack of hearts now?
This is a good one for one (maybe two) of our Wednesday think out loud lessons.
Here is a declarer play problem by Bob Jones. It appeared in his regular column on October 18.

Spades at trick one are deuce, four, six, and ace!. The excellent trump lead negates the possibility of ruffing a losing club in dummy. How would you go about holding your losers to three?
Hint: notice that your six trumps are higher than opponents’ remaining three. Try making dummy the master hand, ruffing heart and diamond losers in your hand.
You have to be careful to preserve entries to dummy to do so. Make sure you win the opening lead with a high trump in hand. That way the jack and nine of spades will be entries when LHO continues to attack trumps.
Try this:
That gives you 10 tricks: 3 spades plus heart ruff and 2 diamond ruffs in hand, Ace and King of hearts, Ace of clubs, and Ace of diamonds.
Be alert for possible “dummy reversals”. Here was the entire deal:

Here is a hand I played at the club recently. I am in 3 spades on the bidding shown. I messed up the fundamentals. Look at my problem and see if you can do better. 

What would be your plan? (Scroll down to see the plan I should have come up with.)
Visualizing the opponents’ hands: It looks like the king of hearts is top of a doubleton (North likely started with 7 hearts). Also, East is likely to be short in diamonds. Bottom line is that you may be able to develop a crossruff without either opponent being able to overruff. You need to cash the outside suit (clubs) before starting the crossruff. Also, you need to lead a diamond to void your hand.
Plan:
10. Diamond ruff.
11. Ace of spades for your 10th trick.
Wasn’t that easy! (I pulled trumps prematurely)
In my opinion there were three errors when this deal was played: a bidding error, a declarer play error, and a defensive error.

Check out the bidding first. Before you look at my opinion, who do you think made the error?
I don’t like South’s bid of 3C. North showed the major suits with no extras. From South’s perspective it is a misfit, and time to get out. But the better sign-off is to take the suit preference to two spades. North will be happy you stopped at the two-level. And North will like your two spade honors.
Now you are South in three clubs. (Suggest you print the NS hands to more easily follow the play.) Can you hold it to down one? West led the ace of diamonds followed by the king of diamonds at trick two. The eight of hearts then went to East’s jack. East continued with the ace of hearts. You trumped with a low club and led a low club to dummy’s ace as the queen fell from East. Back to your hand with the king of spades. Then the jack of clubs revealed the 5-1 break. West wins the king and exits with the four of hearts. How do you play from here? (Cover up the EW hands and see if you can avoid South’s error.)
Give it some thought before reading my recommendation.
The key is to make sure that West is on lead (end played so that she will be forced to exit with a trump from 9-6 to your 10-8. Do that by cashing the queen of diamonds and ace of spades. Then lead the queen of spades, discarding the nine of diamonds from hand. West will be in and forced to lead a club at trick 12.
The actual South did not do that. Instead, South cashed the 10 of clubs and had to lead the nine of diamonds at trick 12. Thus losing the last two trick to the 10 of diamonds and nine of clubs. The mistake cost EW a top board in a pairs game: Plus 100 instead of plus 50 by most of the field.
West erred on defense, however. West trumped the nine of diamonds, crashing East’s 10. And West had to give up a trick to South’s eight of clubs. Painful to watch.
Put yourself in the South seat on this hand. You are declaring 3 hearts after the auction shown below. Opening lead is the deuce of clubs. What is your plan?

Reminder of fundamentals involved:
Counting losers:
Visualizing opponents’ hands from the bidding:
Decide on your plan of play and then scroll down to see mine.
I plan to win the ace of clubs at trick one. Draw trumps and lead the 10 of diamonds, intending to let it ride. That will hold my diamond losses to one trick when West has ace, queen 5 times (10 tricks). If the finesse losses, I will still be home with 9 tricks, contract making.
I failed to concentrate on what could go wrong on this one. And what could go wrong did go wrong!
Put yourself in the South seat and see if you can do better:

Opening lead was the five of hearts. East won the ace and returned the four, I won with the king, and West played the six. I then cashed the ace and king of spades and saw West discard the nine of hearts on the second spade.
From here is looks easy: Cash the queen of hearts to discard a diamond and draw the last trump. Losers are one heart, one diamond, and one club.
Oops, there was another loser. What went wrong, and how could I have avoided the error?
ACBL links to some helpful syndicated bridge columns here. Although not appearing at the link, this is a fine example of a declarer play problem from Bob Jones (“First Things First”) that ran in our local newspaper April 28. Jones sets up the problem for rubber bridge or IMP:s scoring, meaning your objective is to make the contract (overtrick is not important). How would you play to give yourself the best chance of making 6NT? Lead was the jack of diamonds. Here is the bidding, and what you see on opening lead:


It’s usually best in a NT contract to start by counting your winners. Here you have 11 easy winners: 4 spades, 1 heart, 3 diamonds, and 3 clubs. Where is your 12th winner going to come from?
Hearts offer one possibility. If East holds the king of hearts you can finesse it for the 12th trick by leading low toward the queen. That’s a 50 percent chance.
Clubs offer a better possiblility. You are missing six clubs, including the jack. Thanks to Karen Walker here are the possible breaks of the club suit along with their odds:
Let’s use Karen’s table to assess the likelihood of making your contract if you start clubs from the top, hoping to drop the jack or otherwise develop a 4th trick in clubs. Here is a summary of the possible breaks and associated percentages for developing at least a 4th trick on clubs:

BTW, basic knowledge of percentage suit splits for common declarer problems will aid your decision making at the table. Missing 6 cards, 5 cards, 4 cards or 3 cards are common.
What if both opponents follow low when you cash the king of clubs? Does that change anything? Yes, and that’s the main point of the lesson. Your only worry in that case is that West’s low club might have been a singleton. On the oft chance it was, finessing the 10 will get you your 12th trick. On the more likely chance it wasn’t, you can set up a certain 4th trick in clubs even if the finesse loses.
Here was the entire deal:

10 tricks are easy on this one. But you are in five hearts. Where are you going to find the 11th winner? Here is the hand, auction, and opening lead.


Your thoughts at trick one:
Give it a try and then scroll down for the solution.
Your thoughts at trick one:
Now that you can picture East’s hand, you know to go up with the ace of clubs immediately. Otherwise, East will win the trick and give West a club ruff. When a spade comes back through king in dummy you will be down two after first four tricks.
The idea is to end play East in one of the black suits. Run your seven hearts. By doing so, East must protect the black suits. So, East will be left with 5 black cards:

Now when you cash your ace of diamonds, pitching a low club from dummy, East must discard a club or the queen of spades.
As South you opened 1NT in 3rd seat. 1NT gets passed out. Your mission is to plan the best chance for overtricks at matchpoints. Follow the play to the 1st two tricks and decide on your plan.

Trick 1: West leads the ace of clubs (A from AK), East plays the jack, and you play low.
Trick 2: West shifts to the three of diamonds, East play the nine, and you win with the ace.
Reminder: You need to employ two NT fundamentals:

What do you plan to do at trick three? Put differently, what suit is best to establish a winner now? Decide on your plan (be specific), and scroll down to see my recommendation:
I recommend you lead the nine of clubs at trick three. That has the effect of establishing two club winners while creating two club entries to dummy (the eight and queen will become winners in the dummy).
What if West refuses to win the king, leaving you with only one sure entry to dummy? In that case lead the AK of diamonds at tricks 4 and 5. Then lead the ace and jack of hearts at tricks 6 and 7. Now your entry to dummy is set up when you next lead a club.
BTW, the defense might cause you a problem at trick 7. Do you see what that might be?
You are South in a contract of four spades. Opening lead is the queen of clubs. How should you plan to play the hand given the bidding shown below?


Play of the hand: Start by counting losers: no spade losers, no heart losers (if you are careful to use dummy to ruff hearts at the right time), two diamond losers, and one club loser. It looks like you should bring this contract home. How do you give yourself the best chance to succeed?
See below for my recommended line:
It’s probably best to draw two rounds of trumps before starting the diamonds. You need to make sure a trump is left to provide an entry to dummy’s diamonds in case opponents attack hearts. Notice that the only spade honor missing in your combined holding is the ten.
Comment on the bidding: North’s 3D bid is a Bergen raise. It tells partner that North has 4-card support and less than a limit raise in spades. Marty Bergen is famous for recent innovations in bidding, and this is an example. Do you like South’s raise to game?
The contract should have been six hearts (NS have a nine-card heart fit). Be that as it may, South now has to play 6NT? Opening lead is the jack of clubs, East following with the deuce.

South wins with the queen of clubs and notes that dummy has only one sure entry to the heart suit. What is South’s best chance to make 6NT? Please give me your thoughts in the comments.
Here is a declarer play problem. You are South in a contract of six spades on the bidding shown. North leads the ten of clubs and this is what you see:


You assume that West would not lead the club 10 when holding the king, so you play the ace of clubs and draw trumps in 2 rounds. As you do so you observe the following from opponents:
Your 12th trick will have to come via a successful finesse. Are you counting the opponents’ hands? Which red suit finesse offers the better likelihood of success? Give it some thought and then scroll down for my decision rationale:
West showed up with a singleton spade and doubleton club. That means West started with 10 red cards and East with five. After West discards two hearts you know that West now holds 8 red cards and East 5 red cards. Odds are 8 to 5 that West holds the king of hearts. Probability that West holds the heart king is 8/13 (61.5%). It’s the same for West holding the diamond queen. I decide to go with the odds and finesse West for the heart king.
World class player and author Richard Pavlicek’s website is loaded with good bridge tips and stories for players of all abilities. Check out his excellent site if you have not already done so.
Here is a fun example I ran across a few days ago. South is dealer and opens the bidding one club. How do you think the bidding might go If West overcalls one spade?


North’s 4N is quantitative, inviting South to bid slam with extras. However, with a crummy 14 HCP (flat hand, three queens, four deuces) South declines the invitation.
Opening lead by West was the nine of hearts. You can see that, despite having a combined 31 HCP, declarer could not make 4N. Or so I thought. Maybe I was wrong. Could you make 4N? It’s a good puzzle, and you can find the answer by exploring Richard’s site.
When opponents make an error, you need to make them pay. Can you make them pay on this hand? You are declarer in a contract of one spade. Here is the auction and what you see on opening lead of the 10 of diamonds:

The play goes as follows. At trick one you put in the queen without much hope, East covers with the king, and you win the ace.
At trick two you lead the jack of spades, won by East’s king with West following low.
At trick three East shifts to the eight of hearts, won in your hand with the ace.
At trick four you lead the 10 of spades, West following low and East showing out with the deuce of clubs.
At trick five you lead the three of clubs to dummy’s queen with both opponents following low.
At trick six you lead a low heart to your king, East following with the jack and West the four.
At trick seven you lead the nine of hearts, won by East’s queen with West following low.
At trick eight East leads the 10 of clubs and you win the ace with West playing the eight. The opponents have still not cashed their winning diamond! And you still must lose a trick to the ace of spades.
Here is the situation from your perspective with you on lead from hand at trick nine. How will you take advantage of opponents’ failure to cash their diamond winner?

I hope you did not get mesmerized by that king of clubs.
BTW, that was a risky vulnerable third hand opening bid by East. It worked out well for EW. West knew what to lead as a result. Here was East’s hand:


Opening lead is the three of clubs. East play the Jack. Do you hold up or win the trick? Decide what to do. Then scoll down to see my recommendation:
↓
↓
↓
↓
↓
I hope you won the trick. Notice the texture of clubs in dummy. The king and queen are only remaining cards ranking higher than dummy’s clubs. By winning the ace at trick one you are assured of two club tricks.
You opened one heart in 2nd seat and West overcalled two diamonds. Partner had enough strength to make a negative double at the two level. Having 5-5 in the rounded suits increased the value of your hand. So, you were willing to go to three clubs for your rebid. Partner took the suit preference for hearts and you bid game. Opening lead was the king of diamonds.
Here is what you saw summary of the bidding:

You were in a good contract. How would you play to make four hearts? Your thoughts on opening lead:
Do those clues shed light on how you should play? Please let me know by email or in comments if you are unclear on what to do at trick two.
You are South in a contract of three hearts doubled. Here is the auction and what you see when West leads the queen of clubs:

East overtakes with the club king and continues with the ace at trick two. Counting losers, you have two hearts, one diamond, and one club. The problem is you may lose trump control as defenders force you to ruff clubs. The good new is you are reasonably sure that East has the ace and queen of hearts. The bad news is that you need to get to dummy twice to finess of the ace and queen of hearts. Also, East may well have four hearts.
It looks like you will need the king of diamonds to be onside. So, you might as well make that assumption.
What card do you play at trick 3? (Remember that your are worried about losing trump control.)
I recommend discarding a diamond at trick two. That makes life difficult for East. She cannot continue clubs because dummy is now void. If she shifts to a spade you let it ride to dummy’s king. Now you can lead the 8 of hearts, expecting to to win or drive out one of East’s honors. Either way you are in control.
Similarly if she shifts to a diamond you will let that ride to dummy and play as before. You may even make an overtrick: three spades, four hearts, and three diamonds.
Here was the entire hand:

You are South declaring three diamonds after West makes a preemptive jump to two spades over your opening bid. West leads the three of spades. Here is what you see with a summary of the auction:

Trick 1: You win the king of spades, East playing the jack.
Trick 2: Then you cash the ace of clubs, both following.
Trick 3: You then lead the eight of clubs, ruffing low in dummy.
Trick 4: Next comes the three of hearts from dummy and you put in the eight, losing to West’s jack.
Solution: Play the nine of spades, knowing it will get ruffed. West started with six spades for the preemtive overcall. You and dummy started with a combined total of six spades. East’s jack at trick one had to be a singleton. Don’t let your ace of spades get ruffed!