Tag Archives: End Play

Learning by studying errors

Posted on by 0 comment

In my opinion there were three errors when this deal was played: a bidding error, a declarer play error, and a defensive error.


Check out the bidding first. Before you look at my opinion, who do you think made the error?


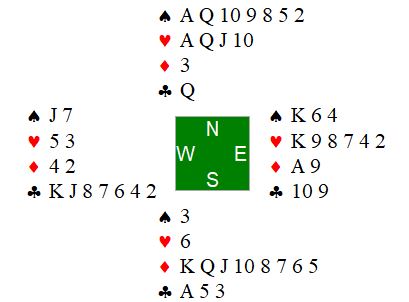
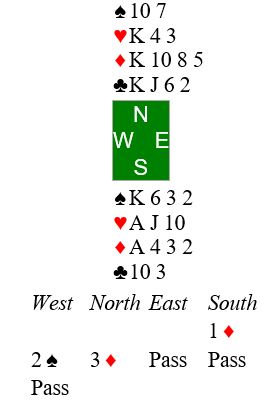
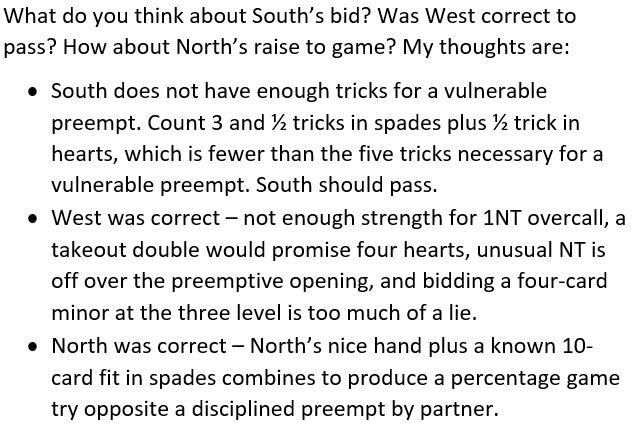
I don’t like South’s bid of 3C. North showed the major suits with no extras. From South’s perspective it is a misfit, and time to get out. But the better sign-off is to take the suit preference to two spades. North will be happy you stopped at the two-level. And North will like your two spade honors.


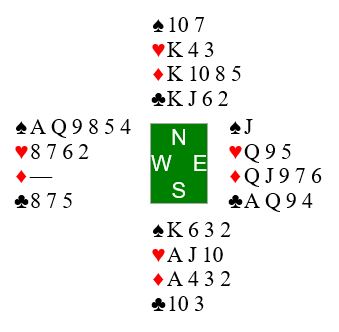
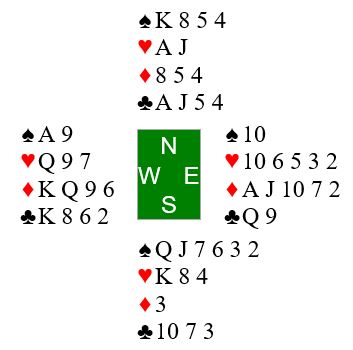
Now you are South in three clubs. (Suggest you print the NS hands to more easily follow the play.) Can you hold it to down one? West led the ace of diamonds followed by the king of diamonds at trick two. The eight of hearts then went to East’s jack. East continued with the ace of hearts. You trumped with a low club and led a low club to dummy’s ace as the queen fell from East. Back to your hand with the king of spades. Then the jack of clubs revealed the 5-1 break. West wins the king and exits with the four of hearts. How do you play from here? (Cover up the EW hands and see if you can avoid South’s error.)


Give it some thought before reading my recommendation.


The key is to make sure that West is on lead (end played so that she will be forced to exit with a trump from 9-6 to your 10-8. Do that by cashing the queen of diamonds and ace of spades. Then lead the queen of spades, discarding the nine of diamonds from hand. West will be in and forced to lead a club at trick 12.


The actual South did not do that. Instead, South cashed the 10 of clubs and had to lead the nine of diamonds at trick 12. Thus losing the last two trick to the 10 of diamonds and nine of clubs. The mistake cost EW a top board in a pairs game: Plus 100 instead of plus 50 by most of the field.


West erred on defense, however. West trumped the nine of diamonds, crashing East’s 10. And West had to give up a trick to South’s eight of clubs. Painful to watch.


Think Before You Play to Trick 1

Posted on by 0 comment

10 tricks are easy on this one. But you are in five hearts. Where are you going to find the 11th winner? Here is the hand, auction, and opening lead.

Your thoughts at trick one:

  • What can I infer from the opening lead?
  • What can I infer about opponents’ spade holdings from the bidding?
  • If my inferences from opening lead and bidding are correct, then how many cards does East have in the red suits?
  • Now that I can picture East’s hand, how am I going to hold my losers to two?

Give it a try and then scroll down for the solution.


Your thoughts at trick one:

  • What did you infer from the opening lead? I bet it’s a singleton!
  • What can you infer from the bidding? Looks like West must have four spades for the preemptive jump raise. East must have 5 spades to the ace from opening bid.
  • If your inferences from opening lead and bidding are correct, then how many cards does East have in the red suits? East has five spades and five clubs. Therefore, East holds three red cards.


Now that you can picture East’s hand, you know to go up with the ace of clubs immediately. Otherwise, East will win the trick and give West a club ruff. When a spade comes back through king in dummy you will be down two after first four tricks.

The idea is to end play East in one of the black suits. Run your seven hearts. By doing so, East must protect the black suits. So, East will be left with 5 black cards:

Now when you cash your ace of diamonds, pitching a low club from dummy, East must discard a club or the queen of spades.

  • If it’s a low club, you will lead a club to the king and throw East in with a club. East will have to lead a spade from A,Q into your K3.
  • If it’s the spade queen, you will lead a low spade and play low from dummy, throwing East in with the ace of spades. Now you will make 12 tricks, since East must lead into your K, J of clubs!


An interesting double dummy problem

Posted on by 0 comment

I was going to include this hand in my “think before you play to trick one” lessons. But I played it so badly that I cannot bear to show you my errors. I was in five diamonds and managed to go down one.

Interestingly, however, the hand can make six diamonds against any defense. It’s a fun double dummy problem. You are South in six diamonds: Here is the hand:

double dummy 6D

Your mission is to make six diamonds.

Well known bridge teacher Buck Buchanan is convinced (and I agree) that solving double dummy problems “can make you a more resourceful declarer or defender when tough hands come up”. Give this one a try.

A Sure Ten Tricks?

Posted on by 0 comment

Here is a somewhat contrived example of “sure tricks” by George S. Coffin. (Contrived because the bidding is unrealistic given the unbalanced nature of the hands.) It nonetheless gives you an interesting and counterintuitive declarer play puzzle to solve. How are you going to bring home 10 tricks?

coffin4

South opened the bidding one heart, and West overcalled two clubs. Partner and right-hand opponent both passed. South bid four hearts, ending the auction.

The play started with West cashing the Ace and King of clubs, East discarding a low spade on the second club. At trick three West led the 10 of hearts on which East discarded another spade! Where is that certain 10th trick coming from? Over to you:

Double Dummy Puzzle from Hell

Posted on by 0 comment

Update 6/6/20: I have solved the puzzle! It turns out that Bridge Composer Double Dummy app knows that West would never be so silly as to open the queen of diamonds. 12 tricks are there on opening lead of the diamond queen.

I will offer my solution after you’ve worked a bit to solve it. Here is the original post from June 5th:

Here is another one from George S. Coffin. This one seems impossible to me. I ran it thourgh my Bridge Composer double dummy software to see if that app found a solution. It did not. So, either Coffin made an editorial or compositional error or he craftily outwitted the software and me. Which do you think it is?

You are in Six No Trump with the queen of diamonds opening lead.

coffin3

Coffin gave some hints as to what he had in mind:

  • Win the king of diamonds on opening lead and start spades with the queen. East cannot productively cover, so her hand becomes irrelevant. You must be careful to play the spade nine under the queen. When you continue with the spade eight and follow with the spade seven in hand, note West’s discard.
  • From there you continue spades, watching West’s discards, and you will be able to set up two additional tricks in one of the other suits. That part was easy.
  • Then he says you will be able to set up an additional trick in another suit as you continue the squeeze. This is what I found to be impossible. I could not squeeze West when leading from dummy, because I had to discard from hand before West chose his discard.

Maybe you can find a way around that. Good luck.

Email me or put a note in the comments when you would like the solution.

Good Bridge Puzzles from Long Ago

Posted on by 4 comments

I have been dipping into an old book by George S. Coffin, Sure Tricks (2nd edition, 1950). Our copy once belonged to H. Kunimura (any of you recall that name?). Somehow the club obtained it over the years. I googled and was surprised to find the book listed at Amazon: https://www.amazon.com/Sure-tricks-George-S-COFFIN/dp/B000M8HNSC

It contains lots of fun double dummy puzzles. Also play problems in which you are challenged to make your contract by visualizing the worst possible lie of opponents’ cards (thus the title of the book: Sure Tricks).

Here is a sample of his double dummy puzzles:

coffin1

You are South in 6NT.  Lead is the queen of Hearts*. How are you going to make your contract against any defense?

*Typo: Lead corrected to queen of hearts rather than queen of diamonds 6/9/20.

Here is the solution if you give up: Coffin1 Solution

Bad Trump Break

Posted on by 0 comment

You are in three diamonds (both vul) as South. North had a difficult decision after West’s preempt and reasonably chose to respond three diamonds. That’s where the bidding ended:

bad trump break1

West led the ace of spades, South playing the Jack and you the six (trying to hide the spade situation from West). West continued with a low spade and East ruffed with the six of diamonds.


At trick 3 East shifts to the nine of hearts. You play the jack and it wins as West follows with the deuce.


At trick 4 you lead the deuce of diamonds, West discards a low spade, you play the king and East plays a low diamond. How many diamonds did East start with? It does not look like you will make the contract. What do you do now?


When I observed the hand, declarer did not get flummoxed. She reasoned that she needed to do as well or better than the other NS pairs. After all, diamonds were going to break 5-0 for all declarers. She managed to hold it to down one. Do you see how?


She had lost one spade, one spade ruff, and was sure to lose two more diamonds. If she could hold her club losers to one, she would get out for down 1. It was likely that East held the club ace, so if she could endplay East, the ace would be her only club loser.


At tricks five and six she cashed her two top hearts ending in hand. Then she led a low spade ruffed with dummy’s and overruffed with East’s nine. At trick eight East led the diamond queen taken with declarer’s ace. At trick nine she led the king of spades, but East could see the endplay coming and refused to ruff. Declarer then led a trump to East’s winner and the endplay was complete, resulting in 75 percent of the matchpoints for NS.

Here is the entire hand:

bad trump break2


You may want to lay out the hand with cards on the table to make sure you follow it all.

BTW, West erred in leading the ace of spades. Any other lead and South will go down two. Some declarers went down three, failing to make the endplay.

Eye Opening Declarer Play

Posted on by 0 comment

Yesterday I wrote about an eye opening slam auction by Robert Levin and Geoff Hampson. I enjoyed a two-fer when Levin’s play of the slam also opened my eyes! Here was the hand and the bidding with Levin sitting West.

Rlevin Slam3

Rlevin Slam4

Rlevin Slam6JPG

rl

A slam will bid and well played.


:

Visualizing the Opponents’ Hands II

Posted on by 0 comment

 See update below with my recommendationvisualize6

visualize7

visualize8


Update 3/2/20:

visualize9

visualize1a


Coda:

I enjoyed discussing the possibilities of this hand with Steve Bartholomew. We discovered one situation in which the end play would not work, namely if East happened to start with all three missing spades (11 percent chance). In that case you are back to guessing who has the king of clubs.

By using a clue from the bidding to visualize East’s hand, you increased your chance of making the slam from 50 percent to 95 percent. Good concentration and nice play! Isn’t it fun when you can “see” all the hands?

Visualizing the Opponents’ Hands

Posted on by 0 comment

 2/29/20 See update belowvisualize1

visualize2

visualize3


visualize4

This is a good double dummy exercise involving an end play, Can you figure it out? Answer tomorrow afternoon.

Update 2/29/20:

visualize5

Good concentration and nice play! Isn’t it fun when you can “see” all the hands?


Bad Trump Break

Posted on by 0 comment

You are East in a contract of four hearts.

bad trump break


This is a contract you are unlikely to make, given the discovery that South started with five hearts to the king 10 9 7 6. You would have to hold your club losers to zero, your spade losers to one, and your heart losers to one.

Don’t panic. All the good pairs will be in a similar situation. Plan to end play South whenever you can. For example, when you take the club finesse and it loses, South will be unable to attack spades or trumps without giving you a sure trick. If South ruffs later in the hand, leave her on lead while pitching a loser from dummy. Make sure you go down one rather than two, resulting in more matchpoints than those who were not so careful.

Preempted by Partner

Posted on by 0 comment


preempt2


preempt3

preempt4

preempt5