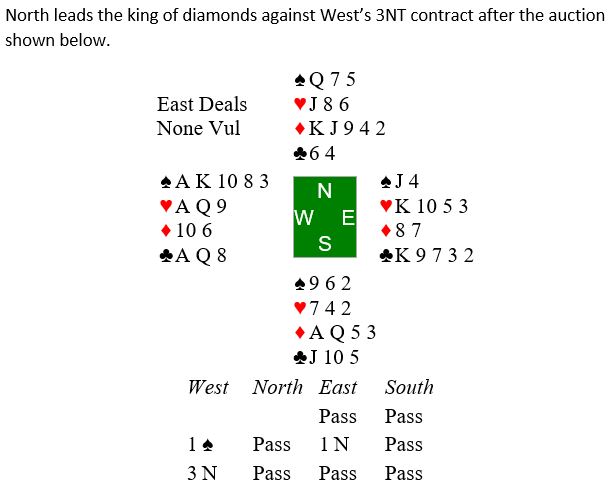
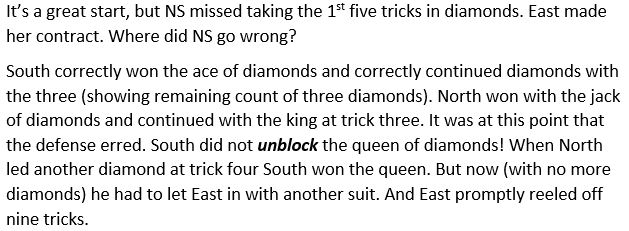
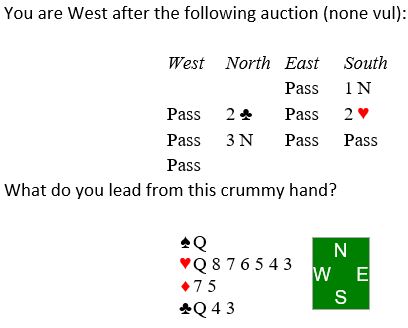
You are West on opening lead against South’s contract of three hearts. Here is your hand:
Visualize opponents’ hands. What does that leave for partner? What’s your lead?
Hilo Bridge Club Updates
You are West on opening lead against South’s contract of three hearts. Here is your hand:
Visualize opponents’ hands. What does that leave for partner? What’s your lead?
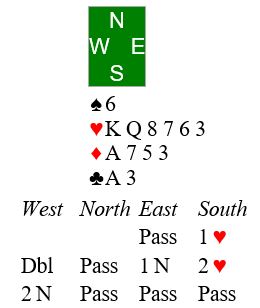
Here is a good defensive puzzle. You are East. How do you plan to defend after partner leads the queen of hearts?
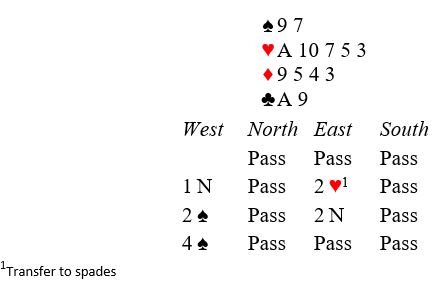
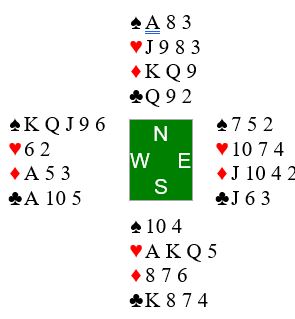
Here is another hand I misplayed recently at the club. Once again I played by seat-of-the-pants rather than using sound fundamentals for declaring NT contract. Here is the hand:

How would you play 1NT after opening lead of five of diamonds?
Start by counting your winners: 3Cs and 1 spade. Opponents have attacked diamonds, giving you a sure winner there. Look at the heirarchy in that heart suit. You should be able to set up two tricks once the ace and king are driven out. That gets you to seven tricks as long as diamonds are not splitting 6-2. You may even take 8 tricks if the spade finesse works.
In my opinion there were three errors when this deal was played: a bidding error, a declarer play error, and a defensive error.

Check out the bidding first. Before you look at my opinion, who do you think made the error?
I don’t like South’s bid of 3C. North showed the major suits with no extras. From South’s perspective it is a misfit, and time to get out. But the better sign-off is to take the suit preference to two spades. North will be happy you stopped at the two-level. And North will like your two spade honors.
Now you are South in three clubs. (Suggest you print the NS hands to more easily follow the play.) Can you hold it to down one? West led the ace of diamonds followed by the king of diamonds at trick two. The eight of hearts then went to East’s jack. East continued with the ace of hearts. You trumped with a low club and led a low club to dummy’s ace as the queen fell from East. Back to your hand with the king of spades. Then the jack of clubs revealed the 5-1 break. West wins the king and exits with the four of hearts. How do you play from here? (Cover up the EW hands and see if you can avoid South’s error.)
Give it some thought before reading my recommendation.
The key is to make sure that West is on lead (end played so that she will be forced to exit with a trump from 9-6 to your 10-8. Do that by cashing the queen of diamonds and ace of spades. Then lead the queen of spades, discarding the nine of diamonds from hand. West will be in and forced to lead a club at trick 12.
The actual South did not do that. Instead, South cashed the 10 of clubs and had to lead the nine of diamonds at trick 12. Thus losing the last two trick to the 10 of diamonds and nine of clubs. The mistake cost EW a top board in a pairs game: Plus 100 instead of plus 50 by most of the field.
West erred on defense, however. West trumped the nine of diamonds, crashing East’s 10. And West had to give up a trick to South’s eight of clubs. Painful to watch.
You are East on defense after the auction shown below. Here is what you see when partner leads the eight of hearts (partnership agreement is to lead low from 3 or more cards when your partner has the suit). Declarer plays the ace from dummy, three by you, and deuce by declarer.

At trick two declarer leads the three of spades from dummy. Are you counting? What’s your plan for the defense?
Scroll down for my recommended plan.
There are two key clues to this puzzle:
Rise with the ace of spades at trick two and lead a heart. If partner ruffs, you will set the contract: ace of spades, heart ruff, top two diamonds.
If partner cannot ruff, opponents were always going to get the top three hearts. So, you have lost nothing. You may be able to find a fourth trick in the minor suits since partner has a little smattering of HCP. Make declarer do all the work to bring contract home.


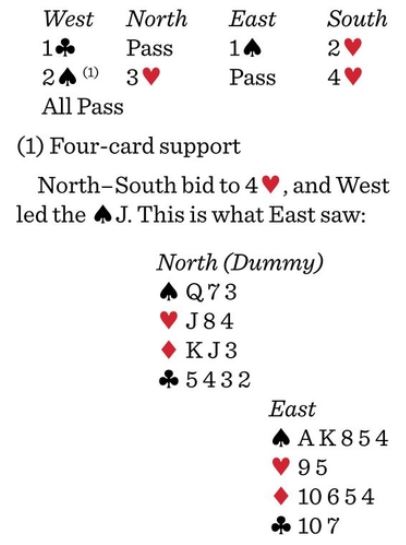
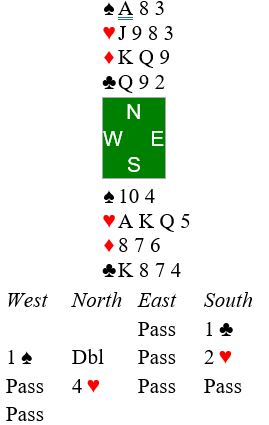
Put yourself in the East seat on this hand. You open one heart. LHO overcalls one spade. Partner raises you to two hearts. RHO advances with three spades, and you bid four heats. LHO competes to four spades, ending the auction.

Partner leads the ace of hearts, and you are disappointed to see dummy come down with the king. You follow with the heart deuce, informing partner of your preference for a club shift. Partner cooperates, leading the eight of clubs. Declarer calls for the 10 from dummy. What card to you play and why?
Hint: What is partner telling you with that eight of clubs?
Now you know what to do, right? Yes, right! (It always helps to put cards on the table if you are not seeing the possibilies.)

Clues from bidding and play are usually available for you to deduce the original shape of unseen hands. Once you can visualize those shapes, your path to taking tricks becomes much clearer. The issue for most of us is time: How are we going to do it in the heat of battle while the director’s clock is ticking?.
The answer is practice! Bridge Winners has developed a nice game to practice deducing the opponents’ original suit holding when one player shows out: http://bridgewinners.com/pages/counting-game/. Also, Bridge Winners has a nice discussion forum among well-known experts on how best to go about practicing: https://bridgewinners.com/article/view/counting-3/ How you do it is up to you, but I recommend you get started now.
I try to tentatively estimate shapes early from the opening lead and bidding. Usually, though, I must wait until one opponent shows out of a suit to reach a firm conclusion. When an opponent shows out, it becomes easy with practice to make a mental note of how many cards in that suit each opponent originally held.
Another source for practice: Larry Cohen’s guidance on counting and visualization: https://www.larryco.com/bridge-articles/counting. (BTW, I recommend you subscribe to his newsletter. It is a great resource for learning.)
Auction suggests that opponents are likely to make 3NT. Perhaps they will, but you should still endeavor to prevent overtricks.
In a recent pairs game on BBO I was the unfortunate declarer when West made a well thought out opening lead. Decide on West’s lead and then scroll down to appreciate West’s thought process:
Follow West’s thought process in visualizing opponents’ hands during the auction:
When it comes to solving the mystery of visualizing unseen hands, World Champion Mike Lawrence’s books and software provide the best guidance I have encountered. Here is Mike’s website: http://michaelslawrence.com/
Here is a fine example one of his books:
http://michaelslawrence.com/product/how-to-read-your-opponents-cards/
I benefited immensely from this software back in the late 90s: http://michaelslawrence.com/product/counting-at-bridge-2-cd-for-pc-only/
Mike gives us daily puzzles to help improve our game. Go to his BridgeClues site: https://www.bridgeclues2.com/ to enjoy and learn.
You are South on lead against 2NT. What clues does the auction give you?
Here is what Mike Lawrence might be thinking:
Try this from Mike Lawrence’s article “Trick one quandry” on page 56 of the April 2020 issue of Bridge Bulletin*. You are East and must decide what to do at trick one:
*Bridge Bulletin is a great source for learning. I recommend you join the ACBL if you have not already done so.
Here is your hand as North on opening lead against four hearts after the auction shown:
Rank the following possible opening leads from first to worst:
What is your rationale for the rankings?
You are North on opening lead against four spades after the auction shown:
Rank the following possible opening leads from first to worst:
What is your rationale for the rankings?
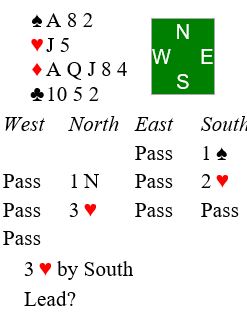
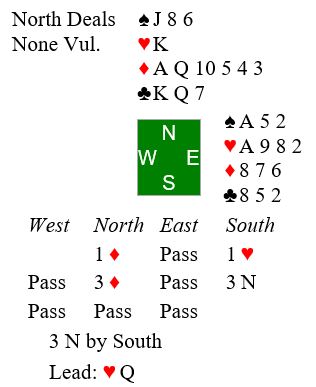
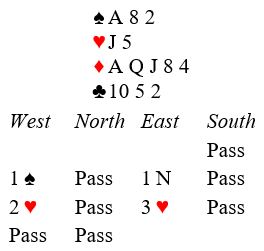
You are East defending 3NT, and your partner’s opening lead is the 10 of diamonds. You see this dummy and recollect the bidding shown:
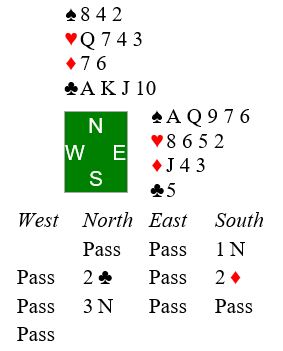
Which card to you play and what is your plan? (See below)
Things are looking good. You have a sure entry with the ace of spades, and partner must have about seven HCP (why?). Since partner is surely leading from a perfect or almost perfect sequence, you should unblock with the jack.
Assuming declarer wins the 1st trick with the king or queen, which diamond will you play later when you are in with the ace of spades? This is something that comes up a lot, and many players get it wrong. East should play the four of diamonds, giving declarer remaining count. High-low shows an even number of diamonds remaining. Partner will know how many diamonds declarer started with and whether she can cash her remaining diamonds.
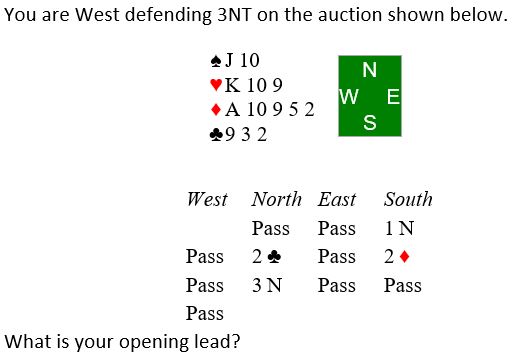
You would like to set up your long diamond suit. Best in my opinion is to lead 4th best diamond — the five of diamonds. Your 10 9 of diamonds is not a good enough sequence.
Leading the 10 should promise the nine as well as the eight or seven. 10 9 8 is a perfect sequence for leading the 10 (top of sequence). 10 9 7 is an almost perfect sequence. From either of those holdings I would lead the 10
This hand played by experts on BBO was bid nicely, but the play was botched. Follow along and see if you agree:
South got to four hearts after she opened the bidding one club, her LHO overcalled one spade, and her partner made a negative double.
Opening lead by West was the king of spades. Declarer won the ace, played a trump to dummy’s ace, and led a low club to the queen which won. Declarer can now conclude that West has the ace of clubs. If trumps split 3-2 and West has the king of diamonds, this contract should make: Go to dummy with a second round of trumps and lead a diamond toward the king-queen. If West plays the ace your diamonds are set up and your king of clubs is protected. If West plays low, you draw a third round of trumps and lead another diamond toward the queen. Contract should make with one spade loser, one diamond loser and one club loser.
Inexplicably to me, declarer led another club back toward the king at trick four and down she went. Here is the entire hand:


Best to lead top of a perfect or almost perfect sequence. Lead 4th highest from a long suit only when it is broken.
Declarer will have a very difficult time making 3NT if you don’t give away that trick to the 10 of spades.