You are West on opening lead against South’s contract of three hearts. Here is your hand:
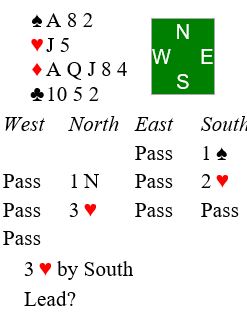
Visualize opponents’ hands. What does that leave for partner? What’s your lead?
Hilo Bridge Club Updates
You are West on opening lead against South’s contract of three hearts. Here is your hand:
Visualize opponents’ hands. What does that leave for partner? What’s your lead?
Here is a good defensive puzzle. You are East. How do you plan to defend after partner leads the queen of hearts?
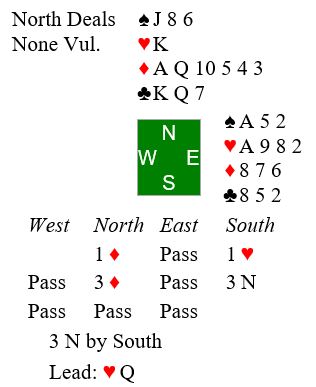
The Villages Bridge Club gives us an interesting “hand of the week” puzzle each Sunday. Here is a recent example:
East follows suit with the six of hearts. Can you find the sure way to make four hearts?
You are south in 3NT. Partner opens the bidding with two hearts (weak) in 1st seat. You respond 2NT, asking partner about his hand. Partner raises you to 3NT, promising a strong 6-card heart suit.
Opening lead by West is the queen of diamonds. You win in hand as East follows with the three of diamonds. Next you lead a low heart toward dummy, West following with the deuce. Here is what you see and what you know about opponents’ hands before you play from dummy:
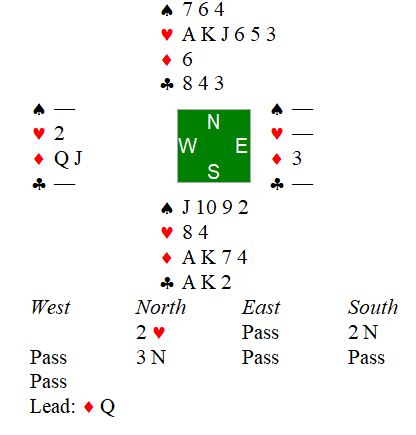
You know from the opening lead and play so far that West started with the queen-jack and 10 or 9 of diamonds and (from West’s card at trick two) the deuce of hearts. You know one card that East started with was the three of diamonds. That leaves 9 unknown spaces in the West hand and 12 unknown spaces in the East hand.
Now you need to decide how you are going to play the heart suit.
You can count six sure winners: two clubs, two diamonds, and two hearts. You will need to develolp 3 more winners in hearts to make the contract. 4 more heart winners would give you an overtrick. In matchpoints it’s always better to go for the overtrick when you have a better than even chance of winning it.
In thinking about your decision, notice that hearts provide your only entry to dummy.
Your best line of play depends on opponents’ shapes in their holding of the remaining hearts. What are those possible shapes? Should you finess the jack of hearts now?
This is a good one for one (maybe two) of our Wednesday think out loud lessons.
Here is another hand I misplayed recently at the club. Once again I played by seat-of-the-pants rather than using sound fundamentals for declaring NT contract. Here is the hand:

How would you play 1NT after opening lead of five of diamonds?
Start by counting your winners: 3Cs and 1 spade. Opponents have attacked diamonds, giving you a sure winner there. Look at the heirarchy in that heart suit. You should be able to set up two tricks once the ace and king are driven out. That gets you to seven tricks as long as diamonds are not splitting 6-2. You may even take 8 tricks if the spade finesse works.
Here is a declarer play problem by Bob Jones. It appeared in his regular column on October 18.

Spades at trick one are deuce, four, six, and ace!. The excellent trump lead negates the possibility of ruffing a losing club in dummy. How would you go about holding your losers to three?
Hint: notice that your six trumps are higher than opponents’ remaining three. Try making dummy the master hand, ruffing heart and diamond losers in your hand.
You have to be careful to preserve entries to dummy to do so. Make sure you win the opening lead with a high trump in hand. That way the jack and nine of spades will be entries when LHO continues to attack trumps.
Try this:
That gives you 10 tricks: 3 spades plus heart ruff and 2 diamond ruffs in hand, Ace and King of hearts, Ace of clubs, and Ace of diamonds.
Be alert for possible “dummy reversals”. Here was the entire deal:

Here is a hand I played at the club recently. I am in 3 spades on the bidding shown. I messed up the fundamentals. Look at my problem and see if you can do better. 

What would be your plan? (Scroll down to see the plan I should have come up with.)
Visualizing the opponents’ hands: It looks like the king of hearts is top of a doubleton (North likely started with 7 hearts). Also, East is likely to be short in diamonds. Bottom line is that you may be able to develop a crossruff without either opponent being able to overruff. You need to cash the outside suit (clubs) before starting the crossruff. Also, you need to lead a diamond to void your hand.
Plan:
10. Diamond ruff.
11. Ace of spades for your 10th trick.
Wasn’t that easy! (I pulled trumps prematurely)
In my opinion there were three errors when this deal was played: a bidding error, a declarer play error, and a defensive error.

Check out the bidding first. Before you look at my opinion, who do you think made the error?
I don’t like South’s bid of 3C. North showed the major suits with no extras. From South’s perspective it is a misfit, and time to get out. But the better sign-off is to take the suit preference to two spades. North will be happy you stopped at the two-level. And North will like your two spade honors.
Now you are South in three clubs. (Suggest you print the NS hands to more easily follow the play.) Can you hold it to down one? West led the ace of diamonds followed by the king of diamonds at trick two. The eight of hearts then went to East’s jack. East continued with the ace of hearts. You trumped with a low club and led a low club to dummy’s ace as the queen fell from East. Back to your hand with the king of spades. Then the jack of clubs revealed the 5-1 break. West wins the king and exits with the four of hearts. How do you play from here? (Cover up the EW hands and see if you can avoid South’s error.)
Give it some thought before reading my recommendation.
The key is to make sure that West is on lead (end played so that she will be forced to exit with a trump from 9-6 to your 10-8. Do that by cashing the queen of diamonds and ace of spades. Then lead the queen of spades, discarding the nine of diamonds from hand. West will be in and forced to lead a club at trick 12.
The actual South did not do that. Instead, South cashed the 10 of clubs and had to lead the nine of diamonds at trick 12. Thus losing the last two trick to the 10 of diamonds and nine of clubs. The mistake cost EW a top board in a pairs game: Plus 100 instead of plus 50 by most of the field.
West erred on defense, however. West trumped the nine of diamonds, crashing East’s 10. And West had to give up a trick to South’s eight of clubs. Painful to watch.
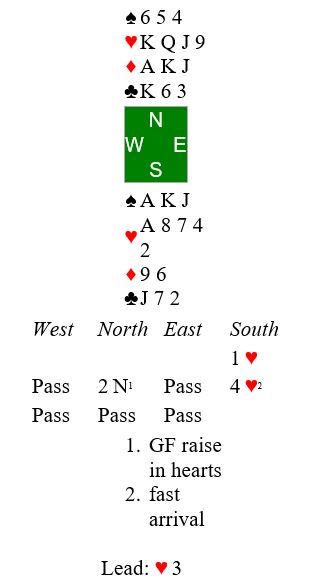
Put yourself in the South seat on this hand. You are declaring 3 hearts after the auction shown below. Opening lead is the deuce of clubs. What is your plan?

Reminder of fundamentals involved:
Counting losers:
Visualizing opponents’ hands from the bidding:
Decide on your plan of play and then scroll down to see mine.
I plan to win the ace of clubs at trick one. Draw trumps and lead the 10 of diamonds, intending to let it ride. That will hold my diamond losses to one trick when West has ace, queen 5 times (10 tricks). If the finesse losses, I will still be home with 9 tricks, contract making.
I failed to concentrate on what could go wrong on this one. And what could go wrong did go wrong!
Put yourself in the South seat and see if you can do better:

Opening lead was the five of hearts. East won the ace and returned the four, I won with the king, and West played the six. I then cashed the ace and king of spades and saw West discard the nine of hearts on the second spade.
From here is looks easy: Cash the queen of hearts to discard a diamond and draw the last trump. Losers are one heart, one diamond, and one club.
Oops, there was another loser. What went wrong, and how could I have avoided the error?
You have this hand in 4th seat (favorable vulnerability). Left hand opponent opens with a weak two hearts, partner passes, and right hand opponent bids four hearts.

It’s your turn. What do you decide to do?
First thing to think about is what kind of hands opponents have. The oppening bid is straightforward, usually promising six hearts, 5 to 10 high card points, and likely loss of no more than three tricks vulnerable..
Right hand opponent usually has two kinds of hands for continuing the preempt. It could be somewhat weakish hand with four card support for hearts. Or, it could be a good hand with only two or three card support for hearts. You are somewhat in the dark, and that’s why preempts are so annoying. Those rascals have forced you to make your first decision at the four-level!
What can you deduce from your partner’s decision to pass in second seat? If responder had the weakish hand with good trump support, then partner would be short in hearts with a good hand. But partner did not double or overcall! Therefore, right hand opponent must have a big hand. You may not want to risk jumping into the auction if that’s the case. Unless, of course, you think you can hold your loss to minus 500 (down 4 in four spades doubled).Do you think your spade textue is good enough to hold your loss to down 4? Whan I saw this played on BBO, 4th seat chose to bid four spades. He went down four for minus 800 and a bad match point result. The usual result was minus 620 or minus 650 when opponents were allowed to play four hearts — above average match point score for the defenders..
Here is a fun hand I held the other day:

I was in 4th seat, favorable vulnerability. Freak hands are often difficult to handle. They don’t show up in text books because they are so rare. Consider what your strategy might be for the auction.
ACBL links to some helpful syndicated bridge columns here. Although not appearing at the link, this is a fine example of a declarer play problem from Bob Jones (“First Things First”) that ran in our local newspaper April 28. Jones sets up the problem for rubber bridge or IMP:s scoring, meaning your objective is to make the contract (overtrick is not important). How would you play to give yourself the best chance of making 6NT? Lead was the jack of diamonds. Here is the bidding, and what you see on opening lead:


It’s usually best in a NT contract to start by counting your winners. Here you have 11 easy winners: 4 spades, 1 heart, 3 diamonds, and 3 clubs. Where is your 12th winner going to come from?
Hearts offer one possibility. If East holds the king of hearts you can finesse it for the 12th trick by leading low toward the queen. That’s a 50 percent chance.
Clubs offer a better possiblility. You are missing six clubs, including the jack. Thanks to Karen Walker here are the possible breaks of the club suit along with their odds:
Let’s use Karen’s table to assess the likelihood of making your contract if you start clubs from the top, hoping to drop the jack or otherwise develop a 4th trick in clubs. Here is a summary of the possible breaks and associated percentages for developing at least a 4th trick on clubs:

BTW, basic knowledge of percentage suit splits for common declarer problems will aid your decision making at the table. Missing 6 cards, 5 cards, 4 cards or 3 cards are common.
What if both opponents follow low when you cash the king of clubs? Does that change anything? Yes, and that’s the main point of the lesson. Your only worry in that case is that West’s low club might have been a singleton. On the oft chance it was, finessing the 10 will get you your 12th trick. On the more likely chance it wasn’t, you can set up a certain 4th trick in clubs even if the finesse loses.
Here was the entire deal:

10 tricks are easy on this one. But you are in five hearts. Where are you going to find the 11th winner? Here is the hand, auction, and opening lead.


Your thoughts at trick one:
Give it a try and then scroll down for the solution.
Your thoughts at trick one:
Now that you can picture East’s hand, you know to go up with the ace of clubs immediately. Otherwise, East will win the trick and give West a club ruff. When a spade comes back through king in dummy you will be down two after first four tricks.
The idea is to end play East in one of the black suits. Run your seven hearts. By doing so, East must protect the black suits. So, East will be left with 5 black cards:

Now when you cash your ace of diamonds, pitching a low club from dummy, East must discard a club or the queen of spades.
Here is an auction I observed recently on BBO:


What do you think of the bidding by North? And how about South’s action? Give it some thought and see my critique below:
North erred by “super” accepting the transfer (jump to 4S) with the known 9+ card fit. That may work out occasionally but not recommended for two reasons:
South was on the right track to visualize a slam opportunity if partner has a diamond fit and if partner has the ace of hearts. Those are two big IFs. Too big to commit to slam. South erred by not passing North’s bid of four spades.
Post mortem: Best way to reach slam is to cue bid your way there. North used up too much space with the “super accept”. Without it, South could have made a mild slam try by bidding four diamonds. North would then temporize with five spades, denying first round control of hearts. And, since South should be worried about two quick losers in hearts, that’s where the bidding would end.
Your partner opens 2NT (20-21) in 2nd seat, making you “captain of the hand”. Assuming that RHO passes, what is your plan to direct the remainder of the auction? Here is your hand:

Your worry about the diamond void makes this a difficult problem. It looks like you have enough to be in game, holding ace of hearts and a runnable club suit. It will be best if you discover an 8+ spade fit. So, you respond three hearts, transferring partner to three Spades. But what do you do after that?
Knowing that partner will bid game in spades with at least three of them, bid 3NT. Yes, diamonds are causing you discomfort. But should partner have only two spades, she is likely to have diamonds well stopped. Don’t chance leaving partner in a 7-card spade fit opposite 5 crummy spades.
You (South) have strength for an almost certain game in spades with good prospect for slam.

What is your call at 1st turn after bidding shown above?
Unfortunately, you cannot use the Jacoby 2NT game-forcing raise after East’s interference. I recommend you indicate a limit raise or better by cue bidding three clubs. Do not bid two hearts. It’s best to keep those nice hearts a secret from the opponents. Experts like Eddie Kantar always emphasize support with support.
That should be your highest priority with the known 9+ spade fit.
Here is a hand I recently observed on BBO. It’s illustrative of good slam bidding, using cue bids to get to the best contract.
Here is the hand:

The bidding started as shown above. South can discern the excellent slam potential of the hand. North had opened one diamond and guaranteed four hearts by raising to two hearts at second turn. Moreover, South knows there is a diamond fit, including prospect of parking that losing club on partner’s fourth diamond.
Most Souths blasted into Roman Key Card Blackwood at 2nd turn. That’s not the recommended strategy with two potential spade losers. Better is to cue bid your way there.
Recommended approach:
At 2nd turn South should cue bid 3 clubs, showing first round control and interest in slam. South is hoping partner will now show first round control of spades. When partner does exactly that, South should cue bid 3 Diamonds (first round control). Now partner may bid 3 spades, showing second round control. If so, you will be in grand slam territory.
Hand 1:

Hand 2:
