Tag Archives: Remember the bidding

Fundamentals of playing a suit contract

Posted on by 0 comment

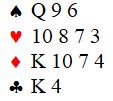
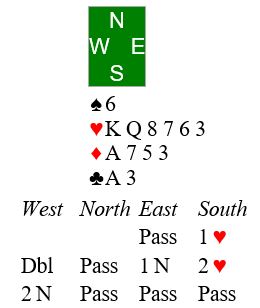
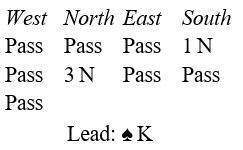
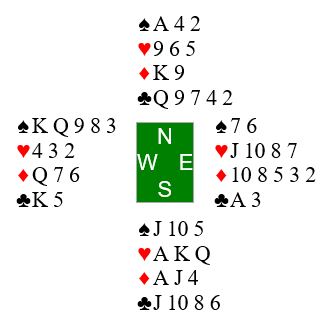
Here is a hand I played at the club recently. I am in 3 spades on the bidding shown. I messed up the fundamentals. Look at my problem and see if you can do better. 

What would be your plan? (Scroll down to see the plan I should have come up with.)


Visualizing the opponents’ hands: It looks like the king of hearts is top of a doubleton (North likely started with 7 hearts). Also, East is likely to be short in diamonds. Bottom line is that you may be able to develop a crossruff without either opponent being able to overruff. You need to cash the outside suit (clubs) before starting the crossruff. Also, you need to lead a diamond to void your hand.


Plan:

  1. Ruff the opening lead in dummy.
  2. Low club to your king.
  3. Low diamond toward dummy (maybe you will get lucky if West has the ace and does not play it). Assume West wins the ace and returns a trump (best defense).
  4. You win West’s trump lead in hand.
  5. Club to dummy’s ace, hoping it survives.
  6. Cash diamond king, discarding heart from hand.
  7. Ruff a diamond.
  8. Ruff a heart.
  9. Heart ruff.

10. Diamond ruff.

11. Ace of spades for your 10th trick.


Wasn’t that easy! (I pulled trumps prematurely)


How would you play this one?

Posted on by 0 comment

Put yourself in the South seat on this hand. You are declaring 3 hearts after the auction shown below. Opening lead is the deuce of clubs. What is your plan?


Reminder of fundamentals involved:

  1. Think before you play to trick one.
  2. Count your losers.
  3. Remember the bidding.
  4. Visualize opponents’ hands as best you can.


Counting losers:

  1. Spades? Zero.
  2. Hearts? Zero
  3. Diamonds? Two. You are missing the ace and queen
  4. Clubs? Two. You are missing the king, queen, and jack.


Visualizing opponents’ hands from the bidding:

  1. East passed in 2nd seat, so should have fewer than 12 HCP.
  2. West made a takeout double after your opening bid. So, West should have an opening hand and likely shortness in hearts, 4-spades (no overcall), support for the minors.
  3. East advanced with 2 clubs. East must have 4 clubs or West would have fewer than 3 clubs for her takeout double (althought it’s possible West’s shape is 4-2-5-2).
  4. West’s rebid was 3 diamonds over your rebid of 2 hearts. West’s shape must be something like 4-1-5-3. How many hearts does that give to East? How many diamonds?
  5. Visualization: East’s shape is likely 4-4-1-4, and East’s singleton diamond is a worry.


Decide on your plan of play and then scroll down to see mine.


I plan to win the ace of clubs at trick one. Draw trumps and lead the 10 of diamonds, intending to let it ride. That will hold my diamond losses to one trick when West has ace, queen 5 times (10 tricks). If the finesse losses, I will still be home with 9 tricks, contract making.

Clues from the Auction

Posted on by 0 comment

You have this hand in 4th seat (favorable vulnerability). Left hand opponent opens with a weak two hearts, partner passes, and right hand opponent bids four hearts. 

It’s your turn. What do you decide to do?

First thing to think about is what kind of hands opponents have. The oppening bid is straightforward, usually promising six hearts, 5 to 10 high card points, and likely loss of no more than three tricks vulnerable..

Right hand opponent usually has two kinds of hands for continuing the preempt. It could be somewhat weakish hand with four card support for hearts. Or, it could be a good hand with only two or three card support for hearts. You are somewhat in the dark, and that’s why preempts are so annoying. Those rascals have forced you to make your first decision at the four-level!

What can you deduce from your partner’s decision to pass in second seat? If responder had the weakish hand with good trump support, then partner would be short in hearts with a good hand. But partner did not double or overcall! Therefore, right hand opponent must have a big hand. You may not want to risk jumping into the auction if that’s the case. Unless, of course, you think you can hold your loss to minus 500 (down 4 in four spades doubled).Do you think your spade textue is good enough to hold your loss to down 4? Whan I saw this played on BBO, 4th seat chose to bid four spades. He went down four for minus 800 and a bad match point result. The usual result was minus 620 or minus 650 when opponents were allowed to play four hearts — above average match point score for the defenders..

Think Before You Play to Trick 1

Posted on by 0 comment

10 tricks are easy on this one. But you are in five hearts. Where are you going to find the 11th winner? Here is the hand, auction, and opening lead.

Your thoughts at trick one:

  • What can I infer from the opening lead?
  • What can I infer about opponents’ spade holdings from the bidding?
  • If my inferences from opening lead and bidding are correct, then how many cards does East have in the red suits?
  • Now that I can picture East’s hand, how am I going to hold my losers to two?

Give it a try and then scroll down for the solution.


Your thoughts at trick one:

  • What did you infer from the opening lead? I bet it’s a singleton!
  • What can you infer from the bidding? Looks like West must have four spades for the preemptive jump raise. East must have 5 spades to the ace from opening bid.
  • If your inferences from opening lead and bidding are correct, then how many cards does East have in the red suits? East has five spades and five clubs. Therefore, East holds three red cards.


Now that you can picture East’s hand, you know to go up with the ace of clubs immediately. Otherwise, East will win the trick and give West a club ruff. When a spade comes back through king in dummy you will be down two after first four tricks.

The idea is to end play East in one of the black suits. Run your seven hearts. By doing so, East must protect the black suits. So, East will be left with 5 black cards:

Now when you cash your ace of diamonds, pitching a low club from dummy, East must discard a club or the queen of spades.

  • If it’s a low club, you will lead a club to the king and throw East in with a club. East will have to lead a spade from A,Q into your K3.
  • If it’s the spade queen, you will lead a low spade and play low from dummy, throwing East in with the ace of spades. Now you will make 12 tricks, since East must lead into your K, J of clubs!


Your plan for the defense?

Posted on by 0 comment

You are East on defense after the auction shown below. Here is what you see when partner leads the eight of hearts (partnership agreement is to lead low from 3 or more cards when your partner has the suit). Declarer plays the ace from dummy, three by you, and deuce by declarer.

At trick two declarer leads the three of spades from dummy.  Are you counting? What’s your plan for the defense?

Scroll down for my recommended plan.


There are two key clues to this puzzle:

  1. Partner started with doubleton or singleton heart, meaning opponents hold the top three heart honors (declarer has the queen). If partner has doubleton heart, opponents’ hearts are 3-3. If partner has singleton heart, declarer has four hearts to the queen.
  2. Opponents should hold at least 24 points, meaning partner holds at most 4 points.


Rise with the ace of spades at trick two and lead a heart. If partner ruffs, you will set the contract: ace of spades, heart ruff, top two diamonds.

If partner cannot ruff, opponents were always going to get the top three hearts. So, you have lost nothing. You may be able to find a fourth trick in the minor suits since partner has a little smattering of HCP. Make declarer do all the work to bring contract home.


Take Advantage of Opponents’ Errors

Posted on by 0 comment

When opponents make an error, you need to make them pay. Can you make them pay on this hand? You are declarer in a contract of one spade. Here is the auction and what you see on opening lead of the 10 of diamonds:


The play goes as follows. At trick one you put in the queen without much hope, East covers with the king, and you win the ace.

At trick two you lead the jack of spades, won by East’s king with West following low.

At trick three East shifts to the eight of hearts, won in your hand with the ace.

At trick four you lead the 10 of spades, West following low and East showing out with the deuce of clubs.

At trick five you lead the three of clubs to dummy’s queen with both opponents following low.

At trick six you lead a low heart to your king, East following with the jack and West the four.

At trick seven you lead the nine of hearts, won by East’s queen with West following low.

At trick eight East leads the 10 of clubs and you win the ace with West playing the eight. The opponents have still not cashed their winning diamond! And you still must lose a trick to the ace of spades.

Here is the situation from your perspective with you on lead from hand at trick nine. How will you take advantage of opponents’ failure to cash their diamond winner?

I hope you did not get mesmerized by that king of clubs.

BTW, that was a risky vulnerable third hand opening bid by East. It worked out well for EW. West knew what to lead as a result. Here was East’s hand:

Another on Counting your Losers

Posted on by 0 comment

You opened one heart in 2nd seat and West overcalled two diamonds. Partner had enough strength to make a negative double at the two level. Having 5-5 in the rounded suits increased the value of your hand. So, you were willing to go to three clubs for your rebid. Partner took the suit preference for hearts and you bid game. Opening lead was the king of diamonds.


Here is what you saw summary of the bidding:

You were in a good contract. How would you play to make four hearts? Your thoughts on opening lead:

  • West should have the ace of hearts.
  • Other than that you have the remaining high hearts.
  • You have the top three clubs, and there is a good chance they will split no worse than 4-2 (84%).
  • You should lose no more than two spades and the ace of hearts.
  • Hearts should split no worse than 4-2 (84%).

Do those clues shed light on how you should play? Please let me know by email or in comments if you are unclear on what to do at trick two.

Counting your losers in a suit contract

Posted on by 0 comment

You are South in a contract of three hearts doubled. Here is the auction and what you see when West leads the queen of clubs:

East overtakes with the club king and continues with the ace at trick two. Counting losers, you have two hearts, one diamond, and one club. The problem is you may lose trump control as defenders force you to ruff clubs. The good new is you are reasonably sure that East has the ace and queen of hearts. The bad news is that you need to get to dummy twice to finess of the ace and queen of hearts. Also, East may well have four hearts.

It looks like you will need the king of diamonds to be onside. So, you might as well make that assumption.

What card do you play at trick 3? (Remember that your are worried about losing trump control.)

I recommend discarding a diamond at trick two. That makes life difficult for East. She cannot continue clubs because dummy is now void. If she shifts to a spade you let it ride to dummy’s king. Now you can lead the 8 of hearts, expecting to to win or drive out one of East’s honors. Either way you are in control.

Similarly if she shifts to a diamond you will let that ride to dummy and play as before. You may even make an overtrick: three spades, four hearts, and three diamonds.

Here was the entire hand:


Using clues from the bidding to guide your play

Posted on by 0 comment

You are South declaring three diamonds after West makes a preemptive jump to two spades over your opening bid. West leads the three of spades. Here is what you see with a summary of the auction:

Trick 1: You win the king of spades, East playing the jack.

Trick 2: Then you cash the ace of clubs, both following.

Trick 3: You then lead the eight of clubs, ruffing low in dummy.

Trick 4: Next comes the three of hearts from dummy and you put in the eight, losing to West’s jack.


At trick 5 West shifts to the four of spades. What spade do you play from hand? Scroll down for the answer.


Solution: Play the nine of spades, knowing it will get ruffed. West started with six spades for the preemtive overcall. You and dummy started with a combined total of six spades. East’s jack at trick one had to be a singleton. Don’t let your ace of spades get ruffed!

Visualizing the unseen hands

Posted on by 0 comment

You are South, having ended up in a contract of three hearts. East opened the bidding in 1st seat with one spade, and you overcalled two hearts. From there it was an interesting competitive auction, during which West and North indicated weak hands by their reluctance to bid. West leads the king of spades. Here is what you see, including details of the auction:

Trick 1: You won the ace of spades.

Trick 2: You cashed the ace of hearts.

Trick 3 you gave up a spade to East.

Trick 4 East then cashed the king of hearts, West discarding the deuce of diamonds. (See details of 1st 4 tricks above.)

At trick 5 East shifts to the three of clubs. It’s your turn: Use clues from the bidding and play to decide which card to play from hand. Scroll down to see the solution.


Solution: You know from the auction that East has the ace of clubs. Play the queen of clubs and it wins. Once you get to dummy again you will lead another club, putting in the king if East follows low. You are assured of two club tricks, knowing that the ace of clubs is onside.


Learning from our Errors

Posted on by 0 comment

A particularly useful aspect of playing on BBO is the ability to assess errors quickly via post mortem discussion with partner. Here is a hand I thought I had misplayed, and I knew an expert had been in the field sitting in my seat (East). It would be easy for me to see how the expert had played this hand:

BBO misbid

Both vulnerable, my partner opened one club in 1st seat. North overcalled one heart. With eight points, three spades and a partial heart stopper I decided to respond one no trump. That’s where the bidding ended.

South led the nine of hearts and this is the dummy I saw:

BBO misbid1

I was happy to see the nine of hearts, knowing I now had a sure heart stopper. North took three rounds of hearts. But rather than giving me my sure stopper in hearts, he shifted to a low diamond. I correctly recognized that I had a sure stopper in diamonds since dummy had the nine and eight. So, I played low from hand. The rest of it went quickly. And when the dust settled, I was down three for a bottom board. Do you see where I went wrong? What did the expert do that was different? Give it some thought and then scroll down for my evaluation.


What did North do that was different? Answer was easy: East passed at his first turn. It was a negative double situation, and he had a heart stack. There was no reason for him, with eight points, to come into the auction. We bridge players tend to be too aggressive at times, and that was my blunder. No reason not to be patient, partner still has another turn.  The huge error on my part was bidding.


BTW, I did misplay the hand, too. I could have salvaged a matchpoint by putting up the king of diamonds at trick four. ☹


Visualizing the Unseen Hands in Practice

Posted on by 1 comment

Solving the Puzzle of Shapes of Unseen Hands

Clues from bidding and play are usually available for you to deduce the original shape of unseen hands. Once you can visualize those shapes, your path to taking tricks becomes much clearer. The issue for most of us is time: How are we going to do it in the heat of battle while the director’s clock is ticking?.

The answer is practice! Bridge Winners has developed a nice game to practice deducing the opponents’ original suit holding when one player shows out: http://bridgewinners.com/pages/counting-game/. Also, Bridge Winners has a nice discussion forum among well-known experts on how best to go about practicing: https://bridgewinners.com/article/view/counting-3/  How you do it is up to you, but I recommend you get started now.

I try to tentatively estimate shapes early from the opening lead and bidding. Usually, though, I must wait until one opponent shows out of a suit to reach a firm conclusion. When an opponent shows out, it becomes easy with practice to make a mental note of how many cards in that suit each opponent originally held.

Another source for practice: Larry Cohen’s guidance on counting and visualization: https://www.larryco.com/bridge-articles/counting. (BTW, I recommend you subscribe to his newsletter. It is a great resource for learning.)

Rectifying the Count

Posted on by 0 comment

What’s usually referred to as “counting the hand” might better be termed visualizing the unseen hands. Experts don’t count. They rectify hand patterns from clues during bidding and play. Once they have done that, they have “gotten a count on the hand” or “rectified the count”, meaning they have deduced shapes of unseen hands.

Here is a nice declarer play exercise in visualizing hand patterns by Eddie Kantar*.

kantar1

Follow the first eight tricks:

  1. West cashes the ace of hearts, East playing the nine
  2. West cashes the king of hearts, East playing the five
  3. West play the nine of clubs, East playing low, you win the queen
  4. You cash the king of spades, West discarding a heart
  5. You cash the ace of spades, another heart from West
  6. You cash the queen of spades, another heart from West
  7. You go to the king of clubs, West following low
  8. You cash the ace of clubs, West discarding a heart while you discard a low diamond

Tell me the hand pattern West started with? How many diamonds did East start with? How are you going to play the diamonds?

Were you able to “rectify the count” after trick eight?

*https://www.amazon.com/Test-Your-Bridge-Play-2/dp/1554947758

Scroll down for the answer if you need help:


At trick 3 you know that West started with 7 hearts, East with 2 hearts.

At trick 4 you discover that West started with zero spades, East with 4 spades.

At trick 8 you discover that West started with 2 clubs, East with 6 clubs.

Now you can rectify the count: West started with zero spades, 7 hearts, ?? diamonds, and 2 clubs. How many diamonds did West start with? How many diamonds did East start with? Hint: All four hands contain a total of 13 diamonds.

Now you know how to play the diamonds.

Opening Lead decision?

Posted on by 0 comment

Here is a chance to practice your visualization skills during the auction:

MikeL12


Auction suggests that opponents are likely to make 3NT. Perhaps they will, but you should still endeavor to prevent overtricks.

In a recent pairs game on BBO I was the unfortunate declarer when West made a well thought out opening lead. Decide on West’s lead and then scroll down to appreciate West’s thought process:


Follow West’s thought process in visualizing opponents’ hands during the auction:

  1.  South has 15-17 HCP and balanced hand.
  2.  North has invitational or better hand with at least one four-card major (2 Clubs is Stayman inquiry).
  3.  South has four hearts and possibly four spades (answering the Stayman inquiry).
  4. North signs off in 3NT, saying “I have four spades, partner, please decide on 3NT or four spades”.
  5. South holds fewer than four spades (took preference for 3NT by passing).
  6.  I only have three queens. Partner may have as much as 8 HCP and should have at least 5 spades (Stayman sequence indicates North has 4 spades and South has at most three). Declarer doesn’t know about our shapes and strength. If I lead the queen of spades through dummy’s “bid” suit, it will be deceptive and will not likely hurt our side. Out goes my queen of spades!

Recommendations to help you think like a bridge player

Posted on by 0 comment

When it comes to solving the mystery of visualizing unseen hands, World Champion Mike Lawrence’s books and software provide the best guidance I have encountered. Here is Mike’s website: http://michaelslawrence.com/

Here is a fine example one of his books:

http://michaelslawrence.com/product/how-to-read-your-opponents-cards/

I benefited immensely from this software back in the late 90s: http://michaelslawrence.com/product/counting-at-bridge-2-cd-for-pc-only/

Mike gives us daily puzzles to help improve our game. Go to his BridgeClues site: https://www.bridgeclues2.com/ to enjoy and learn.


Think like a bridge player

Posted on by 0 comment

 What would Mike Lawrence do?

You are South on lead against 2NT. What clues does the auction give you?

MikeL5

Here is what Mike Lawrence might be thinking:

  • It looks like East has two heart stoppers and fewer than four spades. His shape is probably something like 3-4-3-3.
  • After my rebid of two hearts, West is still inviting game. He probably has about 17 HCP with shortness in hearts.
  • East has nothing extra, probably no more than six HCP.
  • Leading a heart does not look like a good idea. How best for me to go passive with this holding?
  • It looks like the opponents have a maximum of 7 spades between them – four with West and 3 with East. Partner should have at least five spades. The unusual lead of a singleton spade should not hurt the defense.
  • I lead the six of spades.

Think before you play to trick one

Posted on by 0 comment

This is a recent hand on BBO where I let my instincts takeover. I made the common mistake of failing to think at trick one, and I went down in a cold contract. Opening lead is the five of hearts. What do you think I should have done?

MikeL1

Put yourself in my shoes and decide. Then scroll down to make sure you got it right.


I managed to go down because I overlooked the almost certain location of the king of hearts. I should win the ace of hearts at trick one, club to the ace, ruff a club, and lead the queen of hearts. If RHO ducks I pitch my last club and likely make 11 tricks. If RHO plays the king, I ruff high and lead a top trump, losing only one club and ace of diamonds.

Visualizing declarer’s hand

Posted on by 0 comment

Try this from Mike Lawrence’s article “Trick one quandry” on page 56 of the April 2020 issue of Bridge Bulletin*. You are East and must decide what to do at trick one:

bulletin3

Time to practice visualizing declarer’s hand. Try answering the following questions:

  • How many spades does declarer have?
  • How many losers does declarer have? Or, conversely, how many winners does your side have?
  • What was your partner’s opening bid?
  • With clues from your answers, what card do you play at trick one and what is your plan for the defense?

 How did you do?

*Bridge Bulletin is a great source for learning. I recommend you join the ACBL if you have not already done so.


How to Visualize a Hand

Posted on by 0 comment

I am dipping into How to Play Card Combinations by Mike Lawrence. There is a nice lesson in visualizing possibilities from his 1st hand:

MikeL7

MikeL8

The play looks easy if West is leading from a 4-card suit. You will drive out the two top clubs and make nine tricks.

But what if West is leading from a 5-card suit? That would mean East started with two spades. If so, what is the danger and how should you play the spades? You have two sure spade stoppers (right?), and you don’t want West to get in once they are exhausted. Say you win the opening lead in dummy and start the clubs. East wins and returns a spade to West’s queen. West then plays another spade, setting up his two remaining spades. You are safe if East started with the ace, king of clubs, but you are going down if West has one top club honor. How about the possibility that West started with the two top club honors? West would have opened the bidding with A,K of clubs the K,Q five times of spades. Your worry is the real possibility that West started with one of the top club honors.

If you duck the opening lead, you will still have two spades stoppers. After the second spade, East will not be able to hurt you when he gets in with a top club. When you work all that out you duck the opening lead!


Here is the entire hand:


MikeL11


One More Opening Lead Problem

Posted on by 0 comment

Here is your hand as North on opening lead against four hearts after the auction shown:

open lead problem2

Rank the following possible opening leads from first to worst:

  • Ace of spades
  • Jack of hearts
  • Ace of diamonds
  • Deuce of clubs

What is your rationale for the rankings?