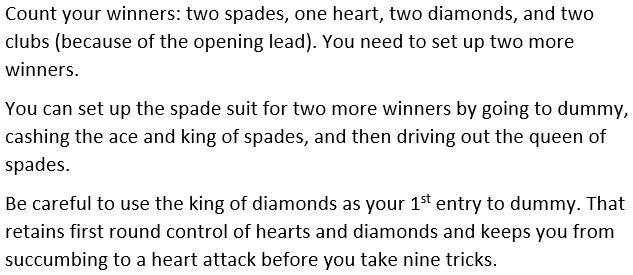
Here is a good defensive puzzle. You are East. How do you plan to defend after partner leads the queen of hearts?
Hilo Bridge Club Updates
Here is a good defensive puzzle. You are East. How do you plan to defend after partner leads the queen of hearts?
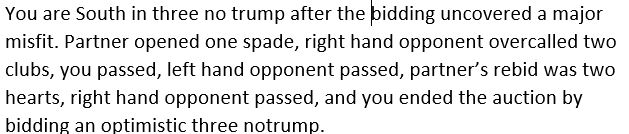
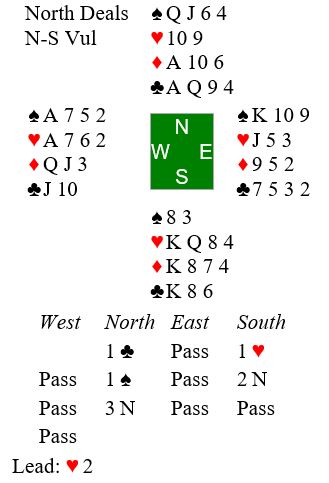
You are south in 3NT. Partner opens the bidding with two hearts (weak) in 1st seat. You respond 2NT, asking partner about his hand. Partner raises you to 3NT, promising a strong 6-card heart suit.
Opening lead by West is the queen of diamonds. You win in hand as East follows with the three of diamonds. Next you lead a low heart toward dummy, West following with the deuce. Here is what you see and what you know about opponents’ hands before you play from dummy:
You know from the opening lead and play so far that West started with the queen-jack and 10 or 9 of diamonds and (from West’s card at trick two) the deuce of hearts. You know one card that East started with was the three of diamonds. That leaves 9 unknown spaces in the West hand and 12 unknown spaces in the East hand.
Now you need to decide how you are going to play the heart suit.
You can count six sure winners: two clubs, two diamonds, and two hearts. You will need to develolp 3 more winners in hearts to make the contract. 4 more heart winners would give you an overtrick. In matchpoints it’s always better to go for the overtrick when you have a better than even chance of winning it.
In thinking about your decision, notice that hearts provide your only entry to dummy.
Your best line of play depends on opponents’ shapes in their holding of the remaining hearts. What are those possible shapes? Should you finess the jack of hearts now?
This is a good one for one (maybe two) of our Wednesday think out loud lessons.
Here is another hand I misplayed recently at the club. Once again I played by seat-of-the-pants rather than using sound fundamentals for declaring NT contract. Here is the hand:

How would you play 1NT after opening lead of five of diamonds?
Start by counting your winners: 3Cs and 1 spade. Opponents have attacked diamonds, giving you a sure winner there. Look at the heirarchy in that heart suit. You should be able to set up two tricks once the ace and king are driven out. That gets you to seven tricks as long as diamonds are not splitting 6-2. You may even take 8 tricks if the spade finesse works.
ACBL links to some helpful syndicated bridge columns here. Although not appearing at the link, this is a fine example of a declarer play problem from Bob Jones (“First Things First”) that ran in our local newspaper April 28. Jones sets up the problem for rubber bridge or IMP:s scoring, meaning your objective is to make the contract (overtrick is not important). How would you play to give yourself the best chance of making 6NT? Lead was the jack of diamonds. Here is the bidding, and what you see on opening lead:


It’s usually best in a NT contract to start by counting your winners. Here you have 11 easy winners: 4 spades, 1 heart, 3 diamonds, and 3 clubs. Where is your 12th winner going to come from?
Hearts offer one possibility. If East holds the king of hearts you can finesse it for the 12th trick by leading low toward the queen. That’s a 50 percent chance.
Clubs offer a better possiblility. You are missing six clubs, including the jack. Thanks to Karen Walker here are the possible breaks of the club suit along with their odds:
Let’s use Karen’s table to assess the likelihood of making your contract if you start clubs from the top, hoping to drop the jack or otherwise develop a 4th trick in clubs. Here is a summary of the possible breaks and associated percentages for developing at least a 4th trick on clubs:

BTW, basic knowledge of percentage suit splits for common declarer problems will aid your decision making at the table. Missing 6 cards, 5 cards, 4 cards or 3 cards are common.
What if both opponents follow low when you cash the king of clubs? Does that change anything? Yes, and that’s the main point of the lesson. Your only worry in that case is that West’s low club might have been a singleton. On the oft chance it was, finessing the 10 will get you your 12th trick. On the more likely chance it wasn’t, you can set up a certain 4th trick in clubs even if the finesse loses.
Here was the entire deal:

As South you opened 1NT in 3rd seat. 1NT gets passed out. Your mission is to plan the best chance for overtricks at matchpoints. Follow the play to the 1st two tricks and decide on your plan.

Trick 1: West leads the ace of clubs (A from AK), East plays the jack, and you play low.
Trick 2: West shifts to the three of diamonds, East play the nine, and you win with the ace.
Reminder: You need to employ two NT fundamentals:

What do you plan to do at trick three? Put differently, what suit is best to establish a winner now? Decide on your plan (be specific), and scroll down to see my recommendation:
I recommend you lead the nine of clubs at trick three. That has the effect of establishing two club winners while creating two club entries to dummy (the eight and queen will become winners in the dummy).
What if West refuses to win the king, leaving you with only one sure entry to dummy? In that case lead the AK of diamonds at tricks 4 and 5. Then lead the ace and jack of hearts at tricks 6 and 7. Now your entry to dummy is set up when you next lead a club.
BTW, the defense might cause you a problem at trick 7. Do you see what that might be?
The contract should have been six hearts (NS have a nine-card heart fit). Be that as it may, South now has to play 6NT? Opening lead is the jack of clubs, East following with the deuce.

South wins with the queen of clubs and notes that dummy has only one sure entry to the heart suit. What is South’s best chance to make 6NT? Please give me your thoughts in the comments.

Opening lead is the three of clubs. East play the Jack. Do you hold up or win the trick? Decide what to do. Then scoll down to see my recommendation:
↓
↓
↓
↓
↓
I hope you won the trick. Notice the texture of clubs in dummy. The king and queen are only remaining cards ranking higher than dummy’s clubs. By winning the ace at trick one you are assured of two club tricks.
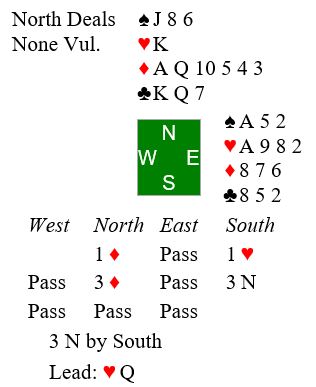
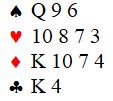
Here is a prime example. I was North and fortunate to have a partner adept at watching the spots:
You may wonder why I decided to accept partner’s invitation to game with “only” 13 HCP. Look at my (North’s) spots: 13 HCP plus a pair of married 10s and 9s to contribute to our trick taking. Perhaps I was a bit lucky when my partner showed up with all four (yes, 4!) 8s.
Now watch what happened. Heart deuce was led, and declarer used the rule of 11 to deduce that East had at most one card higher than the eight. When East played the jack South could count three sure winners in hearts. The outstanding ace of hearts was the only card higher than those in South’s collection. When the dust settled South had come to 10 tricks: one spade, three hearts, two diamonds, and four clubs. 10 tricks on 24 combined HCP bolstered by those trick taking 10s, 9s, and 8s. Cards take tricks, not HCP points.
Watch those spots and take advantage of your intermediates. Don’t miss out on opportunities presented.
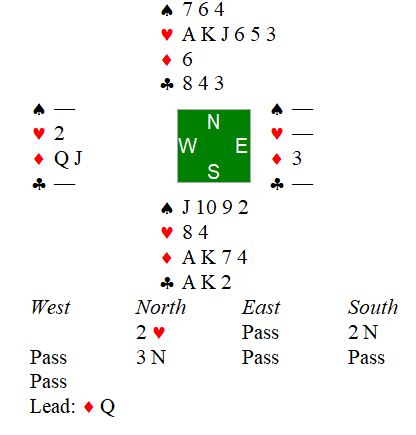
A particularly useful aspect of playing on BBO is the ability to assess errors quickly via post mortem discussion with partner. Here is a hand I thought I had misplayed, and I knew an expert had been in the field sitting in my seat (East). It would be easy for me to see how the expert had played this hand:
Both vulnerable, my partner opened one club in 1st seat. North overcalled one heart. With eight points, three spades and a partial heart stopper I decided to respond one no trump. That’s where the bidding ended.
South led the nine of hearts and this is the dummy I saw:
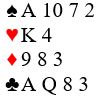
I was happy to see the nine of hearts, knowing I now had a sure heart stopper. North took three rounds of hearts. But rather than giving me my sure stopper in hearts, he shifted to a low diamond. I correctly recognized that I had a sure stopper in diamonds since dummy had the nine and eight. So, I played low from hand. The rest of it went quickly. And when the dust settled, I was down three for a bottom board. Do you see where I went wrong? What did the expert do that was different? Give it some thought and then scroll down for my evaluation.
What did North do that was different? Answer was easy: East passed at his first turn. It was a negative double situation, and he had a heart stack. There was no reason for him, with eight points, to come into the auction. We bridge players tend to be too aggressive at times, and that was my blunder. No reason not to be patient, partner still has another turn. The huge error on my part was bidding.
BTW, I did misplay the hand, too. I could have salvaged a matchpoint by putting up the king of diamonds at trick four. ☹