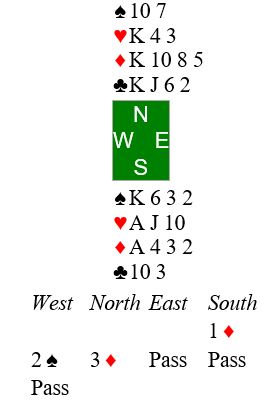
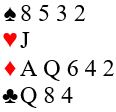
You are North on opening lead against four spades after the auction shown:
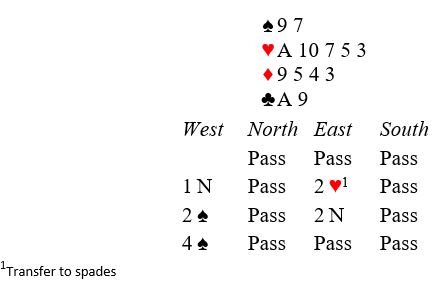
Rank the following possible opening leads from first to worst:
- Nine of spades
- Ace of hearts
- Five of diamonds
- Ace of clubs
What is your rationale for the rankings?
Hilo Bridge Club Updates
You are North on opening lead against four spades after the auction shown:
Rank the following possible opening leads from first to worst:
What is your rationale for the rankings?
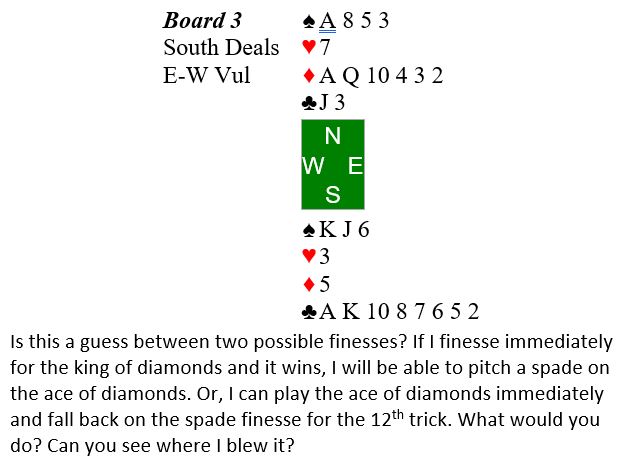
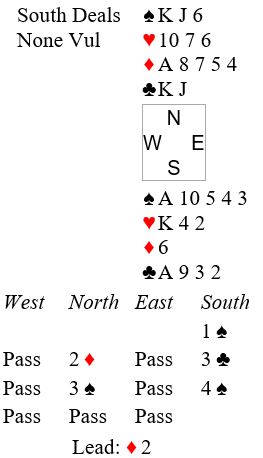
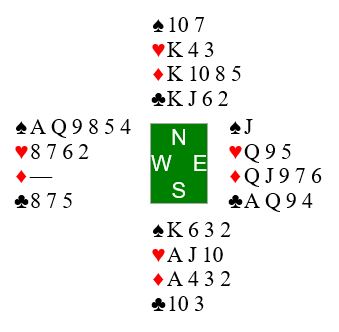
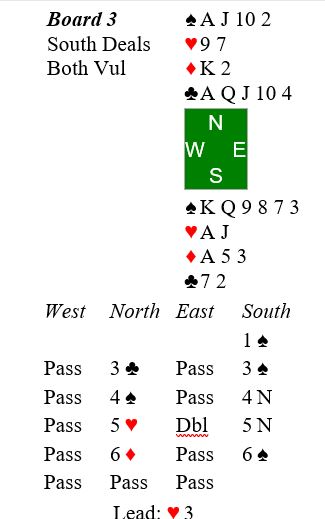
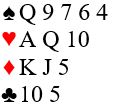
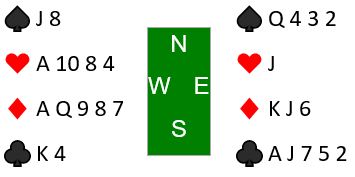
From a recent hand on BBO: You are South in four spades. West leads the queen of clubs. Here is your hand and dummy:

It looks like you will make at least five spades. But you are playing a pairs game (which means matchpoint scoring), so it would be nice to make six. How are you going to play for 12 tricks? Hint: Note that West overcalled 2 ♥ in direct seat.
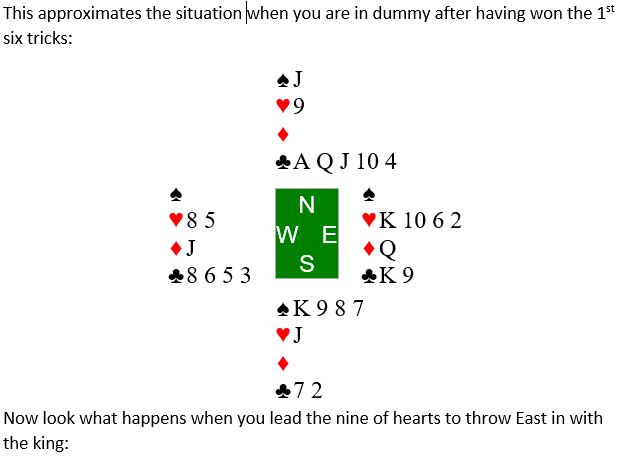
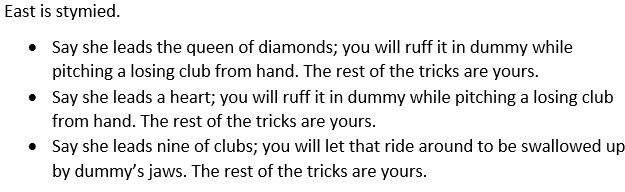
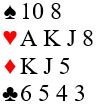
Here is a good visualization exercise for you. I recently saw this hand played in a BBO tournament, and no declarers seemed to put on their Mike Lawrence thinking cap. See if you can do better:
I win the ace of diamonds, East playing the three. What do I make of the opening lead? Opponents started with seven diamonds: Hierarchy of honors K Q J 10 9 as well as the deuce and trey. From what holding would West lead a little diamond when North has made a 2/1 diamond response?
Give this some Mike Lawrence kine thought, and let me know in comments or by email what you conclude.
Steve Bartholomew recently emailed me some declarer play puzzles from Victor Mollo’s book I Challenge You. (Thanks, Steve.) Mollo’s challenge is to use readily available clues to guide your declarer play. Mollo says at the outset, “there’s nothing up my sleeve, no traps for the unwary, and above all, no abstruse conventions in the bidding to obscure the clarity of the play”.
Here, for example, is the first puzzle:
West leads out the ace, king, queen of spades. You ruff the 3rd spade in hand. How are you going to play from here to make the contract?
Scroll down for the solution:
It’s a near certainty that East has the ace of clubs and King of diamonds (West did not open the bidding). Lead your singleton club and put in the 10. If it loses to the jack, there is nothing East can do to hurt you. When you get to dummy again you will take ruffing finesses against East’s ace of clubs to discard your two losing diamonds.
Did I say, “when you get to dummy again”? You did not lazily ruff that third spade with the heart seven, did you? Of course not, you saw the need to preserve the eight of hearts as an entry to dummy. The eight is equal to the ace in its trick taking power against opponents holding of deuce through six of hearts.
In our game it’s often hard to avoid playing by instinct. I recently made an instinctual misplay at trick one when West led the seven of hearts on this hand:
My instinct was “oh, goodie – a free finesse!” I played low from dummy. Only as I was about to lead to trick two did I contemplate how to play trumps should they break 4-1. It was too late. I needed to win trick one in dummy and cash the queen of spades. Then I can come to hand in hearts at trick two and draw trumps.
BTW, assuming I had played correctly at trick one, how are you going to play the minor suits? You know where the heart queen is, right? Yes, right!
You are in three diamonds (both vul) as South. North had a difficult decision after West’s preempt and reasonably chose to respond three diamonds. That’s where the bidding ended:
West led the ace of spades, South playing the Jack and you the six (trying to hide the spade situation from West). West continued with a low spade and East ruffed with the six of diamonds.
At trick 3 East shifts to the nine of hearts. You play the jack and it wins as West follows with the deuce.
At trick 4 you lead the deuce of diamonds, West discards a low spade, you play the king and East plays a low diamond. How many diamonds did East start with? It does not look like you will make the contract. What do you do now?
When I observed the hand, declarer did not get flummoxed. She reasoned that she needed to do as well or better than the other NS pairs. After all, diamonds were going to break 5-0 for all declarers. She managed to hold it to down one. Do you see how?
She had lost one spade, one spade ruff, and was sure to lose two more diamonds. If she could hold her club losers to one, she would get out for down 1. It was likely that East held the club ace, so if she could endplay East, the ace would be her only club loser.
At tricks five and six she cashed her two top hearts ending in hand. Then she led a low spade ruffed with dummy’s and overruffed with East’s nine. At trick eight East led the diamond queen taken with declarer’s ace. At trick nine she led the king of spades, but East could see the endplay coming and refused to ruff. Declarer then led a trump to East’s winner and the endplay was complete, resulting in 75 percent of the matchpoints for NS.
Here is the entire hand:
You may want to lay out the hand with cards on the table to make sure you follow it all.
BTW, West erred in leading the ace of spades. Any other lead and South will go down two. Some declarers went down three, failing to make the endplay.
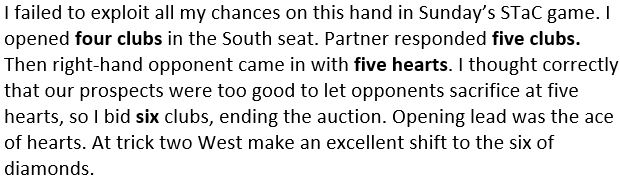
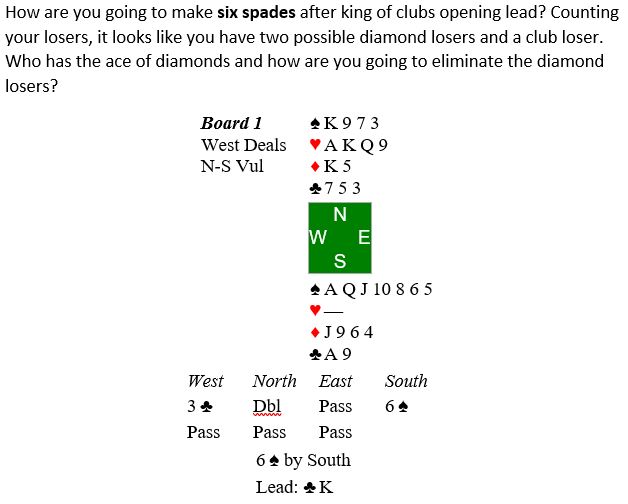
Here is a hand I saw played by Ralph Katz sitting South:
Note that Katz will go down immediately if West leads a diamond. However, West chose the reasonable lead of the ace of clubs.
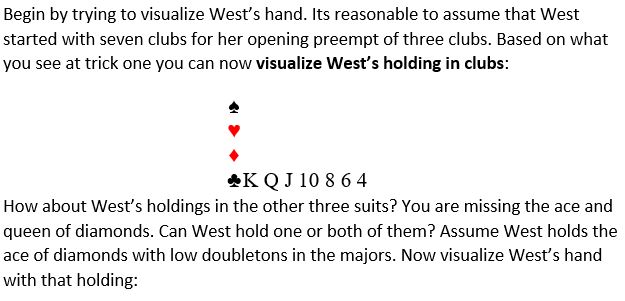
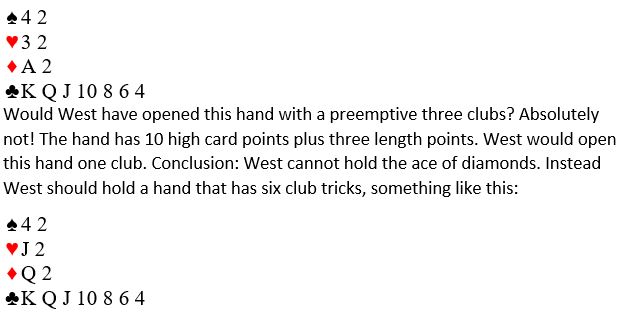
Katz ruffed and visualized the East hand. This is what I infer that Katz was thinking: East had opened the bidding and, after rebidding his diamonds, should hold the ace and king of diamonds. West led the ace of clubs, so presumably has the king as well. Also, it appears that an unbalanced hand with length in clubs would justify West’s aggressive bidding. Therefore, it seems reasonable to assume that East holds the Q J of hearts to justify his opening bid.
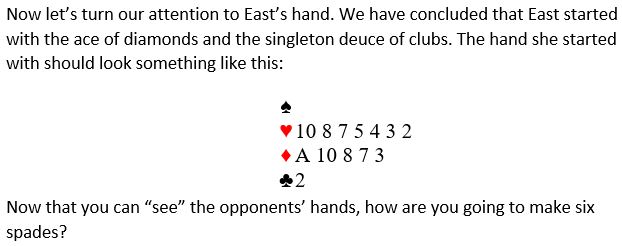
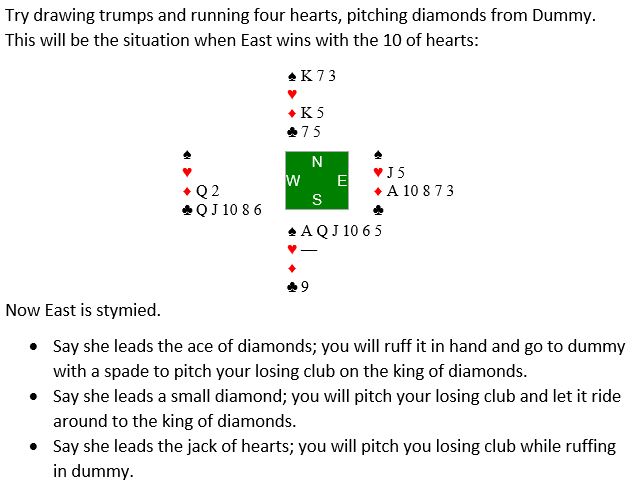
Assume Katz visualized a hand like the one East held, do you see how he avoided losing one heart and two diamonds? He made his doubled contract! How did Katz Play?
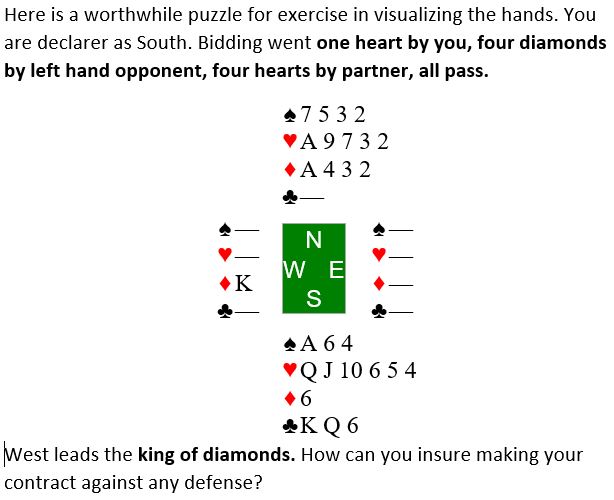
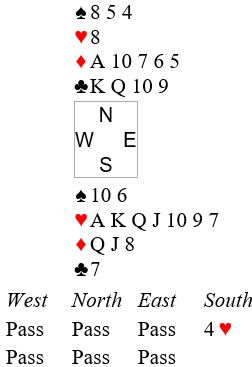
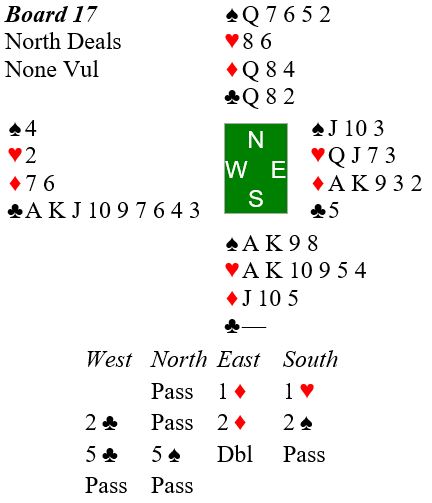
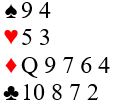
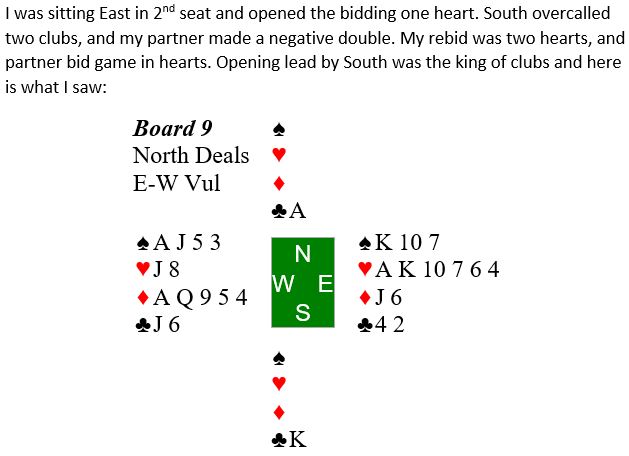
You are South in four hearts after the bidding shown below:

West leads the ace of clubs, East playing the deuce. At trick two West shifts to the jack of spades. You play the queen, East plays the king, and you win with the ace.
You have one spade loser and two club losers. How are you going to handle the trump suit for no losers? The percentage play when missing three trumps is to finesse for the king. But how are you going to get to dummy to do that?
Instead of the heart finesse, maybe you can discard your losing spade on the ace of diamonds? But that requires that you drop the singleton king of hearts, otherwise the defense will cash their spade winner before you can get to dummy.
Is that king of diamonds a mirage? Maybe it would be helpful for you to think of it as a low diamond. Does that make you decision any easier?

This is a good double dummy exercise involving an end play, Can you figure it out? Answer tomorrow afternoon.
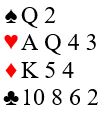
Here is your hand:
Your right hand opponent opens the bidding one heart in second seat. You pass, and left hand opponent responds one spade. Right hand opponents’s rebid is two clubs, and left hand opponent jumps to four hearts. Here is summary of the auction:

You lead the deuce of spades and see this dummy:
Dummy plays low, your partner plays the king, and declarer wins the ace.
Now declarer draws trumps ending in hand, your partner having shown up with four small hearts.
Declarer cashes the jack of spades and leads the 10 to dummy’s queen. Declarer cashes dummy’s remaining two spades. What do you discard on that last spade?
Here is an interesting defensive hand from a recent game. Put yourself in the East seat:
East
North opened the bidding two clubs. South responded two diamonds (waiting). North’s rebid was 2NT (22-23 HCP). Souith raised to 3NT. Finding the right defense was difficult. What would you lead from the East hand?
Time to count: You have 12 points, declarer has 22-23, dummy should have 3+, and partner will be lucky to have so much as one jack.
Knowing from the bidding that partner is probably broke and that opponents have shown no interest in the majors, East should consider a heart attack on opening lead. But which card? I recommend the king* of hearts. Partner will give you attitude when she follows suit. You lead the king, and this is what you see in dummy:
Dummy
When you see Dummy come down you realize that South got a bit too aggressive when she bid 3NT. It’s not a percentage contract, and there is hope for your side. You can now place Partner with two or three points. Partner plays the encouraging seven, and declarer follows with the six. Now what? Do you play the ace or lead the eight, hoping partner has the queen?
My take is that you should cash the ace. It’s more likely that declarer, rather than partner, holds the queen. Partner has no entries, and you may be able to drop the doubleton queen. If partner happens to hold the queen, nothing is lost.
*The recommended lead from A K J 9 is the ace, asking partner to play her highest card. That will let East know if the suit will run. But your heart holding isn’t good enough for that (8 rather than 9).
This is from Warren Buffett in comparing bridge to investing:
The approach and strategies are very similar in that you gather all the information you can and then keep adding to that base of information as things develop. You do whatever the probabilities indicated based on the knowledge that you have at that time, but you are always willing to modify your behavior or your approach as you get new information.

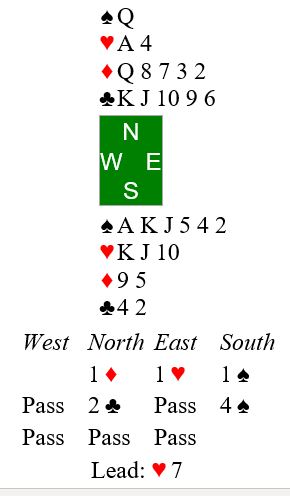
Here is a hand from Wednesday. I was sitting East with 12 points. Opponents were silent. My partner opened one diamond in 2nd seat, one spade by me, two diamonds by partner, three clubs by me, three hearts by partner, three notrump by me, and three passes.
South led the seven of hearts. I played low from dummy and my jack won the trick. I counted my sure tricks: two hearts, five diamonds and two clubs. At trick two I started running the diamonds, hoping that I could set up an overtrick in clubs. That was too lazy.
I forgot to remember an obvious inference for South’s heart holding from trick one. I should have made a mental note that South had to have the king, queen, nine, and perhaps one more in hearts. When I observed South discard the nine of hearts on the last diamond, I must lead the ace of hearts and out a heart to set up my 10 of hearts for a 10th trick. All the opponents can get is one heart and two spades.
BTW, I recommend that West rebid one notrump at her second turn. The two diamond rebid implies six diamonds.
Left-hand opponent opened one club in 1st seat. Her partner responded one heart. Opener’s rebid was one spade. Responder then closed out the auction with one notrump. Your side was silent. Here is your hand:
What is your opening lead against one notrump? Please give me your thoughts in the comments or by email.
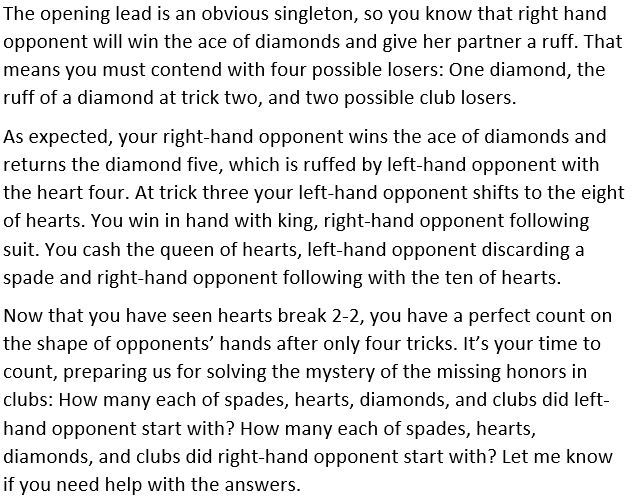
Here is an exercise in counting the hand. Whether you are declarer or defender, counting helps you solve the mystery of missing honors. For example, you need to locate the missing club honors in this hand:

Dummy

Lead ![]()
You

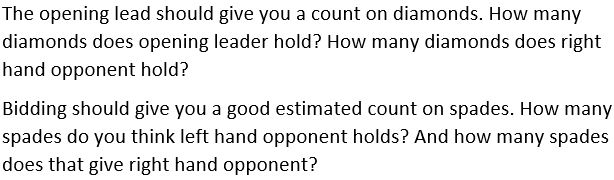
Once you give me the answers to those questions, we will be able do some more counting to investigate location of the missing honors in clubs. Stay tuned.