Category Archives: Exercises: Declarer Play

Visualizing the unseen hands

Posted on by 0 comment

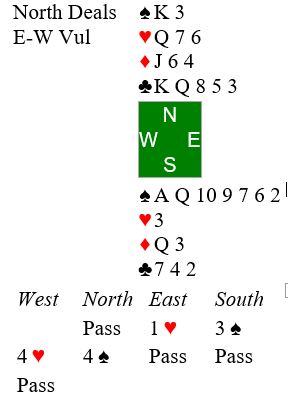
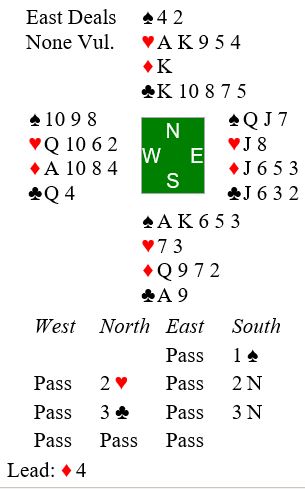
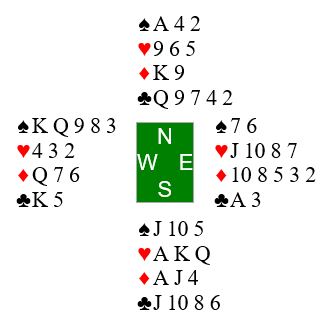
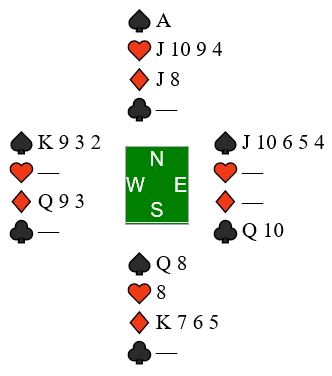
You are South, having ended up in a contract of three hearts. East opened the bidding in 1st seat with one spade, and you overcalled two hearts. From there it was an interesting competitive auction, during which West and North indicated weak hands by their reluctance to bid. West leads the king of spades. Here is what you see, including details of the auction:

Trick 1: You won the ace of spades.

Trick 2: You cashed the ace of hearts.

Trick 3 you gave up a spade to East.

Trick 4 East then cashed the king of hearts, West discarding the deuce of diamonds. (See details of 1st 4 tricks above.)

At trick 5 East shifts to the three of clubs. It’s your turn: Use clues from the bidding and play to decide which card to play from hand. Scroll down to see the solution.


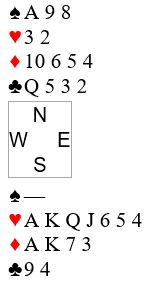
Solution: You know from the auction that East has the ace of clubs. Play the queen of clubs and it wins. Once you get to dummy again you will lead another club, putting in the king if East follows low. You are assured of two club tricks, knowing that the ace of clubs is onside.


The Power of 10s, 9s, and 8s

Posted on by 0 comment

Recommendation for newer players: pay attention to the hierarchy of cards in each suit during play. It’s much easier than you might think. The hierarchy itself facilitates recall of cards played (known as “watching the spots”). The idea is to keep track of cards that are rising to the top in trick taking power. Of course, practice is essential to developing the skill! But with a little practice it becomes easy.

Here is a prime example. I was North and fortunate to have a partner adept at watching the spots:

watching spots

You may wonder why I decided to accept partner’s invitation to game with “only” 13 HCP. Look at my (North’s) spots: 13 HCP plus a pair of married 10s and 9s to contribute to our trick taking. Perhaps I was a bit lucky when my partner showed up with all four (yes, 4!) 8s.

Now watch what happened. Heart deuce was led, and declarer used the rule of 11 to deduce that East had at most one card higher than the eight. When East played the jack South could count three sure winners in hearts. The outstanding ace of hearts was the only card higher than those in South’s collection. When the dust settled South had come to 10 tricks: one spade, three hearts, two diamonds, and four clubs. 10 tricks on 24 combined HCP bolstered by those trick taking 10s, 9s, and 8s. Cards take tricks, not HCP points.

Watch those spots and take advantage of your intermediates. Don’t miss out on opportunities presented.

Watch those Spots!

Posted on by 0 comment

The play by South seemed pretty routine on this one. It looks like South will lose one heart, two diamonds, and perhaps two clubs and one spade.

spot watching

The ace of hearts was led by West, and South ruffed the next heart. Then South led a spade to the king and another back to hand, revealing a 2-2 break. At trick 5 South led a low club toward dummy, 10 from West, queen from dummy and won by East’s ace.


At trick 6 East continued with the king of hearts and North ruffed. At trick 7 declarer led a low club toward dummy’s king, West playing the jack and East the nine!

I watched in horror as declarer led a low club to seven in hand. To declarer’s surprise it won the trick. Declarer had not been watching the club spots. Cashing the eight of clubs and the remaining two clubs would bring in 11 tricks for a top board.

East erred by playing the nine of clubs when also holding the six.

South and East were not paying attention to the hierarchy of cards in the club suit. It’s hard to get newer players out of the mindset that any card lower than a 10 is “x” and inconsequential. It’s the hierarchy itself that facilitates remembering which card has risen to the top in trick taking power. After two rounds of clubs in this hand the eight had risen to boss club.


Best sentence I read today

Posted on by 0 comment

It’s from Chip Dombrowski writing in the latest edition of the ACBL District 20 newsletter Trumpet. Concluding from West’s takeout double that East cannot have any of the missing honors, Chip puts in the queen of hearts from dummy. When East wins the trick with the heart king Chip comments:

It is one of my great pet peeves when people turn up with cards they are known not to have.

We have all experienced that peeve. It seems to occur at least twice every session on BBO.

How Will the Missing Cards in a Suit Break?

Posted on by 0 comment

Karen Walker has posted a useful table of probabilities here.

I suggest you become familiar with it. For example, you often come up with a problem such as how five missing will spades split between East and West. Answer: spades will break 3-2 68 percent of the time, 4-1 28 percent of the time, and 5-0 4 percent of the time.

An Instructive Example of Visualizing the Unseen Hands

Posted on by 1 comment

What’s known as “counting the hand” in bridge might better be called visualization. Experts don’t actually count. They visualize possible ways each suit originally broke in the unseen hands, and they confirm or adjust that vision as more is learned from the play. For example, say you are declarer in a spade contract with silent opponents. You hold eight spades between you and dummy. You tentatively visualize opponents’ original spade holding as breaking either 3-2 or 2-3 (a 68 percent chance). But you realize that the less friendly breaks (4-1 or 1-4 or 5-0 or 0-5) are also possible (32 percent chance).

You start to draw trumps and find that right hand opponent shows out on the second round. Don’t grimace about the 4-1 break. All the other pairs sitting your way are getting the same unfriendly break. Focus instead on adjusting your vision of the unseen hands: You now know that left hand opponent started with four spades, and you know precisely which spades those are. Also, you recall that right hand opponent was silent during the auction even though she held a singleton spade. Adjust your plan of play based on your new, more accurate vision.

To give you a little visualization exercise “here is a rather extreme, but instructive, example” from Alfred Sheinwold’s Five Weeks to Winning Bridge*:

Alfred1


Opening lead is the 10 of diamonds. You have 12 sure tricks. The only possible worry is that clubs don’t break 3-2, and you lose a trick to the jack. You don’t have much of a vision of unseen hands to start with, other than they each contain 13 crummy cards. How are you going to go about visualizing the club suit to eliminate that one little worry?

To get a firm grip on opponents’ original holdings, take your tricks in the other three suits before you tackle clubs:

  • You see West discard diamonds on the second and third spade, so now you know spades were split 1-6 between West and East.
  • You play three rounds of hearts and both follow, so hearts were split either 4-3 or 3-4 between West and East.
  • You see East discard a spade on the third round of diamonds, so diamonds were split 5-2 between West and East.
  • Now you know that West started with one spade, 3 or 4 hearts, five diamonds, and East started with six spades, 4 or 3 hearts. two diamonds. Therefore East has at most two clubs. You play the king and queen of clubs, knowing that ace and 10 in dummy will take the last two trick.

* https://www.amazon.com/Weeks-Winning-Bridge-Alfred-Sheinwold/dp/4871876098

Learning from our Errors

Posted on by 0 comment

A particularly useful aspect of playing on BBO is the ability to assess errors quickly via post mortem discussion with partner. Here is a hand I thought I had misplayed, and I knew an expert had been in the field sitting in my seat (East). It would be easy for me to see how the expert had played this hand:

BBO misbid

Both vulnerable, my partner opened one club in 1st seat. North overcalled one heart. With eight points, three spades and a partial heart stopper I decided to respond one no trump. That’s where the bidding ended.

South led the nine of hearts and this is the dummy I saw:

BBO misbid1

I was happy to see the nine of hearts, knowing I now had a sure heart stopper. North took three rounds of hearts. But rather than giving me my sure stopper in hearts, he shifted to a low diamond. I correctly recognized that I had a sure stopper in diamonds since dummy had the nine and eight. So, I played low from hand. The rest of it went quickly. And when the dust settled, I was down three for a bottom board. Do you see where I went wrong? What did the expert do that was different? Give it some thought and then scroll down for my evaluation.


What did North do that was different? Answer was easy: East passed at his first turn. It was a negative double situation, and he had a heart stack. There was no reason for him, with eight points, to come into the auction. We bridge players tend to be too aggressive at times, and that was my blunder. No reason not to be patient, partner still has another turn.  The huge error on my part was bidding.


BTW, I did misplay the hand, too. I could have salvaged a matchpoint by putting up the king of diamonds at trick four. ☹


Visualizing the Unseen Hands in Practice

Posted on by 1 comment

Solving the Puzzle of Shapes of Unseen Hands

Clues from bidding and play are usually available for you to deduce the original shape of unseen hands. Once you can visualize those shapes, your path to taking tricks becomes much clearer. The issue for most of us is time: How are we going to do it in the heat of battle while the director’s clock is ticking?.

The answer is practice! Bridge Winners has developed a nice game to practice deducing the opponents’ original suit holding when one player shows out: http://bridgewinners.com/pages/counting-game/. Also, Bridge Winners has a nice discussion forum among well-known experts on how best to go about practicing: https://bridgewinners.com/article/view/counting-3/  How you do it is up to you, but I recommend you get started now.

I try to tentatively estimate shapes early from the opening lead and bidding. Usually, though, I must wait until one opponent shows out of a suit to reach a firm conclusion. When an opponent shows out, it becomes easy with practice to make a mental note of how many cards in that suit each opponent originally held.

Another source for practice: Larry Cohen’s guidance on counting and visualization: https://www.larryco.com/bridge-articles/counting. (BTW, I recommend you subscribe to his newsletter. It is a great resource for learning.)

Rectifying the Count

Posted on by 0 comment

What’s usually referred to as “counting the hand” might better be termed visualizing the unseen hands. Experts don’t count. They rectify hand patterns from clues during bidding and play. Once they have done that, they have “gotten a count on the hand” or “rectified the count”, meaning they have deduced shapes of unseen hands.

Here is a nice declarer play exercise in visualizing hand patterns by Eddie Kantar*.

kantar1

Follow the first eight tricks:

  1. West cashes the ace of hearts, East playing the nine
  2. West cashes the king of hearts, East playing the five
  3. West play the nine of clubs, East playing low, you win the queen
  4. You cash the king of spades, West discarding a heart
  5. You cash the ace of spades, another heart from West
  6. You cash the queen of spades, another heart from West
  7. You go to the king of clubs, West following low
  8. You cash the ace of clubs, West discarding a heart while you discard a low diamond

Tell me the hand pattern West started with? How many diamonds did East start with? How are you going to play the diamonds?

Were you able to “rectify the count” after trick eight?

*https://www.amazon.com/Test-Your-Bridge-Play-2/dp/1554947758

Scroll down for the answer if you need help:


At trick 3 you know that West started with 7 hearts, East with 2 hearts.

At trick 4 you discover that West started with zero spades, East with 4 spades.

At trick 8 you discover that West started with 2 clubs, East with 6 clubs.

Now you can rectify the count: West started with zero spades, 7 hearts, ?? diamonds, and 2 clubs. How many diamonds did West start with? How many diamonds did East start with? Hint: All four hands contain a total of 13 diamonds.

Now you know how to play the diamonds.

Recommendations to help you think like a bridge player

Posted on by 0 comment

When it comes to solving the mystery of visualizing unseen hands, World Champion Mike Lawrence’s books and software provide the best guidance I have encountered. Here is Mike’s website: http://michaelslawrence.com/

Here is a fine example one of his books:

http://michaelslawrence.com/product/how-to-read-your-opponents-cards/

I benefited immensely from this software back in the late 90s: http://michaelslawrence.com/product/counting-at-bridge-2-cd-for-pc-only/

Mike gives us daily puzzles to help improve our game. Go to his BridgeClues site: https://www.bridgeclues2.com/ to enjoy and learn.


Counting your tricks in no trump

Posted on by 0 comment

Here is a hand I observed recently on BBO:

Counting in NT

Put yourself in the South seat. It looks like you have two fast tricks in spades, two in hearts, one in diamonds (your singleton king wins at trick one), and two in clubs. You need to set up two additional tricks. It looks like diamonds are splitting 4-4, and that you will lose three diamond tricks. You have seven card fits in each of the other suits. What’s the best way to set up a ninth trick? Give it some thought and scroll down for my recommended plan.


You can hope for a 3-3 split in spades, hearts, or clubs. But clubs offer your best chance. Look at those nice intermediates that you posess in clubs: 10, 9, 8, 7 . Win the ace of clubs and return the nine, planning to overtake if West plays an honor. That will work whenever clubs break 3-3 or you catch West with a doubleton honor. It’s the doubleton honor that gives you a slight extra chance in clubs. Also, you will hold your loss to down one when clubs don’t behave.

Here was the entire hand:

counting in NT too


Counting your tricks for no trump

Posted on by 0 comment

Here is a hand I observed on BBO. Opening lead is the seven of diamonds. You play low from dummy and East plays the 10. Put yourself in the South seat and plan the play:

MikeL6

Where are your nine tricks going to come from? You count one spade, three hearts, one diamond, and one club. You need three more tricks. A successful club finesse would get you one more trick.

How about the diamonds? It looks to me like you are almost assured of three diamond tricks. Do you agree with me? If so, how are you going to play the diamonds? Give is some thought and then scroll down for the answer.


By “rule of 11” West almost certainly has the ace, jack, and eight of diamonds. Win the queen of diamonds and play a low diamond. That will insure that you get three diamond tricks before your ace of spades is dislodged.

Think before you play to trick one

Posted on by 0 comment

This is a recent hand on BBO where I let my instincts takeover. I made the common mistake of failing to think at trick one, and I went down in a cold contract. Opening lead is the five of hearts. What do you think I should have done?

MikeL1

Put yourself in my shoes and decide. Then scroll down to make sure you got it right.


I managed to go down because I overlooked the almost certain location of the king of hearts. I should win the ace of hearts at trick one, club to the ace, ruff a club, and lead the queen of hearts. If RHO ducks I pitch my last club and likely make 11 tricks. If RHO plays the king, I ruff high and lead a top trump, losing only one club and ace of diamonds.

How to Visualize a Hand

Posted on by 0 comment

I am dipping into How to Play Card Combinations by Mike Lawrence. There is a nice lesson in visualizing possibilities from his 1st hand:

MikeL7

MikeL8

The play looks easy if West is leading from a 4-card suit. You will drive out the two top clubs and make nine tricks.

But what if West is leading from a 5-card suit? That would mean East started with two spades. If so, what is the danger and how should you play the spades? You have two sure spade stoppers (right?), and you don’t want West to get in once they are exhausted. Say you win the opening lead in dummy and start the clubs. East wins and returns a spade to West’s queen. West then plays another spade, setting up his two remaining spades. You are safe if East started with the ace, king of clubs, but you are going down if West has one top club honor. How about the possibility that West started with the two top club honors? West would have opened the bidding with A,K of clubs the K,Q five times of spades. Your worry is the real possibility that West started with one of the top club honors.

If you duck the opening lead, you will still have two spades stoppers. After the second spade, East will not be able to hurt you when he gets in with a top club. When you work all that out you duck the opening lead!


Here is the entire hand:


MikeL11


Play Bridge with Mike Lawrence*

Posted on by 0 comment

*Title is same as that of book by Mike Lawrence

Here is an interesting hand in which Mike Lawrence shares his thinking. Mike is sitting South.

MikeL17

The transfer did not get accepted after the lead directing double because (by partnership agreement) North held fewer than three spades. Mike decided to bid game with the known 8-card fit.


Opening lead was the seven of diamonds, and East won with the ace. What diamond did Mike play from hand at trick one and why does it matter?

Tackle this question first in the comments, and I then will have more insights from Mike Lawrence on this particular hand.


Declarer Play Fundamentals

Posted on by 0 comment

You are South in a contract of three hearts. Here is the auction and what you see after opening lead of the queen of diamonds:

play puzzle1

Counting losers like a good declarer, you see two spades, two hearts, and one diamond. You can hold your spade losers to one if ace of spades is onside. How about the diamond loser? East has gotten off to a good lead.

Noticing your combined holding in clubs, you win the ace of diamonds. Then cash the king of clubs and low club, finessing the jack. If the finesse wins, you have a parking place for your diamond loser on the ace of clubs. If the finesse loses, your spade king is protected from attack. Also, you can win any diamond lead and still park your remaining diamond on the ace of clubs.

BTW, I don’t recommend opening two hearts vulnerable with the South hand. South does not have the necessary five playing tricks (within three tricks of making contract when vulnerable). South was lucky to find North with an opening hand and queen-nine third of hearts.

An interesting double dummy problem

Posted on by 0 comment

I was going to include this hand in my “think before you play to trick one” lessons. But I played it so badly that I cannot bear to show you my errors. I was in five diamonds and managed to go down one.

Interestingly, however, the hand can make six diamonds against any defense. It’s a fun double dummy problem. You are South in six diamonds: Here is the hand:

double dummy 6D

Your mission is to make six diamonds.

Well known bridge teacher Buck Buchanan is convinced (and I agree) that solving double dummy problems “can make you a more resourceful declarer or defender when tough hands come up”. Give this one a try.

Do you see how to make seven tricks?

Here is an interesting hand I observed on BBO. You are on lead, hearts are trump, and you need to take the remaining seven tricks. Here is the layout:

seven tricks

Can you do it?

Category: Exercises: Declarer Play | Tags:

A Sure Ten Tricks?

Posted on by 0 comment

Here is a somewhat contrived example of “sure tricks” by George S. Coffin. (Contrived because the bidding is unrealistic given the unbalanced nature of the hands.) It nonetheless gives you an interesting and counterintuitive declarer play puzzle to solve. How are you going to bring home 10 tricks?

coffin4

South opened the bidding one heart, and West overcalled two clubs. Partner and right-hand opponent both passed. South bid four hearts, ending the auction.

The play started with West cashing the Ace and King of clubs, East discarding a low spade on the second club. At trick three West led the 10 of hearts on which East discarded another spade! Where is that certain 10th trick coming from? Over to you:

Play for the Overtrick

Posted on by 0 comment

From a recent hand on BBO: You are South in four spades. West leads the queen of clubs. Here is your hand and dummy:

overtrick6

It looks like you will make at least five spades. But you are playing a pairs game (which means matchpoint scoring), so it would be nice to make six. How are you going to play for 12 tricks? Hint: Note that West overcalled 2 ♥ in direct seat.