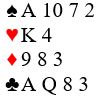
You are in 1st seat, none vul., holding this hand:

What’s your call? Scroll down for my recommendation:
↓
↓
↓
↓
↓
↓
↓
Hilo Bridge Club Updates
↓
↓
↓
↓
↓
↓
↓

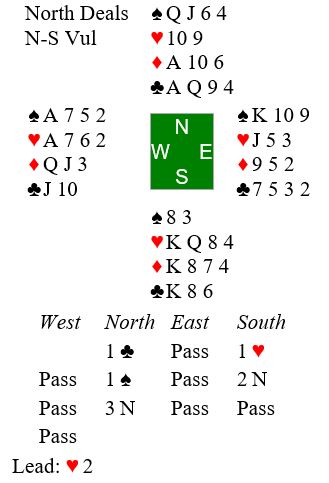
Opening lead is the three of clubs. East play the Jack. Do you hold up or win the trick? Decide what to do. Then scoll down to see my recommendation:
↓
↓
↓
↓
↓
I hope you won the trick. Notice the texture of clubs in dummy. The king and queen are only remaining cards ranking higher than dummy’s clubs. By winning the ace at trick one you are assured of two club tricks.
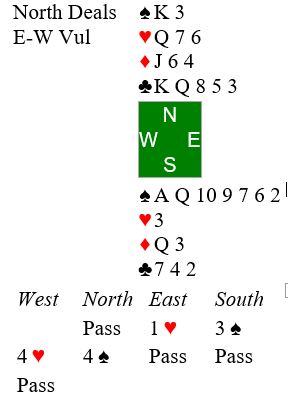
In 2nd seat (none vul.) I opened one diamond with a huge hand. Then my LHO (an expert) preempted four spades! Here was preemptor’s hand:

Do you like the preempt? In answering that question, think about how many tricks you might go down if doubled. In other words, how many tricks do you have with no help from partner? Also, think about where the opponents are likely to go in the auction. Scroll down for a summary of my thouights:
I love this preempt! Preemptor likely 5 tricks in spades and 1 or 2 tricks in clubs. That’s 6 and one-half tricks on your own. Give partner one trick and you will go down no more than three if doubled. Moreover, you have only 7 HCP while partner is a passed hand. Preemptor’s opponents certainly have game or slam in hearts. Make them guess at the five level. Preempts are difficult to deal with. Here was the entire hand (I was East):

As the cards lie our side can easily make 12 tricks in hearts for plus 480. Preemptor went down two doubled, holding us to the poor score of plus 300.
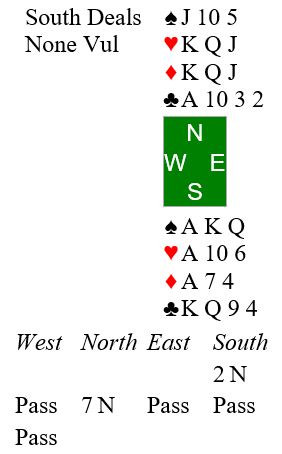
You are South. Partner opens one club in 1st seat. RHO passes, and you respond one spade. Now West overcalls two hearts, and partner passes (minimum opening with fewer that three spades). RHO passes. What is your call with this hand?

Scroll down for my recommendation.
With your good 10 points you know the hand belongs to your side. Double asking partner to bid or leave double in with a heart stack.
Here is an interesting hand observed recently on BBO. Would you open this hand in 1st seat (none vul.)?

It’s a close call. There is a lot to be said for striking the first blow. You have two quick tricks and it makes Bergen’s rule of 20 (11 HCP plus 9 cards in your two longest suits). However, Bergen would downgrade for the ugly doubleton quack in diamonds. Offsetting that, you can add a point or two for length in clubs (but downgrade a little for crummy texture in the long suit). Bottom line is that the majority of good players would likely open the hand one club.
What would you do?
You opened one heart in 2nd seat and West overcalled two diamonds. Partner had enough strength to make a negative double at the two level. Having 5-5 in the rounded suits increased the value of your hand. So, you were willing to go to three clubs for your rebid. Partner took the suit preference for hearts and you bid game. Opening lead was the king of diamonds.
Here is what you saw summary of the bidding:

You were in a good contract. How would you play to make four hearts? Your thoughts on opening lead:
Do those clues shed light on how you should play? Please let me know by email or in comments if you are unclear on what to do at trick two.
You are South in a contract of three hearts doubled. Here is the auction and what you see when West leads the queen of clubs:

East overtakes with the club king and continues with the ace at trick two. Counting losers, you have two hearts, one diamond, and one club. The problem is you may lose trump control as defenders force you to ruff clubs. The good new is you are reasonably sure that East has the ace and queen of hearts. The bad news is that you need to get to dummy twice to finess of the ace and queen of hearts. Also, East may well have four hearts.
It looks like you will need the king of diamonds to be onside. So, you might as well make that assumption.
What card do you play at trick 3? (Remember that your are worried about losing trump control.)
I recommend discarding a diamond at trick two. That makes life difficult for East. She cannot continue clubs because dummy is now void. If she shifts to a spade you let it ride to dummy’s king. Now you can lead the 8 of hearts, expecting to to win or drive out one of East’s honors. Either way you are in control.
Similarly if she shifts to a diamond you will let that ride to dummy and play as before. You may even make an overtrick: three spades, four hearts, and three diamonds.
Here was the entire hand:

South opened one diamond in 1st seat (vulnerable vs not) at matchpoints. West overcalled two clubs and South jumped to three diamonds with his rock crusher. West competed to four clubs. Refusing to give up, South bid four diamonds. East doubled for penalty, ending the auction. Here is South’s hand with a summary of the auction.

Do you agree with South’s action? Scroll down to see what happened.
South was too aggressive, falling in love with his huge hand. Partner understood South’s bids, but remained silent. Moreover, East is likely to have a diamond stack since West has at least seven clubs. When the dust settled South was down four for minus 1100. South should let West play four clubs for minus 130 for NS and an average plus for NS.
You are South declaring three diamonds after West makes a preemptive jump to two spades over your opening bid. West leads the three of spades. Here is what you see with a summary of the auction:

Trick 1: You win the king of spades, East playing the jack.
Trick 2: Then you cash the ace of clubs, both following.
Trick 3: You then lead the eight of clubs, ruffing low in dummy.
Trick 4: Next comes the three of hearts from dummy and you put in the eight, losing to West’s jack.
Solution: Play the nine of spades, knowing it will get ruffed. West started with six spades for the preemtive overcall. You and dummy started with a combined total of six spades. East’s jack at trick one had to be a singleton. Don’t let your ace of spades get ruffed!
You are South, having ended up in a contract of three hearts. East opened the bidding in 1st seat with one spade, and you overcalled two hearts. From there it was an interesting competitive auction, during which West and North indicated weak hands by their reluctance to bid. West leads the king of spades. Here is what you see, including details of the auction:

Trick 1: You won the ace of spades.
Trick 2: You cashed the ace of hearts.
Trick 3 you gave up a spade to East.
Trick 4 East then cashed the king of hearts, West discarding the deuce of diamonds. (See details of 1st 4 tricks above.)
Solution: You know from the auction that East has the ace of clubs. Play the queen of clubs and it wins. Once you get to dummy again you will lead another club, putting in the king if East follows low. You are assured of two club tricks, knowing that the ace of clubs is onside.


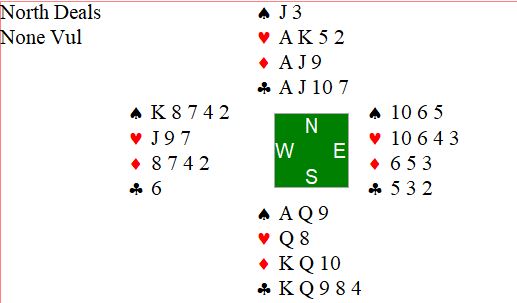
Here is a prime example. I was North and fortunate to have a partner adept at watching the spots:
You may wonder why I decided to accept partner’s invitation to game with “only” 13 HCP. Look at my (North’s) spots: 13 HCP plus a pair of married 10s and 9s to contribute to our trick taking. Perhaps I was a bit lucky when my partner showed up with all four (yes, 4!) 8s.
Now watch what happened. Heart deuce was led, and declarer used the rule of 11 to deduce that East had at most one card higher than the eight. When East played the jack South could count three sure winners in hearts. The outstanding ace of hearts was the only card higher than those in South’s collection. When the dust settled South had come to 10 tricks: one spade, three hearts, two diamonds, and four clubs. 10 tricks on 24 combined HCP bolstered by those trick taking 10s, 9s, and 8s. Cards take tricks, not HCP points.
Watch those spots and take advantage of your intermediates. Don’t miss out on opportunities presented.
The play by South seemed pretty routine on this one. It looks like South will lose one heart, two diamonds, and perhaps two clubs and one spade.
At trick 6 East continued with the king of hearts and North ruffed. At trick 7 declarer led a low club toward dummy’s king, West playing the jack and East the nine!
I watched in horror as declarer led a low club to seven in hand. To declarer’s surprise it won the trick. Declarer had not been watching the club spots. Cashing the eight of clubs and the remaining two clubs would bring in 11 tricks for a top board.
East erred by playing the nine of clubs when also holding the six.
South and East were not paying attention to the hierarchy of cards in the club suit. It’s hard to get newer players out of the mindset that any card lower than a 10 is “x” and inconsequential. It’s the hierarchy itself that facilitates remembering which card has risen to the top in trick taking power. After two rounds of clubs in this hand the eight had risen to boss club.
It’s from Chip Dombrowski writing in the latest edition of the ACBL District 20 newsletter Trumpet. Concluding from West’s takeout double that East cannot have any of the missing honors, Chip puts in the queen of hearts from dummy. When East wins the trick with the heart king Chip comments:
It is one of my great pet peeves when people turn up with cards they are known not to have.
We have all experienced that peeve. It seems to occur at least twice every session on BBO.
I suggest you become familiar with it. For example, you often come up with a problem such as how five missing will spades split between East and West. Answer: spades will break 3-2 68 percent of the time, 4-1 28 percent of the time, and 5-0 4 percent of the time.
You are playing inverted minors and open this hand one club in first seat, none vul:
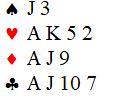
Partner responds two clubs, an inverted minor raise promising 10+ points and 5+ clubs. What is your rebid?
Decide and then scroll down.
You have a big hand, and slam may be possible. Plan to go slow on your way to finding either 6NT or 6Cs. Your 1st rebid should be 2 diamonds, showing the nice stopper in that suit. If partner’s next bid is 2 spades, then you will continue with 3 hearts. As the cards lie, partner will then bid 4 diamonds. You will then bid seven no trump. It looks clear that 13 tricks are likely. Here is the actual hand:
What’s known as “counting the hand” in bridge might better be called visualization. Experts don’t actually count. They visualize possible ways each suit originally broke in the unseen hands, and they confirm or adjust that vision as more is learned from the play. For example, say you are declarer in a spade contract with silent opponents. You hold eight spades between you and dummy. You tentatively visualize opponents’ original spade holding as breaking either 3-2 or 2-3 (a 68 percent chance). But you realize that the less friendly breaks (4-1 or 1-4 or 5-0 or 0-5) are also possible (32 percent chance).
You start to draw trumps and find that right hand opponent shows out on the second round. Don’t grimace about the 4-1 break. All the other pairs sitting your way are getting the same unfriendly break. Focus instead on adjusting your vision of the unseen hands: You now know that left hand opponent started with four spades, and you know precisely which spades those are. Also, you recall that right hand opponent was silent during the auction even though she held a singleton spade. Adjust your plan of play based on your new, more accurate vision.
To give you a little visualization exercise “here is a rather extreme, but instructive, example” from Alfred Sheinwold’s Five Weeks to Winning Bridge*:
Opening lead is the 10 of diamonds. You have 12 sure tricks. The only possible worry is that clubs don’t break 3-2, and you lose a trick to the jack. You don’t have much of a vision of unseen hands to start with, other than they each contain 13 crummy cards. How are you going to go about visualizing the club suit to eliminate that one little worry?
To get a firm grip on opponents’ original holdings, take your tricks in the other three suits before you tackle clubs:
* https://www.amazon.com/Weeks-Winning-Bridge-Alfred-Sheinwold/dp/4871876098
Here is a fun, freak one (at least from my side’s perspective). I was sitting South:

I opened preemptive 2 diamonds in 2nd seat. That may be a bit too conservative, but the vulnerability worried me. West overcalled two spades. Partner jumped to five diamonds at her 1st turn. East bid five spades My hand was suddenly much improved because of the fit, so I furthered my own preempt by bidding six diamonds. West doubled, ending the auction.
Check our partner’s hand on opening lead!
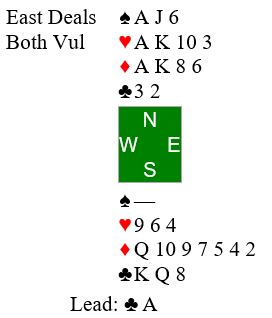
The play went quickly. I won the second trick, drew trump in two rounds, and claimed for plus 1540.
West may have been too undisciplined with her two spades overcall. Here was her hand:
A particularly useful aspect of playing on BBO is the ability to assess errors quickly via post mortem discussion with partner. Here is a hand I thought I had misplayed, and I knew an expert had been in the field sitting in my seat (East). It would be easy for me to see how the expert had played this hand:
Both vulnerable, my partner opened one club in 1st seat. North overcalled one heart. With eight points, three spades and a partial heart stopper I decided to respond one no trump. That’s where the bidding ended.
South led the nine of hearts and this is the dummy I saw:
I was happy to see the nine of hearts, knowing I now had a sure heart stopper. North took three rounds of hearts. But rather than giving me my sure stopper in hearts, he shifted to a low diamond. I correctly recognized that I had a sure stopper in diamonds since dummy had the nine and eight. So, I played low from hand. The rest of it went quickly. And when the dust settled, I was down three for a bottom board. Do you see where I went wrong? What did the expert do that was different? Give it some thought and then scroll down for my evaluation.
What did North do that was different? Answer was easy: East passed at his first turn. It was a negative double situation, and he had a heart stack. There was no reason for him, with eight points, to come into the auction. We bridge players tend to be too aggressive at times, and that was my blunder. No reason not to be patient, partner still has another turn. The huge error on my part was bidding.
BTW, I did misplay the hand, too. I could have salvaged a matchpoint by putting up the king of diamonds at trick four. ☹