Category Archives: Exercises: Declarer Play

What’s your best chance?

Posted on by 0 comment

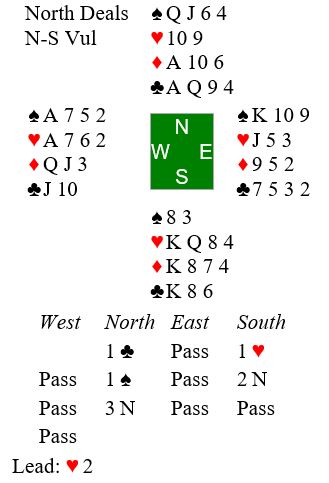
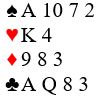
ACBL links to some helpful syndicated bridge columns here.  Although not appearing at the link, this is a fine example of a declarer play problem from Bob Jones (“First Things First”) that ran in our local newspaper April 28. Jones sets up the problem for rubber bridge or IMP:s scoring, meaning your objective is to make the contract (overtrick is not important). How would you play to give yourself the best chance of making 6NT? Lead was the jack of diamonds. Here is the bidding, and what you see on opening lead:

It’s usually best in a NT contract to start by counting your winners. Here you have 11 easy winners: 4 spades, 1 heart, 3 diamonds, and 3 clubs. Where is your 12th winner going to come from?

Hearts offer one possibility. If East holds the king of hearts you can finesse it for the 12th trick by leading low toward the queen. That’s a 50 percent chance.

Clubs offer a better possiblility. You are missing six clubs, including the jack. Thanks to Karen Walker here are the possible breaks of the club suit along with their odds:

Let’s use Karen’s table to assess the likelihood of making your contract if you start clubs from the top, hoping to drop the jack or otherwise develop a 4th trick in clubs. Here is a summary of the possible breaks and associated percentages for developing at least a 4th trick on clubs:

  • For the 3-3 break you will drop the jack for sure with probability 36%.
  • For the 4-2 break you will drop the jack 16% (one-third of 48%) of the time or set up a certain 4th club trick the other 32% of the time.
  • For the 5-1 break you will drop the singleton jack 3% of the time (one-sixth of 15% rounded to nearest percentage).
  • For the 6-0 break you will discover immediately if finessing the 10 will work. If East is void, then you will have to try finessing East for the heart king.
  • Bottom line is that your chances look excellent (87%) to make.


BTW,  basic knowledge of percentage suit splits for common declarer problems will aid your decision making at the table. Missing 6 cards, 5 cards, 4 cards or 3 cards are common.

What if both opponents follow low when you cash the king of clubs? Does that change anything? Yes, and that’s the main point of the lesson. Your only worry in that case is that West’s low club might have been a singleton. On the oft chance it was, finessing the 10 will get you your 12th trick. On the more likely chance it wasn’t, you can set up a certain 4th trick in clubs even if the finesse loses.


Here was the entire deal:


Think Before You Play to Trick 1

Posted on by 0 comment

10 tricks are easy on this one. But you are in five hearts. Where are you going to find the 11th winner? Here is the hand, auction, and opening lead.

Your thoughts at trick one:

  • What can I infer from the opening lead?
  • What can I infer about opponents’ spade holdings from the bidding?
  • If my inferences from opening lead and bidding are correct, then how many cards does East have in the red suits?
  • Now that I can picture East’s hand, how am I going to hold my losers to two?

Give it a try and then scroll down for the solution.


Your thoughts at trick one:

  • What did you infer from the opening lead? I bet it’s a singleton!
  • What can you infer from the bidding? Looks like West must have four spades for the preemptive jump raise. East must have 5 spades to the ace from opening bid.
  • If your inferences from opening lead and bidding are correct, then how many cards does East have in the red suits? East has five spades and five clubs. Therefore, East holds three red cards.


Now that you can picture East’s hand, you know to go up with the ace of clubs immediately. Otherwise, East will win the trick and give West a club ruff. When a spade comes back through king in dummy you will be down two after first four tricks.

The idea is to end play East in one of the black suits. Run your seven hearts. By doing so, East must protect the black suits. So, East will be left with 5 black cards:

Now when you cash your ace of diamonds, pitching a low club from dummy, East must discard a club or the queen of spades.

  • If it’s a low club, you will lead a club to the king and throw East in with a club. East will have to lead a spade from A,Q into your K3.
  • If it’s the spade queen, you will lead a low spade and play low from dummy, throwing East in with the ace of spades. Now you will make 12 tricks, since East must lead into your K, J of clubs!


Fundamentals of Declarer Play

Posted on by 0 comment

As South you opened 1NT in 3rd seat. 1NT gets passed out. Your mission is to plan the best chance for overtricks at matchpoints. Follow the play to the 1st two tricks and decide on your plan.

Trick 1: West leads the ace of clubs (A from AK), East plays the jack, and you play low.

Trick 2: West shifts to the three of diamonds, East play the nine, and you win with the ace.


Reminder: You need to employ two NT fundamentals:

What do you plan to do at trick three? Put differently, what suit is best to establish a winner now? Decide on your plan (be specific), and scroll down to see my recommendation:


I recommend you lead the nine of clubs at trick three. That has the effect of establishing two club winners while creating two club entries to dummy (the eight and queen will become winners in the dummy).

What if West refuses to win the king, leaving you with only one sure entry to dummy? In that case lead the AK of diamonds at tricks 4 and 5. Then lead the ace and jack of hearts at tricks 6 and 7. Now your entry to dummy is set up when you next lead a club.

BTW, the defense might cause you a problem at trick 7. Do you see what that might be?


What’s your plan?

Posted on by 0 comment

You are South in a contract of four spades. Opening lead is the queen of clubs. How should you plan to play the hand given the bidding shown below?

Play of the hand: Start by counting losers: no spade losers, no heart losers (if you are careful to use dummy to ruff hearts at the right time), two diamond losers, and one club loser. It looks like you should bring this contract home. How do you give yourself the best chance to succeed?

  • There is a good chance (92%) that missing diamonds will behave (splitting no worse than 4-2).
  • Also, there is a good chance (95%) that spades will split no worse than 3-1.
  • That means your chance for favorable splits of both suits is better than 80%.


See below for my recommended line:


It’s probably best to draw two rounds of trumps before starting the diamonds. You need to make sure a trump is left to provide an entry to dummy’s diamonds in case opponents attack hearts. Notice that the only spade honor missing in your combined holding is the ten.

Comment on the bidding: North’s 3D bid is a Bergen raise. It tells partner that North has 4-card support and less than a limit raise in spades. Marty Bergen is famous for recent innovations in bidding, and this is an example. Do you like South’s raise to game?


Declarer Play Puzzle

Posted on by 0 comment

The contract should have been six hearts (NS have a nine-card heart fit). Be that as it may, South now has to play 6NT? Opening lead is the jack of clubs, East following with the deuce.

South wins with the queen of clubs and notes that dummy has only one sure entry to the heart suit. What is South’s best chance to make 6NT? Please give me your thoughts in the comments.


A Counting Puzzle for Declarer

Posted on by 0 comment

Here is a declarer play problem. You are South in a contract of six spades on the bidding shown. North leads the ten of clubs and this is what you see:

You assume that West would not lead the club 10 when holding the king, so you play the ace of clubs and draw trumps in 2 rounds. As you do so you observe the following from opponents:

  • At trick 2 West plays the singleton queen of spades, East following low.
  • At trick 3 West discards a low heart and East follows low.
  • At trick 4 you lead a club, East winning the king and West following with the seven.
  • At trick 5 East continues with a low club, West discards another low heart, and you win the trick while discarding a low diamond from hand.


Your 12th trick will have to come via a successful finesse. Are you counting the opponents’ hands? Which red suit finesse offers the better likelihood of success? Give it some thought and then scroll down for my decision rationale:


West showed up with a singleton spade and doubleton club. That means West started with 10 red cards and East with five. After West discards two hearts you know that West now holds 8 red cards and East 5 red cards. Odds are 8 to 5 that West holds the king of hearts. Probability that West holds the heart king is 8/13 (61.5%). It’s the same for West holding the diamond queen. I decide to go with the odds and finesse West for the heart king.

Bridge Wisdom from Richard Pavlicek

Posted on by 0 comment

World class player and author Richard Pavlicek’s website is loaded with good bridge tips and stories for players of all abilities. Check out his excellent site if you have not already done so.

Here is a fun example I ran across a few days ago. South is dealer and opens the bidding one club. How do you think the bidding might go If West overcalls one spade?

North’s 4N is quantitative, inviting South to bid slam with extras. However, with a crummy 14 HCP (flat hand, three queens, four deuces) South declines the invitation.

Opening lead by West was the nine of hearts. You can see that, despite having a combined 31 HCP, declarer could not make 4N. Or so I thought. Maybe I was wrong. Could you make 4N?  It’s a good puzzle, and you can find the answer by exploring Richard’s site.


Take Advantage of Opponents’ Errors

Posted on by 0 comment

When opponents make an error, you need to make them pay. Can you make them pay on this hand? You are declarer in a contract of one spade. Here is the auction and what you see on opening lead of the 10 of diamonds:


The play goes as follows. At trick one you put in the queen without much hope, East covers with the king, and you win the ace.

At trick two you lead the jack of spades, won by East’s king with West following low.

At trick three East shifts to the eight of hearts, won in your hand with the ace.

At trick four you lead the 10 of spades, West following low and East showing out with the deuce of clubs.

At trick five you lead the three of clubs to dummy’s queen with both opponents following low.

At trick six you lead a low heart to your king, East following with the jack and West the four.

At trick seven you lead the nine of hearts, won by East’s queen with West following low.

At trick eight East leads the 10 of clubs and you win the ace with West playing the eight. The opponents have still not cashed their winning diamond! And you still must lose a trick to the ace of spades.

Here is the situation from your perspective with you on lead from hand at trick nine. How will you take advantage of opponents’ failure to cash their diamond winner?

I hope you did not get mesmerized by that king of clubs.

BTW, that was a risky vulnerable third hand opening bid by East. It worked out well for EW. West knew what to lead as a result. Here was East’s hand:

Think Before You Play to the 1st Trick

Posted on by 0 comment

You are South in a contract of 1NT. Here is the hand and auction:

Opening lead is the three of clubs. East play the Jack. Do you hold up or win the trick? Decide what to do. Then scoll down to see my recommendation:

I hope you won the trick. Notice the texture of clubs in dummy. The king and queen are only remaining cards ranking higher than dummy’s clubs. By winning the ace at trick one you are assured of two club tricks.


I hope you won the trick. Notice the texture of clubs in dummy. The king and queen are only remaining cards ranking higher than dummy’s clubs. By winning the ace at trick one you are assured of two club tricks.


Another on Counting your Losers

Posted on by 0 comment

You opened one heart in 2nd seat and West overcalled two diamonds. Partner had enough strength to make a negative double at the two level. Having 5-5 in the rounded suits increased the value of your hand. So, you were willing to go to three clubs for your rebid. Partner took the suit preference for hearts and you bid game. Opening lead was the king of diamonds.


Here is what you saw summary of the bidding:

You were in a good contract. How would you play to make four hearts? Your thoughts on opening lead:

  • West should have the ace of hearts.
  • Other than that you have the remaining high hearts.
  • You have the top three clubs, and there is a good chance they will split no worse than 4-2 (84%).
  • You should lose no more than two spades and the ace of hearts.
  • Hearts should split no worse than 4-2 (84%).

Do those clues shed light on how you should play? Please let me know by email or in comments if you are unclear on what to do at trick two.

Counting your losers in a suit contract

Posted on by 0 comment

You are South in a contract of three hearts doubled. Here is the auction and what you see when West leads the queen of clubs:

East overtakes with the club king and continues with the ace at trick two. Counting losers, you have two hearts, one diamond, and one club. The problem is you may lose trump control as defenders force you to ruff clubs. The good new is you are reasonably sure that East has the ace and queen of hearts. The bad news is that you need to get to dummy twice to finess of the ace and queen of hearts. Also, East may well have four hearts.

It looks like you will need the king of diamonds to be onside. So, you might as well make that assumption.

What card do you play at trick 3? (Remember that your are worried about losing trump control.)

I recommend discarding a diamond at trick two. That makes life difficult for East. She cannot continue clubs because dummy is now void. If she shifts to a spade you let it ride to dummy’s king. Now you can lead the 8 of hearts, expecting to to win or drive out one of East’s honors. Either way you are in control.

Similarly if she shifts to a diamond you will let that ride to dummy and play as before. You may even make an overtrick: three spades, four hearts, and three diamonds.

Here was the entire hand:


Using clues from the bidding to guide your play

Posted on by 0 comment

You are South declaring three diamonds after West makes a preemptive jump to two spades over your opening bid. West leads the three of spades. Here is what you see with a summary of the auction:

Trick 1: You win the king of spades, East playing the jack.

Trick 2: Then you cash the ace of clubs, both following.

Trick 3: You then lead the eight of clubs, ruffing low in dummy.

Trick 4: Next comes the three of hearts from dummy and you put in the eight, losing to West’s jack.


At trick 5 West shifts to the four of spades. What spade do you play from hand? Scroll down for the answer.


Solution: Play the nine of spades, knowing it will get ruffed. West started with six spades for the preemtive overcall. You and dummy started with a combined total of six spades. East’s jack at trick one had to be a singleton. Don’t let your ace of spades get ruffed!

Visualizing the unseen hands

Posted on by 0 comment

You are South, having ended up in a contract of three hearts. East opened the bidding in 1st seat with one spade, and you overcalled two hearts. From there it was an interesting competitive auction, during which West and North indicated weak hands by their reluctance to bid. West leads the king of spades. Here is what you see, including details of the auction:

Trick 1: You won the ace of spades.

Trick 2: You cashed the ace of hearts.

Trick 3 you gave up a spade to East.

Trick 4 East then cashed the king of hearts, West discarding the deuce of diamonds. (See details of 1st 4 tricks above.)

At trick 5 East shifts to the three of clubs. It’s your turn: Use clues from the bidding and play to decide which card to play from hand. Scroll down to see the solution.


Solution: You know from the auction that East has the ace of clubs. Play the queen of clubs and it wins. Once you get to dummy again you will lead another club, putting in the king if East follows low. You are assured of two club tricks, knowing that the ace of clubs is onside.


The Power of 10s, 9s, and 8s

Posted on by 0 comment

Recommendation for newer players: pay attention to the hierarchy of cards in each suit during play. It’s much easier than you might think. The hierarchy itself facilitates recall of cards played (known as “watching the spots”). The idea is to keep track of cards that are rising to the top in trick taking power. Of course, practice is essential to developing the skill! But with a little practice it becomes easy.

Here is a prime example. I was North and fortunate to have a partner adept at watching the spots:

watching spots

You may wonder why I decided to accept partner’s invitation to game with “only” 13 HCP. Look at my (North’s) spots: 13 HCP plus a pair of married 10s and 9s to contribute to our trick taking. Perhaps I was a bit lucky when my partner showed up with all four (yes, 4!) 8s.

Now watch what happened. Heart deuce was led, and declarer used the rule of 11 to deduce that East had at most one card higher than the eight. When East played the jack South could count three sure winners in hearts. The outstanding ace of hearts was the only card higher than those in South’s collection. When the dust settled South had come to 10 tricks: one spade, three hearts, two diamonds, and four clubs. 10 tricks on 24 combined HCP bolstered by those trick taking 10s, 9s, and 8s. Cards take tricks, not HCP points.

Watch those spots and take advantage of your intermediates. Don’t miss out on opportunities presented.

Watch those Spots!

Posted on by 0 comment

The play by South seemed pretty routine on this one. It looks like South will lose one heart, two diamonds, and perhaps two clubs and one spade.

spot watching

The ace of hearts was led by West, and South ruffed the next heart. Then South led a spade to the king and another back to hand, revealing a 2-2 break. At trick 5 South led a low club toward dummy, 10 from West, queen from dummy and won by East’s ace.


At trick 6 East continued with the king of hearts and North ruffed. At trick 7 declarer led a low club toward dummy’s king, West playing the jack and East the nine!

I watched in horror as declarer led a low club to seven in hand. To declarer’s surprise it won the trick. Declarer had not been watching the club spots. Cashing the eight of clubs and the remaining two clubs would bring in 11 tricks for a top board.

East erred by playing the nine of clubs when also holding the six.

South and East were not paying attention to the hierarchy of cards in the club suit. It’s hard to get newer players out of the mindset that any card lower than a 10 is “x” and inconsequential. It’s the hierarchy itself that facilitates remembering which card has risen to the top in trick taking power. After two rounds of clubs in this hand the eight had risen to boss club.


Best sentence I read today

Posted on by 0 comment

It’s from Chip Dombrowski writing in the latest edition of the ACBL District 20 newsletter Trumpet. Concluding from West’s takeout double that East cannot have any of the missing honors, Chip puts in the queen of hearts from dummy. When East wins the trick with the heart king Chip comments:

It is one of my great pet peeves when people turn up with cards they are known not to have.

We have all experienced that peeve. It seems to occur at least twice every session on BBO.

How Will the Missing Cards in a Suit Break?

Posted on by 0 comment

Karen Walker has posted a useful table of probabilities here.

I suggest you become familiar with it. For example, you often come up with a problem such as how five missing will spades split between East and West. Answer: spades will break 3-2 68 percent of the time, 4-1 28 percent of the time, and 5-0 4 percent of the time.

An Instructive Example of Visualizing the Unseen Hands

Posted on by 1 comment

What’s known as “counting the hand” in bridge might better be called visualization. Experts don’t actually count. They visualize possible ways each suit originally broke in the unseen hands, and they confirm or adjust that vision as more is learned from the play. For example, say you are declarer in a spade contract with silent opponents. You hold eight spades between you and dummy. You tentatively visualize opponents’ original spade holding as breaking either 3-2 or 2-3 (a 68 percent chance). But you realize that the less friendly breaks (4-1 or 1-4 or 5-0 or 0-5) are also possible (32 percent chance).

You start to draw trumps and find that right hand opponent shows out on the second round. Don’t grimace about the 4-1 break. All the other pairs sitting your way are getting the same unfriendly break. Focus instead on adjusting your vision of the unseen hands: You now know that left hand opponent started with four spades, and you know precisely which spades those are. Also, you recall that right hand opponent was silent during the auction even though she held a singleton spade. Adjust your plan of play based on your new, more accurate vision.

To give you a little visualization exercise “here is a rather extreme, but instructive, example” from Alfred Sheinwold’s Five Weeks to Winning Bridge*:

Alfred1


Opening lead is the 10 of diamonds. You have 12 sure tricks. The only possible worry is that clubs don’t break 3-2, and you lose a trick to the jack. You don’t have much of a vision of unseen hands to start with, other than they each contain 13 crummy cards. How are you going to go about visualizing the club suit to eliminate that one little worry?

To get a firm grip on opponents’ original holdings, take your tricks in the other three suits before you tackle clubs:

  • You see West discard diamonds on the second and third spade, so now you know spades were split 1-6 between West and East.
  • You play three rounds of hearts and both follow, so hearts were split either 4-3 or 3-4 between West and East.
  • You see East discard a spade on the third round of diamonds, so diamonds were split 5-2 between West and East.
  • Now you know that West started with one spade, 3 or 4 hearts, five diamonds, and East started with six spades, 4 or 3 hearts. two diamonds. Therefore East has at most two clubs. You play the king and queen of clubs, knowing that ace and 10 in dummy will take the last two trick.

* https://www.amazon.com/Weeks-Winning-Bridge-Alfred-Sheinwold/dp/4871876098

Learning from our Errors

Posted on by 0 comment

A particularly useful aspect of playing on BBO is the ability to assess errors quickly via post mortem discussion with partner. Here is a hand I thought I had misplayed, and I knew an expert had been in the field sitting in my seat (East). It would be easy for me to see how the expert had played this hand:

BBO misbid

Both vulnerable, my partner opened one club in 1st seat. North overcalled one heart. With eight points, three spades and a partial heart stopper I decided to respond one no trump. That’s where the bidding ended.

South led the nine of hearts and this is the dummy I saw:

BBO misbid1

I was happy to see the nine of hearts, knowing I now had a sure heart stopper. North took three rounds of hearts. But rather than giving me my sure stopper in hearts, he shifted to a low diamond. I correctly recognized that I had a sure stopper in diamonds since dummy had the nine and eight. So, I played low from hand. The rest of it went quickly. And when the dust settled, I was down three for a bottom board. Do you see where I went wrong? What did the expert do that was different? Give it some thought and then scroll down for my evaluation.


What did North do that was different? Answer was easy: East passed at his first turn. It was a negative double situation, and he had a heart stack. There was no reason for him, with eight points, to come into the auction. We bridge players tend to be too aggressive at times, and that was my blunder. No reason not to be patient, partner still has another turn.  The huge error on my part was bidding.


BTW, I did misplay the hand, too. I could have salvaged a matchpoint by putting up the king of diamonds at trick four. ☹


Visualizing the Unseen Hands in Practice

Posted on by 1 comment

Solving the Puzzle of Shapes of Unseen Hands

Clues from bidding and play are usually available for you to deduce the original shape of unseen hands. Once you can visualize those shapes, your path to taking tricks becomes much clearer. The issue for most of us is time: How are we going to do it in the heat of battle while the director’s clock is ticking?.

The answer is practice! Bridge Winners has developed a nice game to practice deducing the opponents’ original suit holding when one player shows out: http://bridgewinners.com/pages/counting-game/. Also, Bridge Winners has a nice discussion forum among well-known experts on how best to go about practicing: https://bridgewinners.com/article/view/counting-3/  How you do it is up to you, but I recommend you get started now.

I try to tentatively estimate shapes early from the opening lead and bidding. Usually, though, I must wait until one opponent shows out of a suit to reach a firm conclusion. When an opponent shows out, it becomes easy with practice to make a mental note of how many cards in that suit each opponent originally held.

Another source for practice: Larry Cohen’s guidance on counting and visualization: https://www.larryco.com/bridge-articles/counting. (BTW, I recommend you subscribe to his newsletter. It is a great resource for learning.)