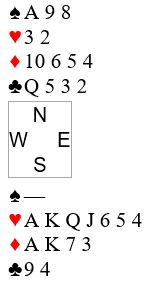
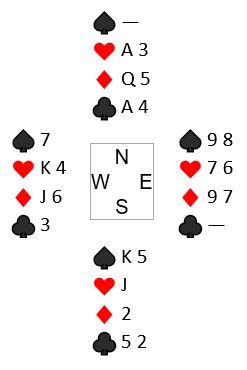
Here is an interesting hand I observed on BBO. You are on lead, hearts are trump, and you need to take the remaining seven tricks. Here is the layout:
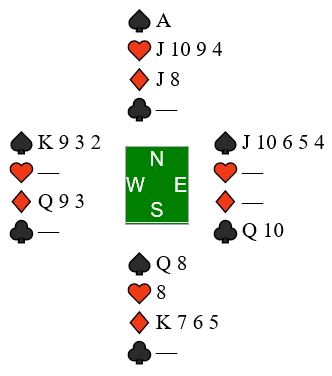
Can you do it?
Hilo Bridge Club Updates
Here is an interesting hand I observed on BBO. You are on lead, hearts are trump, and you need to take the remaining seven tricks. Here is the layout:
Can you do it?
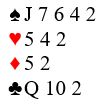
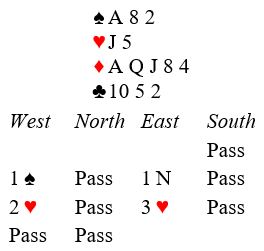
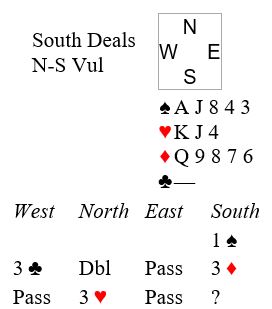
You hold this hand in second seat (favorable vulnerability):
Your right-hand opponent opens the bidding one diamond. You pass with your ugly hand. Left-hand opponent responds one heart. Now your partner comes in with a preemptive overcall of two spades. Right-hand opponent doubles to show exactly three hearts. Summary of the auction so far:
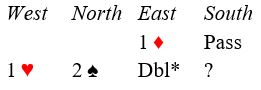
*Support double showing exactly three hearts.
You know that partner is weak and opponents have game and possibly slam.
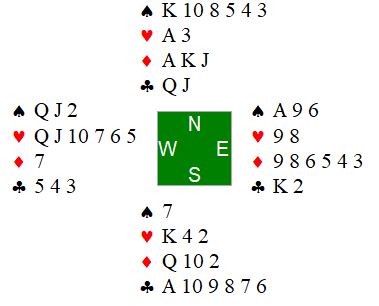
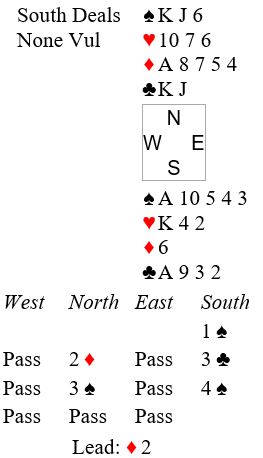
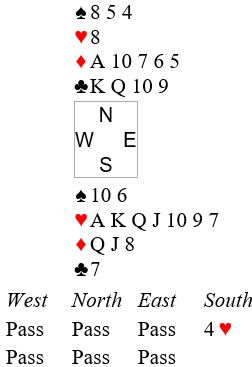
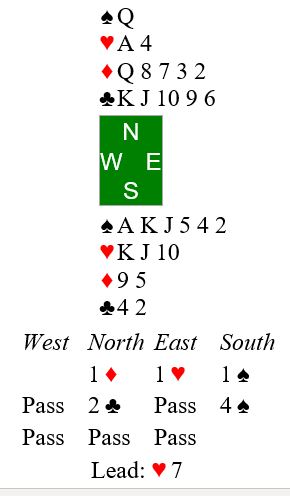
Here is a somewhat contrived example of “sure tricks” by George S. Coffin. (Contrived because the bidding is unrealistic given the unbalanced nature of the hands.) It nonetheless gives you an interesting and counterintuitive declarer play puzzle to solve. How are you going to bring home 10 tricks?
South opened the bidding one heart, and West overcalled two clubs. Partner and right-hand opponent both passed. South bid four hearts, ending the auction.
The play started with West cashing the Ace and King of clubs, East discarding a low spade on the second club. At trick three West led the 10 of hearts on which East discarded another spade! Where is that certain 10th trick coming from? Over to you:
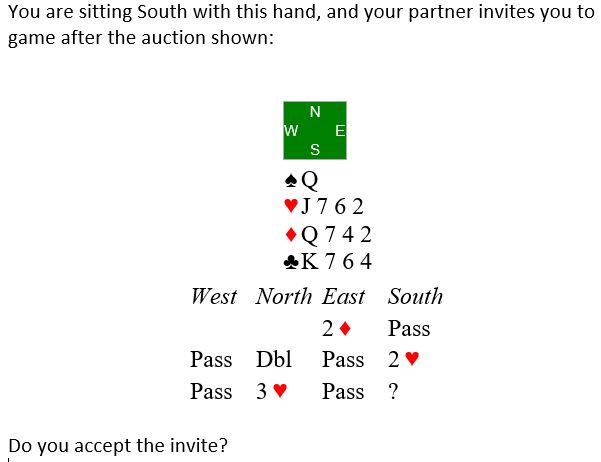
Here is your hand as North on opening lead against four hearts after the auction shown:
Rank the following possible opening leads from first to worst:
What is your rationale for the rankings?
You are North on opening lead against four spades after the auction shown:
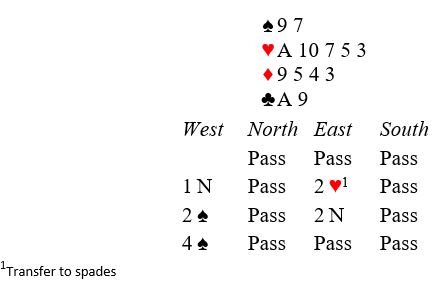
Rank the following possible opening leads from first to worst:
What is your rationale for the rankings?
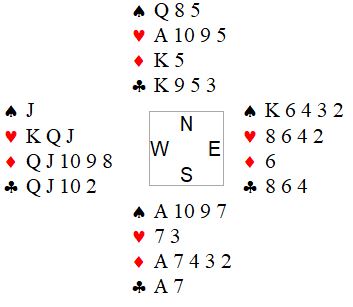
From a recent hand on BBO: You are South in four spades. West leads the queen of clubs. Here is your hand and dummy:

It looks like you will make at least five spades. But you are playing a pairs game (which means matchpoint scoring), so it would be nice to make six. How are you going to play for 12 tricks? Hint: Note that West overcalled 2 ♥ in direct seat.
I will offer my solution after you’ve worked a bit to solve it. Here is the original post from June 5th:
Here is another one from George S. Coffin. This one seems impossible to me. I ran it thourgh my Bridge Composer double dummy software to see if that app found a solution. It did not. So, either Coffin made an editorial or compositional error or he craftily outwitted the software and me. Which do you think it is?
You are in Six No Trump with the queen of diamonds opening lead.
Coffin gave some hints as to what he had in mind:
Maybe you can find a way around that. Good luck.
Email me or put a note in the comments when you would like the solution.
Here is a shorter puzzle from George S. Coffin:
You are South and and the lead is in your hand. Your challenge is to take the last six tricks:
How and when are you going to make best use of your clubs?
I have been dipping into an old book by George S. Coffin, Sure Tricks (2nd edition, 1950). Our copy once belonged to H. Kunimura (any of you recall that name?). Somehow the club obtained it over the years. I googled and was surprised to find the book listed at Amazon: https://www.amazon.com/Sure-tricks-George-S-COFFIN/dp/B000M8HNSC
It contains lots of fun double dummy puzzles. Also play problems in which you are challenged to make your contract by visualizing the worst possible lie of opponents’ cards (thus the title of the book: Sure Tricks).
Here is a sample of his double dummy puzzles:
*Typo: Lead corrected to queen of hearts rather than queen of diamonds 6/9/20.
Here is the solution if you give up: Coffin1 Solution
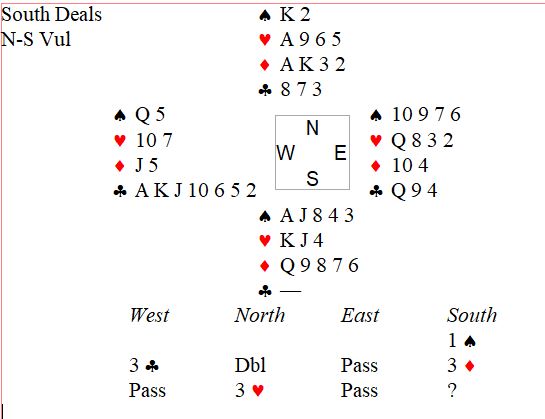
Here is a bidding problem that I got wrong recently:
What would you do after the auction shown? I failed to exercise my visualization skill. What is partner doing? Why is she bidding hearts after making the negative double? How big is her hand? Can you you make a better decision than I did? Let me know in the comments.
Partner would have responded 3 hearts rather than making the negative double at her 1st turn. The negative double should have told me she is near to a game forcing hand or better. The three heart bid at 2nd turn suggests she has game forcing values and is looking for me to bid 3NT with a club stopper. Having none, I should bid out my pattern by making the rebid of four diamonds. Parter’s strengh must be in diamonds and hearts, and she she should have fewer than three spades with an honor. Here is the entire hand:
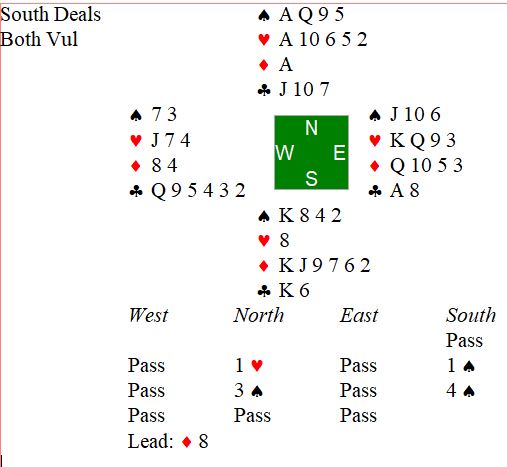
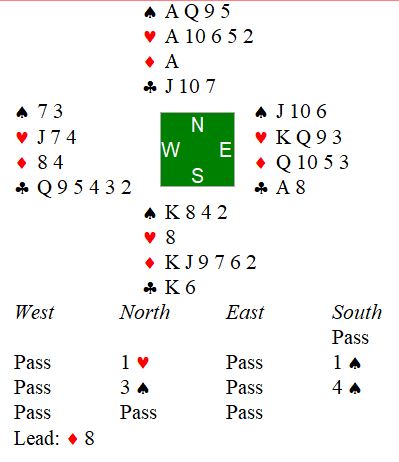
Here is a good visualization exercise for you. I recently saw this hand played in a BBO tournament, and no declarers seemed to put on their Mike Lawrence thinking cap. See if you can do better:
I win the ace of diamonds, East playing the three. What do I make of the opening lead? Opponents started with seven diamonds: Hierarchy of honors K Q J 10 9 as well as the deuce and trey. From what holding would West lead a little diamond when North has made a 2/1 diamond response?
Give this some Mike Lawrence kine thought, and let me know in comments or by email what you conclude.
You are South in 3NT. How are you going to make the contract after East plays the jack of hearts at trick one and you win the queen?

*From I Challenge You by Victor Mollo
Count your sure winners: one spade, two hearts, one diamond, and one club. You need to develop five more winners to get to nine tricks. The diamond suit should set up for four or five of the additional tricks. That gets you to eight or nine tricks. By driving out the king of spades you will have at least nine tricks.
But there is a danger that the opponents will get five tricks before you can get nine! How are you going to avoid that danger and what card do you play at trick two?
This is a common dilemma for declarer, so it would benefit you to work it out before scrolling down for the solution:
It looks like West started with five hearts and East with three. The danger is that West may cash three heart tricks if she has an entry with the king of spades. And East is certain to continue the heart attack when she gets in with the king of diamonds. To prevent this, you must keep East off lead while West still has an entry with the king of spades. Play the queen of spades at trick two. No matter who wins that trick, you have a sure nine tricks when East gets in with the king of diamonds: two spades, two hearts, four diamonds, and one club. And you will make an overtrick if West has the king of diamonds. If East happens to get in with the king of spades at trick two, you can safely duck her heart return and take your ace when she continues hearts at trick four.
Steve Bartholomew recently emailed me some declarer play puzzles from Victor Mollo’s book I Challenge You. (Thanks, Steve.) Mollo’s challenge is to use readily available clues to guide your declarer play. Mollo says at the outset, “there’s nothing up my sleeve, no traps for the unwary, and above all, no abstruse conventions in the bidding to obscure the clarity of the play”.
Here, for example, is the first puzzle:
West leads out the ace, king, queen of spades. You ruff the 3rd spade in hand. How are you going to play from here to make the contract?
Scroll down for the solution:
It’s a near certainty that East has the ace of clubs and King of diamonds (West did not open the bidding). Lead your singleton club and put in the 10. If it loses to the jack, there is nothing East can do to hurt you. When you get to dummy again you will take ruffing finesses against East’s ace of clubs to discard your two losing diamonds.
Did I say, “when you get to dummy again”? You did not lazily ruff that third spade with the heart seven, did you? Of course not, you saw the need to preserve the eight of hearts as an entry to dummy. The eight is equal to the ace in its trick taking power against opponents holding of deuce through six of hearts.
Here is a somewhat difficult declarer problem from a recent hand I observed on BBO. You are South with the hand and bidding shown:
Opening lead is the eight of diamonds. How many losers do you have and how are you going to handle the trump suit?
You have one or two losers in clubs. After you take the ace and king of diamonds you may be able to ruff a diamond loser or two. After you win the ace of hearts you may be able to ruff a heart loser or two. Spades look like they can come in with no losers if you get the likely 3-2 break.
Since it looks like you are going to have to do some ruffing of red suit cards, maybe you should not get in a rush to draw trump.
Say you draw two rounds of trump. Now you can ruff two heart losers in hand. That would get you to 10 tricks as long as the ace of clubs is onside.
It looks best to ignore trumps from the get go. Cash the ace of hearts at trick two. Ruff a heart. Cash the king of diamonds. Ruff a diamond. Ruff a heart. Ruff a diamond. You are almost assured of 10 tricks.
The hand will make five spades against perfect defense. It’s a nice double dummy problem. Here is the entire hand if you would like to give it a try:
Declarers who drew three round of trump went down one.
In our game it’s often hard to avoid playing by instinct. I recently made an instinctual misplay at trick one when West led the seven of hearts on this hand:
My instinct was “oh, goodie – a free finesse!” I played low from dummy. Only as I was about to lead to trick two did I contemplate how to play trumps should they break 4-1. It was too late. I needed to win trick one in dummy and cash the queen of spades. Then I can come to hand in hearts at trick two and draw trumps.
BTW, assuming I had played correctly at trick one, how are you going to play the minor suits? You know where the heart queen is, right? Yes, right!
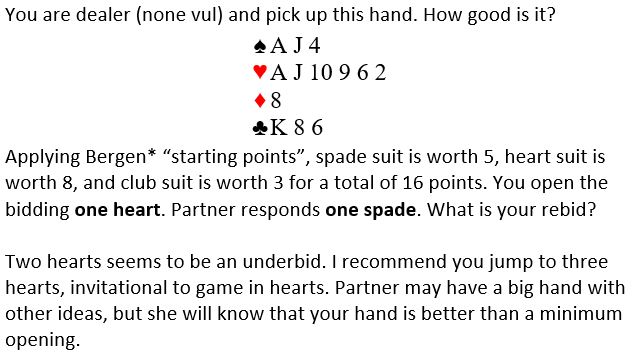
*See Marty Bergen’s latest article on page 53 of this month’s Bridge Bulletin: “Secrets of accurate hand evaluation – part 10”. I recommend that you read all articles in his series on hand evaluation.
The difference between a master and a beginner is that the master has failed more times than the beginner has even tried.
Karen Walker, in this month’s Bridge Bulletin p. 26
We are always reluctant to go past 3NT in the bidding, particularly when rebidding a minor suit after partner bids of 3NT. Here is a hand I held as South recently where I faced that dilemma:
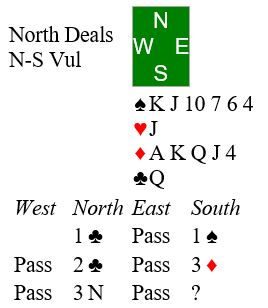
My hand values at 20 points after partner rebids her clubs (the club queen will fill in her suit). I jump to three diamonds at my second turn, forcing to game and showing slam interest. Do you agree with my action so far? What would you do after partner bids 3NT?
I chose to pass. That was a mistake in retrospect. By rebidding four diamonds, we can reach a minor suit slam in diamonds or clubs. My hand to too unbalanced to sit for 3NT.