Category Archives: Exercises: Declarer Play

Minor Suit Slam

Posted on by 0 comment

Update below

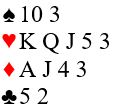
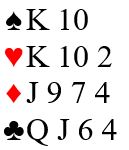
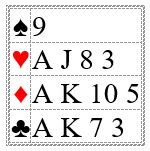
You pick up this nice hand:

Oct6a

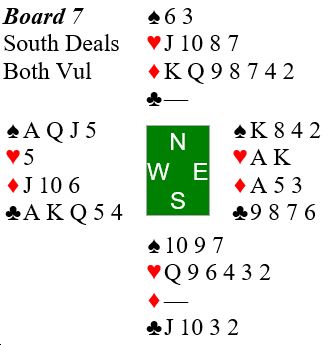
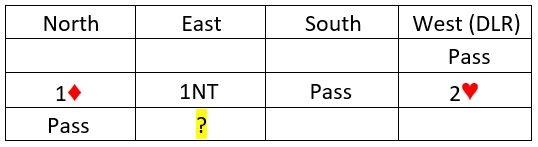
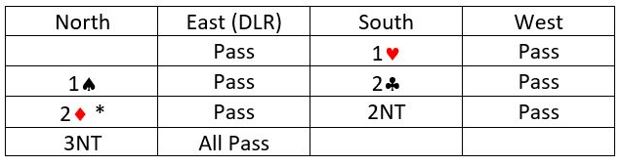
RHO passes in 1st seat and you open one diamond. Partner responds two diamonds (inverted minor suit raise showing 10+ points and no interest in the majors).

You rebid two hearts, showing control of the heart suit. After partner bids controls in spades and clubs you end up in six diamonds. Opening lead is the six of diamonds. (It’s often a good idea to lead trump in this situation to cut down a likely cross ruff by declarer.)

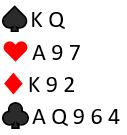
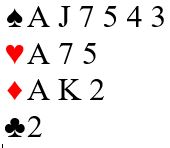
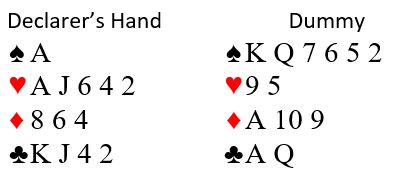
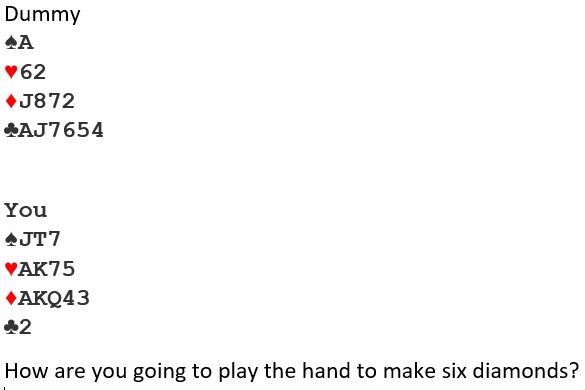
Here is the dummy and your nice hand:

Oct6b

My thoughts tomorrow. Stay tuned.

Update:

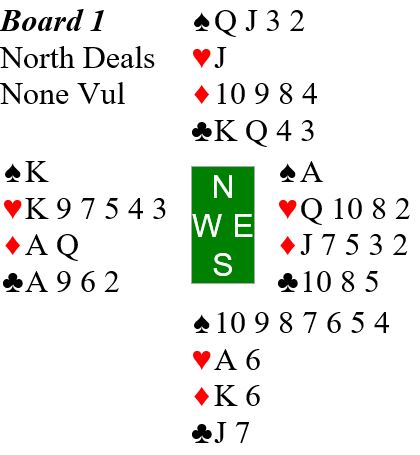
The most straightforward way to play this by ruffing two spade losers and one heart loser in dummy. You need to be careful on timing. I suggest the following sequence: win the opening lead in hand (saving the jack of diamonds to prevent an overruff of the heart), go to the ace of spades, back to the ace of hearts, ruff a spade low, back to the king of hearts, ruff your last spade low, cash the ace of clubs, ruff a club, ruff a heart with the jack, ruff a club high if an honor fell on the 1st club ruff on your left (otherwise ruff it low), cash a high trump to get you to 11 tricks. If trumps have broken 2-2 you are home. You last trump will win trick you the 12th trick. That sequence requires in worst scenario that clubs break no worse that 2-4 and that trumps are 2-2 (not worrying about unlikely problems in spades or hearts). It looks like a 60 percent slam.

You could also try for 13 tricks by setting up the club suit to pitch losers. It’s a useful exercise to give it a try on paper. Assume that you see the queen of clubs fall on your left as you ruff the 1st club.

Good Bid, Partner!

I was sitting South and opened this minimum hand one heart in 1st seat:

good bid

Opponents were silent. My partner responded two clubs and my rebid was two diamonds.

Partner then jumped to three hearts, showing 3-card heart support and a slam invitational hand. My next bid was four hearts with my minimum.

Partner was still interested in slam and bid 4NT (Roman Keycard Blackwood 14-30). I bid five spades showing two key cards plus the trump queen. Partner then put me in a contract of six hearts.

Left hand opponent led the ace of spades and this was my dummy:

my dummy

Recall my hand:

good bid

At trick two LHO made the excellent shift to the seven of clubs. Should I play her for the king of clubs? She is putting me to an early guess! I decided I cannot make the contract without finessing for the king of clubs, so I put in the queen and it won. From there it was a matter of setting up dummy’s clubs for a diamond pitch or two (being careful not to get overruffed).

Play of a 1NT Contract

I often hear that 1NT contracts are especially difficult. Here is my thinking on a recent hand.

On this hand I was South in 1NT after my opening 1NT (15-17) in second seat was passed out:

1NT contract

West leads the six of spades. I play the queen and East contributes the two. Now I know who has the king of spades, and that spades are breaking 4-3. I decide to see if I can set up an extra trick in the club suit (I like the touching jack and 10 in dummy). That looks like best chance for another trick. It may work out even if clubs break 4-2.  The alternative of setting up an extra heart trick requires that hearts break 3-3 or the queen- jack is doubleton (about 38 percent chance altogether). I lead a low club toward hand, hoping that East has the ace. East plays the seven and my king wins (West playing the four). East has the ace! Two tricks are home for me.

Next I lead the five of clubs toward dummy, and West goes into a huddle. Now I know who has the queen. West plays the eight, I play the jack, and East wins the ace.

Back comes the 10 of spades and I win the ace.  Three tricks are home. Now I play the six of clubs and West wins the queen, East discarding a low diamond. I now know that West started with 4-4 shape in the black suits.

West now cashes the two top spades. I discard a heart on the 4th spade and so does East. West shifts to the jack of diamonds, East plays low, and I win the queen. Four tricks are home.

Next I lead six of hearts to the ace, both opponents following low. I cash the 10 of clubs, East discarding a diamond. Six tricks are home.

Next I go to hand to cash king of hearts and back to ace of diamonds for a total of eight tricks, making 2NT for +120.

A puzzle from yesterday’s game

Posted on by 0 comment

Here is board 7 from yesterday:

board 7

Notice that West in a contract of six spades would lose the first five tricks on lead of the King of diamonds.

But what happens if North’s lead is the seven of hearts? Can you make six spades in that case? Give it a try double dummy. Enjoy! smiley

Double Dummy Problem

Posted on by 0 comment

Here is a fun double dummy problem. See if you can solve it. Hint: subject of yesterday’s lesson was unblocking.

South is in four spades, and West leads the ace of clubs.

dbl dummy2

Defense and Declarer Play Exercises

Posted on by 0 comment

Here are the last two exercises from Wednesday’s class:

Exercise 3. Defense puzzle

Put yourself in the East seat. Bidding was:

defense1


West leads the 5C and you see this dummy in North

defhands

North calls for the jack. What do you make of West’s lead? What is your plan? Give me your ideas in the comments.  I will post the solutions on Sunday.


Exercise 4. Declarer play puzzle

You are South in four hearts after the following auction:

declarer2

declarer3

Do your like the bidding? How many losers do you have? What do you make of West’s lead? What is your plan? Give me your ideas in the comments.  I will post the solutions on Sunday.

Declarer Play in a Suit Contract

Posted on by 0 comment

You are South in a contract of four spades. The opening lead by West is the spade deuce. You begin by counting your potential losers you are in a suit contract: one spade, one heart, one diamond, and one club for a total of four losers. You start by trying to drop the spade queen, but that does not work. West started with four spades to the queen. Now what is the best chance to reduce your losers to three?

North Dummy:

Dummy1


South Declarer:

declarer1

Give it some thought before scrolling down for my recommendation:


How about trying the diamond suit? If diamonds break 3-3, the jack will later provide a parking place for a heart loser after you have lost a trick to the queen of diamonds. That’s a 36 percent chance. But there is also the chance that you will drop the queen of diamonds when it is singleton or part of doubleton. That would eliminate the diamond loser. Its chance is roughly one percent for the singleton queen plus 16 percent for the doubleton queen. Bottom line: the diamond suit provides approximately 53 percent chance of eliminating one loser (36+1+16).


Double Dummy Puzzle

Posted on by 0 comment

Here is a double dummy puzzle that we had fun with in class two weeks ago. So far Jane Waldron is the only one I know of who has solved it. You are West in 5H. Opening lead by North is the 3 of clubs. How are you going to make 5 hearts against perfect defense? Specifically, how are you going to keep from losing two clubs plus the ace of hearts? Give it a try and let me know your solution in the comments:

dbl dummy1


Bidding and Declarer Play Exercises

Posted on by 0 comment

Aloha, Bridge Players!

We had a nice group at this week’s Hilo Bridge Club lesson and we had a thoughtful discussion. Today’s post summarizes the main lesson pointers that resulted from two parts of discussion.

Exercise 1: It’s your call. Bidding so far:

20190814-1

You are East holding:

20190814-2

What does West’s 2 bid mean? Your call?

Think of your answer before scrolling down.


Have you discussed this situation with your partner? Are systems on as if you had opened 1NT? Your partner is captain of the hand. If partner’s 2♥ bid is natural, she wants to play it there and you should pass. If it’s a transfer to spades, you should bid 2 spades and await developments. Here is relevant portion of a convention card the way I like to play it, with Systems On:

ConventionCardNTOvercalls


Exercise 2. Declarer Play: Plan South’s play at trick one in 4♠ after the following auction:

20190814-7

West’s opening lead is the 8♣. Your plan?

20190814-8

Think about your plan and play to trick one before scrolling down.


How many losers do you have? Possible losers are 2 spades, 2 hearts and a diamond for a total of five. You need to reduce the number of losers to three. Think about the bidding. What kind of a hand does East have? How about West? Specifically, who has the king of spades, the king and queen of hearts, the ace of diamonds? I am sure you have figured that out, so I leave the solution as an exercise for the reader. But please let me know if you are still puzzled. 


Here’s a good link to the basics of counting losers in a suit contract.

BTW, do you like North-South’s bidding?

August 7 Bridge Lesson Recap – More Exercises!

Posted on by 0 comment

Aloha, Bridge Players!

Yesterday we went over two bidding exercises that we covered in last week’s bridge lesson. Today it’s on to the second set of exercises for last week’s lesson.

Exercise 3: It’s Your Call. The bidding so far.

20190807-05a

You are North holding:

20190807-06

What is the meaning of your partner’s Double and what is your rebid? Think of your answer before scrolling down.


Your partner promises at least 6 points and at least 4 hearts. That is the minimum necessary for a takeout double at the one level. You have a huge hand, valuing at 22 points in context of the known fit. Bid four hearts.

Exercise 4: Declarer Play. Plan South’s play at trick one in 3NT after the following auction:

20190807-07b

*Fourth suit forcing

Opening lead is 3. Your play?

20190807-08

Think about your play to trick 1 before scrolling down.


Count your tricks in NT contract.

  • It looks like you have nine for sure: 3 spades, one heart, one diamond, and one club.
  • If the spades break 3-3 you will have 12 tricks. But you are going to need that ace of hearts as an entry to your remaining clubs. Go up with the ace of diamonds at trick one and run your nine sure tricks.
  • The danger of ducking at trick one (often recommended for NT contracts) is that opponents may shift to a heart, giving you a problem with your entry to clubs later in the hand.

Tomorrow’s another Bridge Day at the HBC in Kea’au. I hope to see you there!

Harry